
First Posted 2/27/2021
Welcome to the third installation of the Linux for Hams series of posts! Today we will be installing the most popular Linux Echolink Client known as Qtel onto our machine. I’m going to be using Raspberry Pi OS Linux (Buster) on my RPi 4 to talk with the WM9W repeater using Qtel. If you’re using AntiX Linux 19 on an old machine instead, the highlighted text within the article will show you a few minor differences. If you’re brand new to ham radio, you’ll need to get a technician license before trying the Echolink system. But don’t let that license requirement discourage you! With the right study materials, you can visit a VE and have your license in no time.
May 2024 edit: Most of the stuff here is still valid, but with the new Raspberry Pi 5 and Debian Bookworm-based Linux distros, things might be slightly different. These writeups will not be getting revised, check out YouTube & other blogs if you need something more current!
Make sure you have working internet on your Linux machine by firing up a web browser and surfing some websites before proceeding; if you’re struggling to get internet definitely check out the techsupport subreddit for troubleshooting ideas. Apologies in advance if this starts off a bit slow, I’ll be going into much more step-by-step detail than usual so those with no Linux experience can follow along. Please note that Qtel is included in HamPi, which might be a better solution than my guide for some Raspberry Pi users. We’ll have to tackle 3 quick prerequisites before using Qtel, then it’s off to the wonderful world of Echolink 🙂

Prerequisite #1: Make sure the correct Microphone & Speaker is selected!
The installation of Qtel is quite simple, but unfortunately getting a working speaker & microphone can sometimes be an uphill battle in Linux. On the Raspberry Pi 4, you have quite a few options for Microphone & Speaker between the Bluetooth radio, USB headsets, and sound card. On an older computer with AntiX Linux, you may have access to a laptop’s built-in speaker and microphone, but you might end up wanting a USB or Bluetooth headset instead due to driver issues. For today’s post, I will be using a Jabra USB headset, but most flavors of audio input & output should be fine. Before installing Qtel, make sure your are using the correct audio device per the following steps:
Raspberry Pi OS Users:
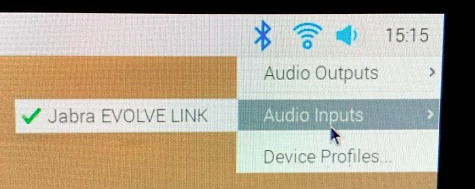
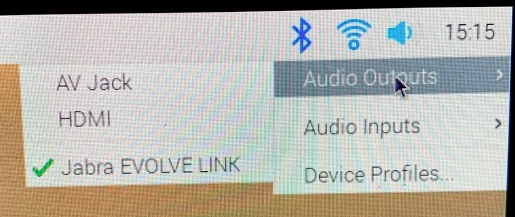
Head over to the top right of your screen, right click on the audio icon, make sure the device you’d like to use is selected for both inputs and outputs:
AntiX Users:
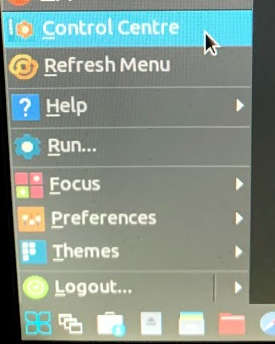
Click on the Favorite Applications menu in the bottom left corner, then click Control Centre:
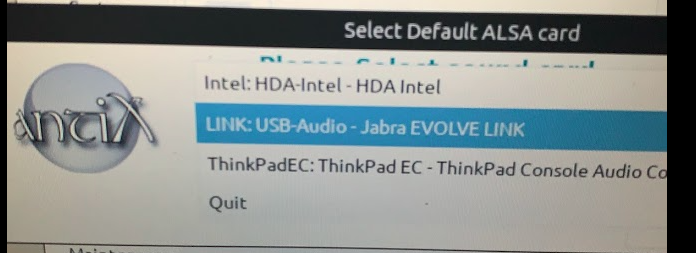
Click on the Hardware tab on the left side, then click “Sound Card Chooser”. Find your headset or sound card on the drop-down menu, save everything, and you should be all set:
I must warn you that if you’re on an older machine, there’s a decent chance your sound card might not be compatible with AntiX without a lot of troubleshooting. I’ve spent a large amount of time trying to get sound working on my Linux laptops over the years, it can get really frustrating! If you find yourself in that position, I’d recommend getting a newer USB sound card or USB headset, it might save you from quite a headache 🙂
Prerequisite #2: Firewall Rules
The other big problem people tend to run into when using Echolink is firewall rules on your home router blocking the traffic. I’m not going to dive too deep into this, but generally speaking if your speaker + microphone is working well and you can’t transmit or receive on Echolink, odds are you have a firewall problem. Should you find yourself in that scenario, I would highly recommend installing Echolink on an Android or iOS device first, connect up to the repeater of your choosing (or better yet, the Echolink test service channel mentioned later in this article), and ensure you can send and receive audio.
This way you’ll know if Echolink will work via your home network, or if there’s additional firewall troubleshooting required. While it is possible to troubleshoot any firewall problems on your Linux machine directly, I think it’s easier for Linux beginners to validate Echolink is working on their mobile device first before going down that path. Unless you’d prefer to dig deep into Linux networking & firewalls like I do at my day job 🙂
Prerequisite #3: Echolink Account
This one’s pretty easy, but if you haven’t created an Echolink account yet, you’ll definitely want to do so before messing with any Echolink client, including Qtel. Head over to https://secure.echolink.org/validation/, and you should have a good account working in no time.
Installing Qtel
Now that we got our speaker + microphone, firewall and account prerequisites knocked out, let’s finally install Qtel! Open up a terminal window by clicking the Terminal button in the upper left of the screen:

(AntiX users: Click on Favorite Applications icon in bottom left corner, Terminal should be at the very top of the menu)
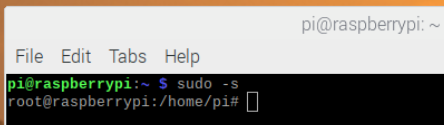
Start off by typing the command “sudo -s” without the quotes, then press enter. Although this isn’t the best security practice, it will allow us to ensure we have proper rights to install Qtel. You may be prompted for your password depending on your security settings. This will result in seeing “root@(your computer’s name)” in the terminal window:
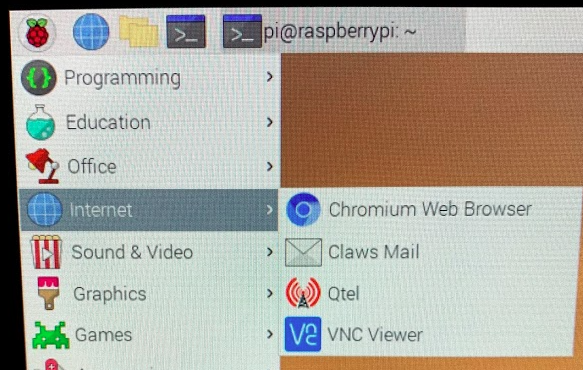
Type “apt-get install qtel” then press enter. You’ll have to press Y and then enter again to allow these necessary packages to install, then close the terminal window once the command prompt re-appears at the bottom of the screen. You should now see the Qtel icon when you click on the Raspberry in the top left corner, click on the Internet submenu, then open Qtel!
AntiX Users: Click on Favorite Applications icon in lower left corner, Applications menu, Internet, Qtel
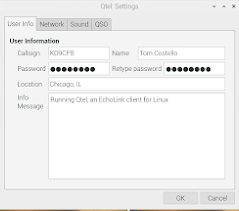
Once Qtel starts, click on the User Info tab, and enter in your info:
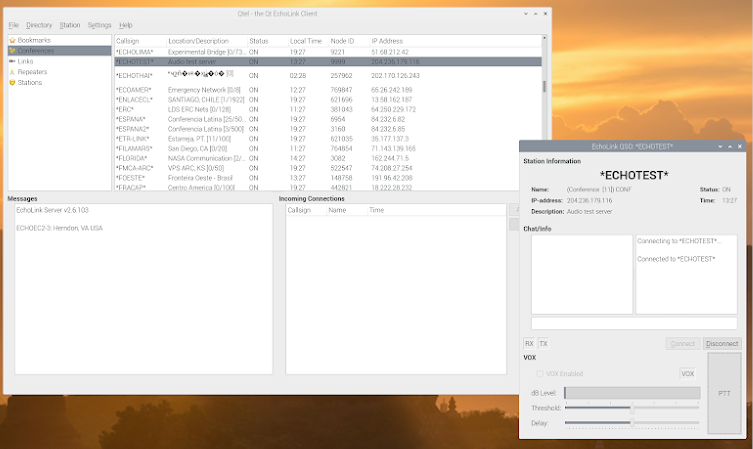
If all is well with your internet, you should be presented with the Qtel main screen! Under the Conferences menu, double-click on *ECHOTEST* and then click Connect on the pop-up screen. Press the PTT button and you should hear yourself on this call testing service (aka “parrot” server), which confirms your setup is working as desired:
If your audio doesn’t work, don’t get too frustrated! Double check you’re using the correct audio device in prerequisite #1, if you have access to a different USB headset, give that a try too. Linux audio troubleshooting may be painful, but google is your friend. If everything worked well, go ahead and click on the Repeaters menu, then chat it up on the repeater of your choosing:

I ended up having a great QSO on WM9W-R in the process of making this article, and I’m really glad I can use Echolink via Qtel on my ancient laptop! While many hams are not too fond of Echolink for many reasons, I’ve never been able to hit the 220MhzGuys repeater from any of my balcony antenna setups, even though it’s pretty close to me geographically. So it’s Echolink via Qtel check-ins for me going forward on their nets. Hope to hear you on one soon!
You’ve reached the end of the post! Click here to go back to the list of all Ham Radio posts.
You should also know I may earn commissions on qualifying Amazon purchases made via kd9cpb.com links to defray the cost of otherwise ad-free web hosting.
I have been able to get qtel up and running through *ECHOTEST and a station to station call with my son, but I am not able to connect to a repeater KK4CWX-R at all whether using qtel on my phone or my linux computer. It says connecting, but never connects, rather it times out and disconnects after awhile. I am able to connect to that repeater using the Echolink app on my phone, just not qtel. What am I missing???
Thanks for this info! I got qtel working on my Linux machine and was able to hit *ECHOTEST* and another conference server. I’m still trying to figure out the proper use for this and if I should count contacts I make over it as real QSOs.
I got my Ubuntu on my laptop and Qtel up and logged in showing all the stations but when i try to connect it freezes up on connecting even echotest!
I’m running qtel on Ubuntu. Works but I’d like to turn on vox so I can use my HT’s. That works on windows. But in qtel vox is grayed out. Any idea how to switch it on.
Thanks
Interesting, I’ve actually been wanting to get qtel going on my Raspberry Pi 5, will try to squeeze that in over the holiday break and let you know how it goes!