
First Posted 6/25/2022
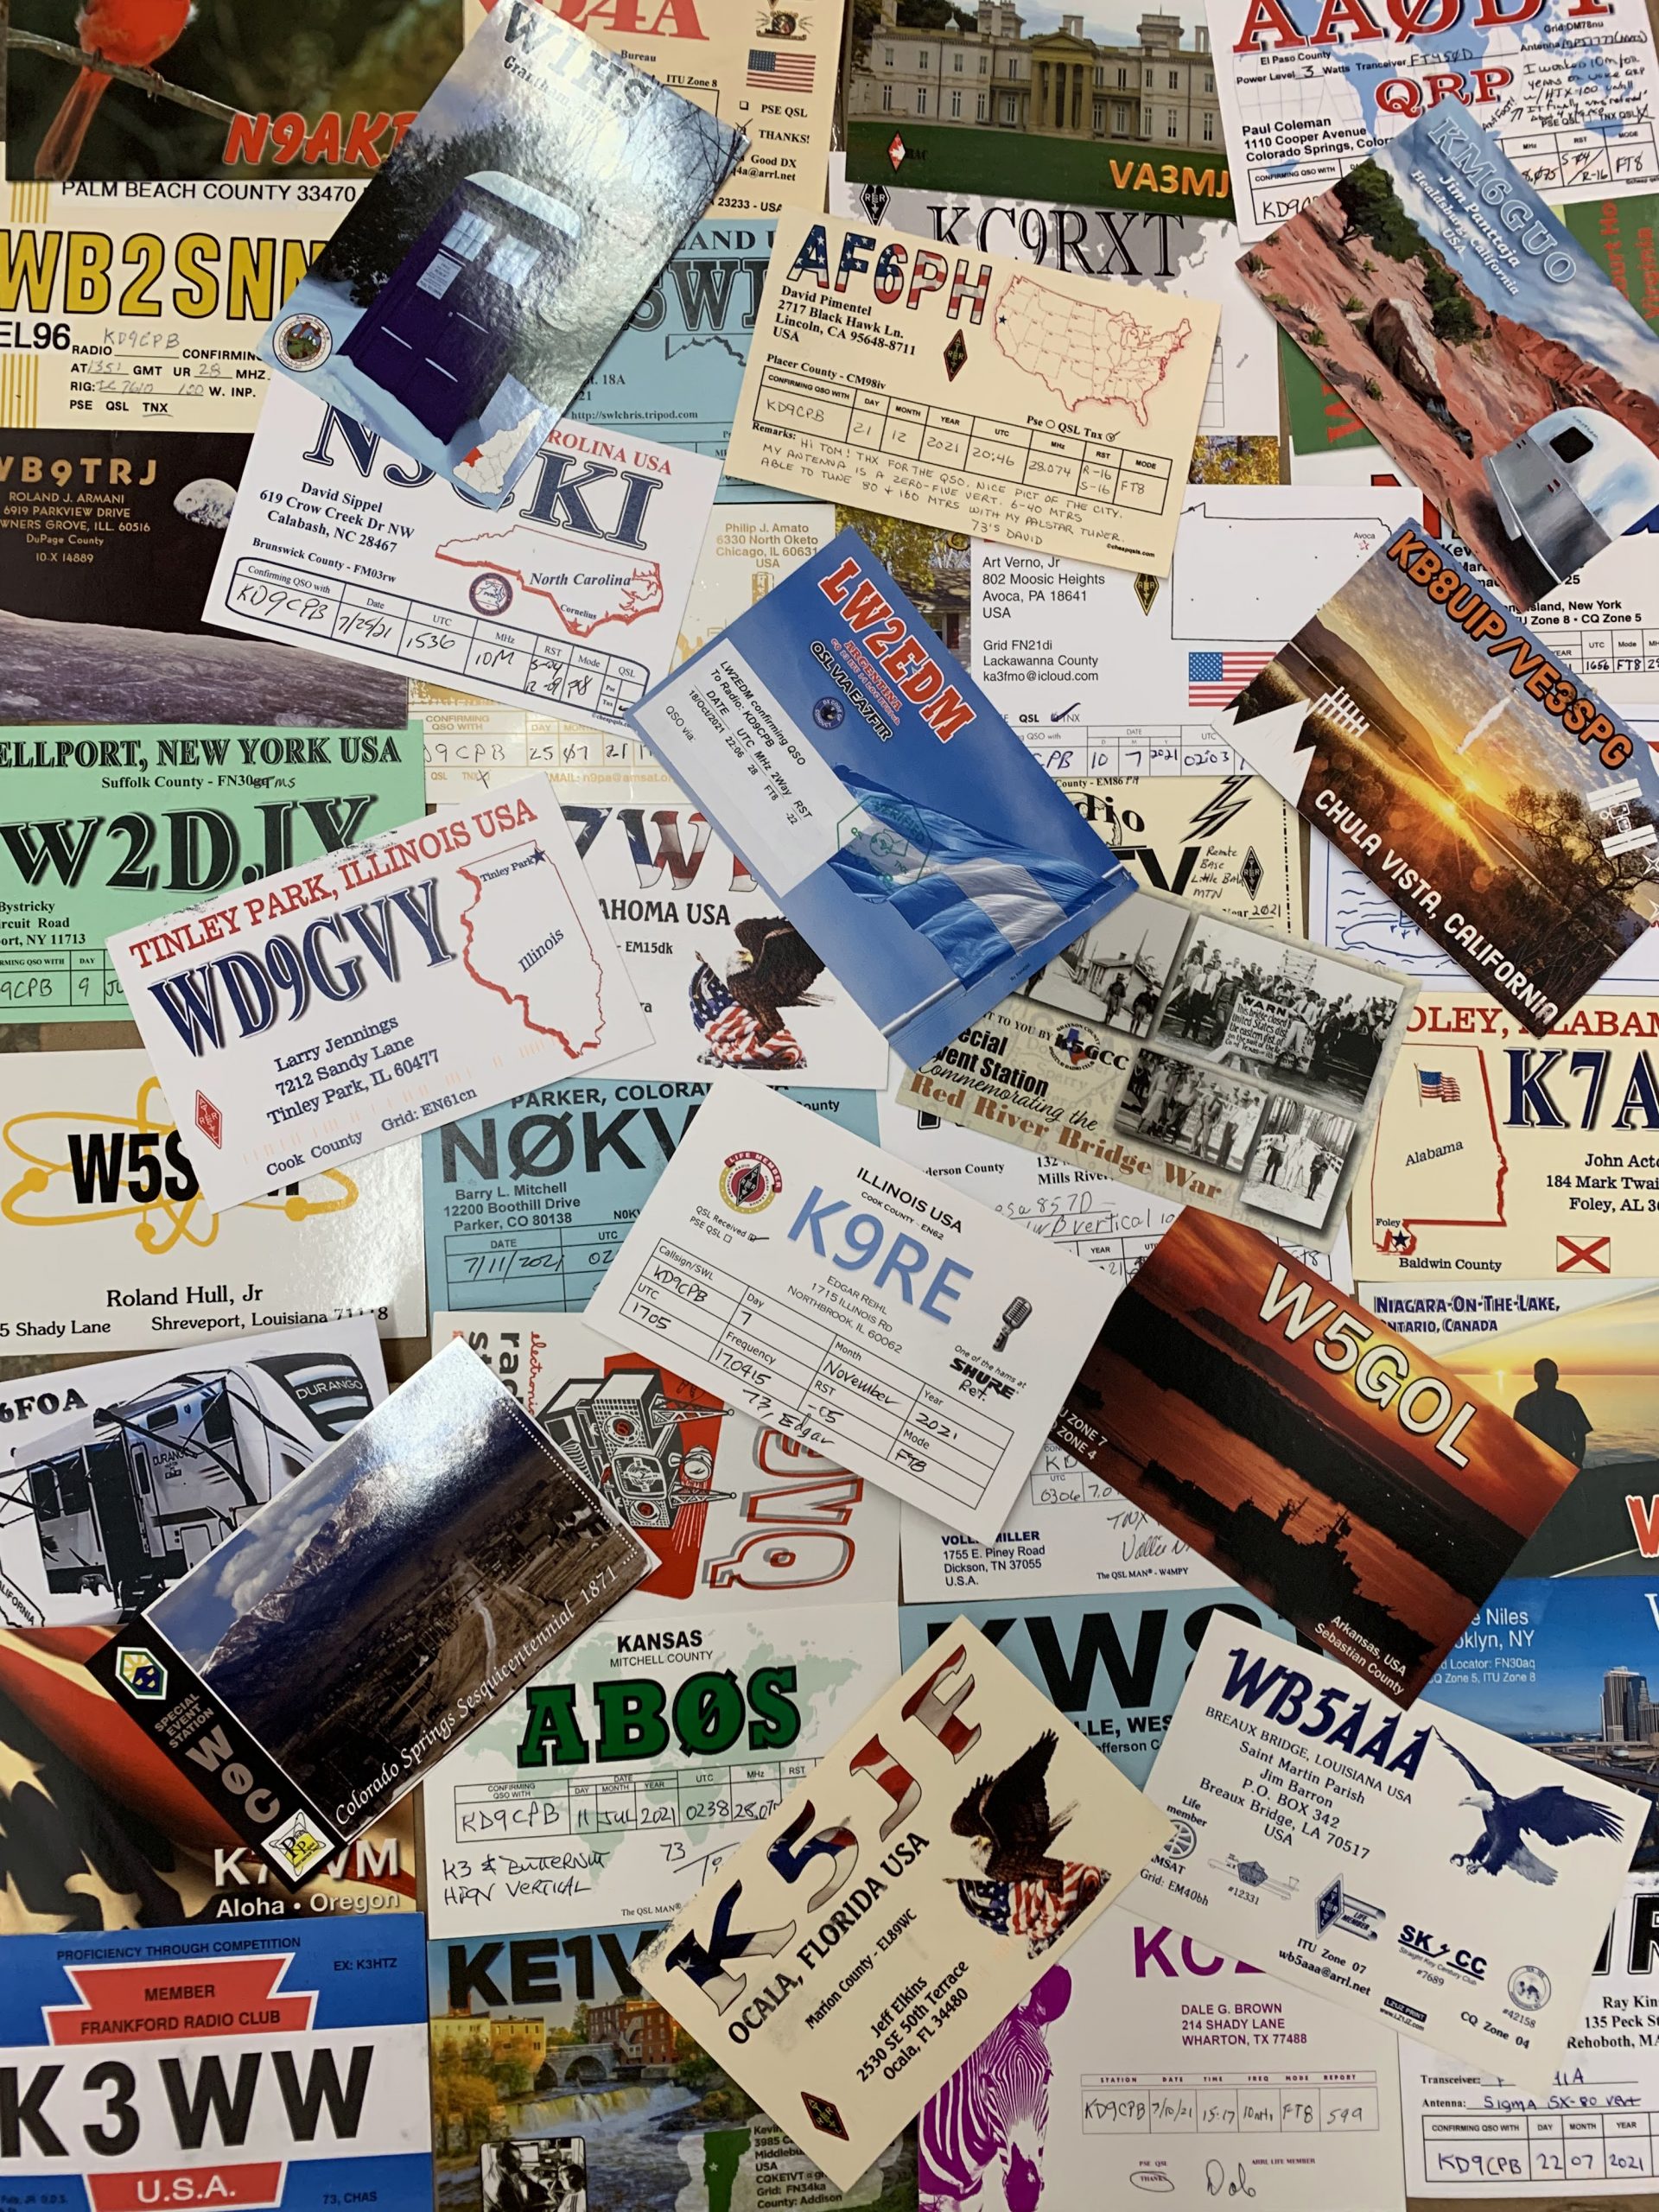
Did you know it’s possible for anyone in the US48 to communicate with amateur HF radio operators in other US states, the Caribbean, and South America with only a technician license? Thanks to the ten meter (10m) band privileges granted to all technician licensees, you don’t need to spend thousands of dollars on radio equipment or countless hours studying for the general exam to begin receiving those nifty QSL cards cherished by so many hams. With as little as $200 and any type of outdoor antenna space (even a condo balcony), you can use weak signal modes such as FT8 to start getting your callsign heard from thousands of miles away. Here’s the 7 steps I took to grow my QSL card collection from none to the 56 shown below, using 10m FT8 QSOs with my Technician license in under a year’s time:
Step 1: Pick out a radio capable of 10m SSB
I decided to go with FT8 as my mode of choice due to its popularity these days. Perhaps the most important item you’ll need to begin getting 10m FT8 QSOs is a 10m transceiver capable of Single Side Band (SSB). I chose a used Realistic HTX-100 radio off eBay for about $100 including shipping. I’ve also heard of others having 10m FT8 success with cheaper used RadioShack HTX-10 radios too, but keep in mind you are taking a gamble with used equipment from the internet or a hamfest. If you’d prefer a new radio with vendor warranty, the AnyTone AT-5555N or President Lincoln II will get you on 10m SSB for well under $300. Be careful of the cheapest 10m transceivers out there, many of them do not support SSB, which is necessary for FT8.
If you plan on upgrading to a General class license in the near future, you might be better off purchasing an all-band HF transceiver such as the Xiegu G90, Yaesu FT-891 or Icom IC-718. Those models are all well under $1000 new, or you could also consider purchasing a used Kenwood TS-590 series at a similar price point. There is no right or wrong answer about which all-band HF transceiver to purchase if you go this route, I personally bought a Xiegu G90 due to the built-in tuner and low cost, but I’ll most likely purchase a Kenwood TS-590 someday for the extra SSB power.
Step 2: Obtain equipment that allows your computer to send and receive FT8 on your radio
If you’re buying a brand-new all-band transceiver, chances are the radio’s manufacturer makes a kit you can purchase which will easily allow your computer’s FT8 application to talk with the radio. There’s YouTube videos showing how to setup just about any newer all-band transceiver for FT8 nowadays using these first-party adapters, I’d highly recommend watching many of these before trying to operate on the FT8 frequency yourself.
If you’re buying an older used all-band transceiver or a 10m only transceiver, you’ll need to do a little homework on getting the radio to talk with your computer’s FT8 application. This usually boils down to either building a custom solution using a sound card & serial connections or purchasing a third-party adapter such as the TigerTronics SignalLink USB. You can build your own custom solution using a low-cost USB sound card and Raspberry Pi General Purpose Input/Output for around $50-75 if you’re on a budget. Otherwise, going with a manufactured solution like the SignalLink USB will cost around $150.
I ended up purchasing the SignalLink USB as I didn’t want to spend time making & troubleshooting custom cables myself. Another thing to keep in mind is that for only $10-20 more, you can buy factory-made cables & jumpers that will allow the SignalLink to send and receive audio on nearly any UHF/VHF transceiver. This is lovely as you can use the same USB sound card setup to easily decode SSTV from the International Space Station’s UHF transmissions too!
Step 3: Obtain a 10m antenna
There is no shortage of guides & opinions on how to make a 10m antenna yourself at very low cost in ARRL’s publications or on the internet. However, if you don’t have the time or space to create your own antenna, there’s many options available for purchase. I chose to buy two MFJ 1610-T “Ham Stick” mobile 10m antennas along with the MFJ-347 adapter, which links them together to form a 14-foot dipole. This is about the maximum amount of antenna I could fit on my condo balcony. It ended up costing about $150 including the cabling, adapters, PVC pipes and U-bolts to install permanently.
Step 4: Obtain an electronic logbook on the internet
Websites such as lotw.arrl.org, qrz.com, qrzcq.com and eqsl.cc allow you to create a free online logbook with your callsign. Many consider ARRL Logbook of the World (LoTW) as the “gold standard” of electronic logging, and I highly recommend signing up for it. However, be advised the LoTW sign-up process involves verifying your callsign via snail mail. It might take weeks to get your callsign setup on LoTW, so make sure you do this early. Trust me; it’s worth the effort to get LoTW setup as soon as you can, since you’ll likely want to go for awards such as ARRL’s Worked All States once you get started on HF.
Step 5: Get your QSL cards printed
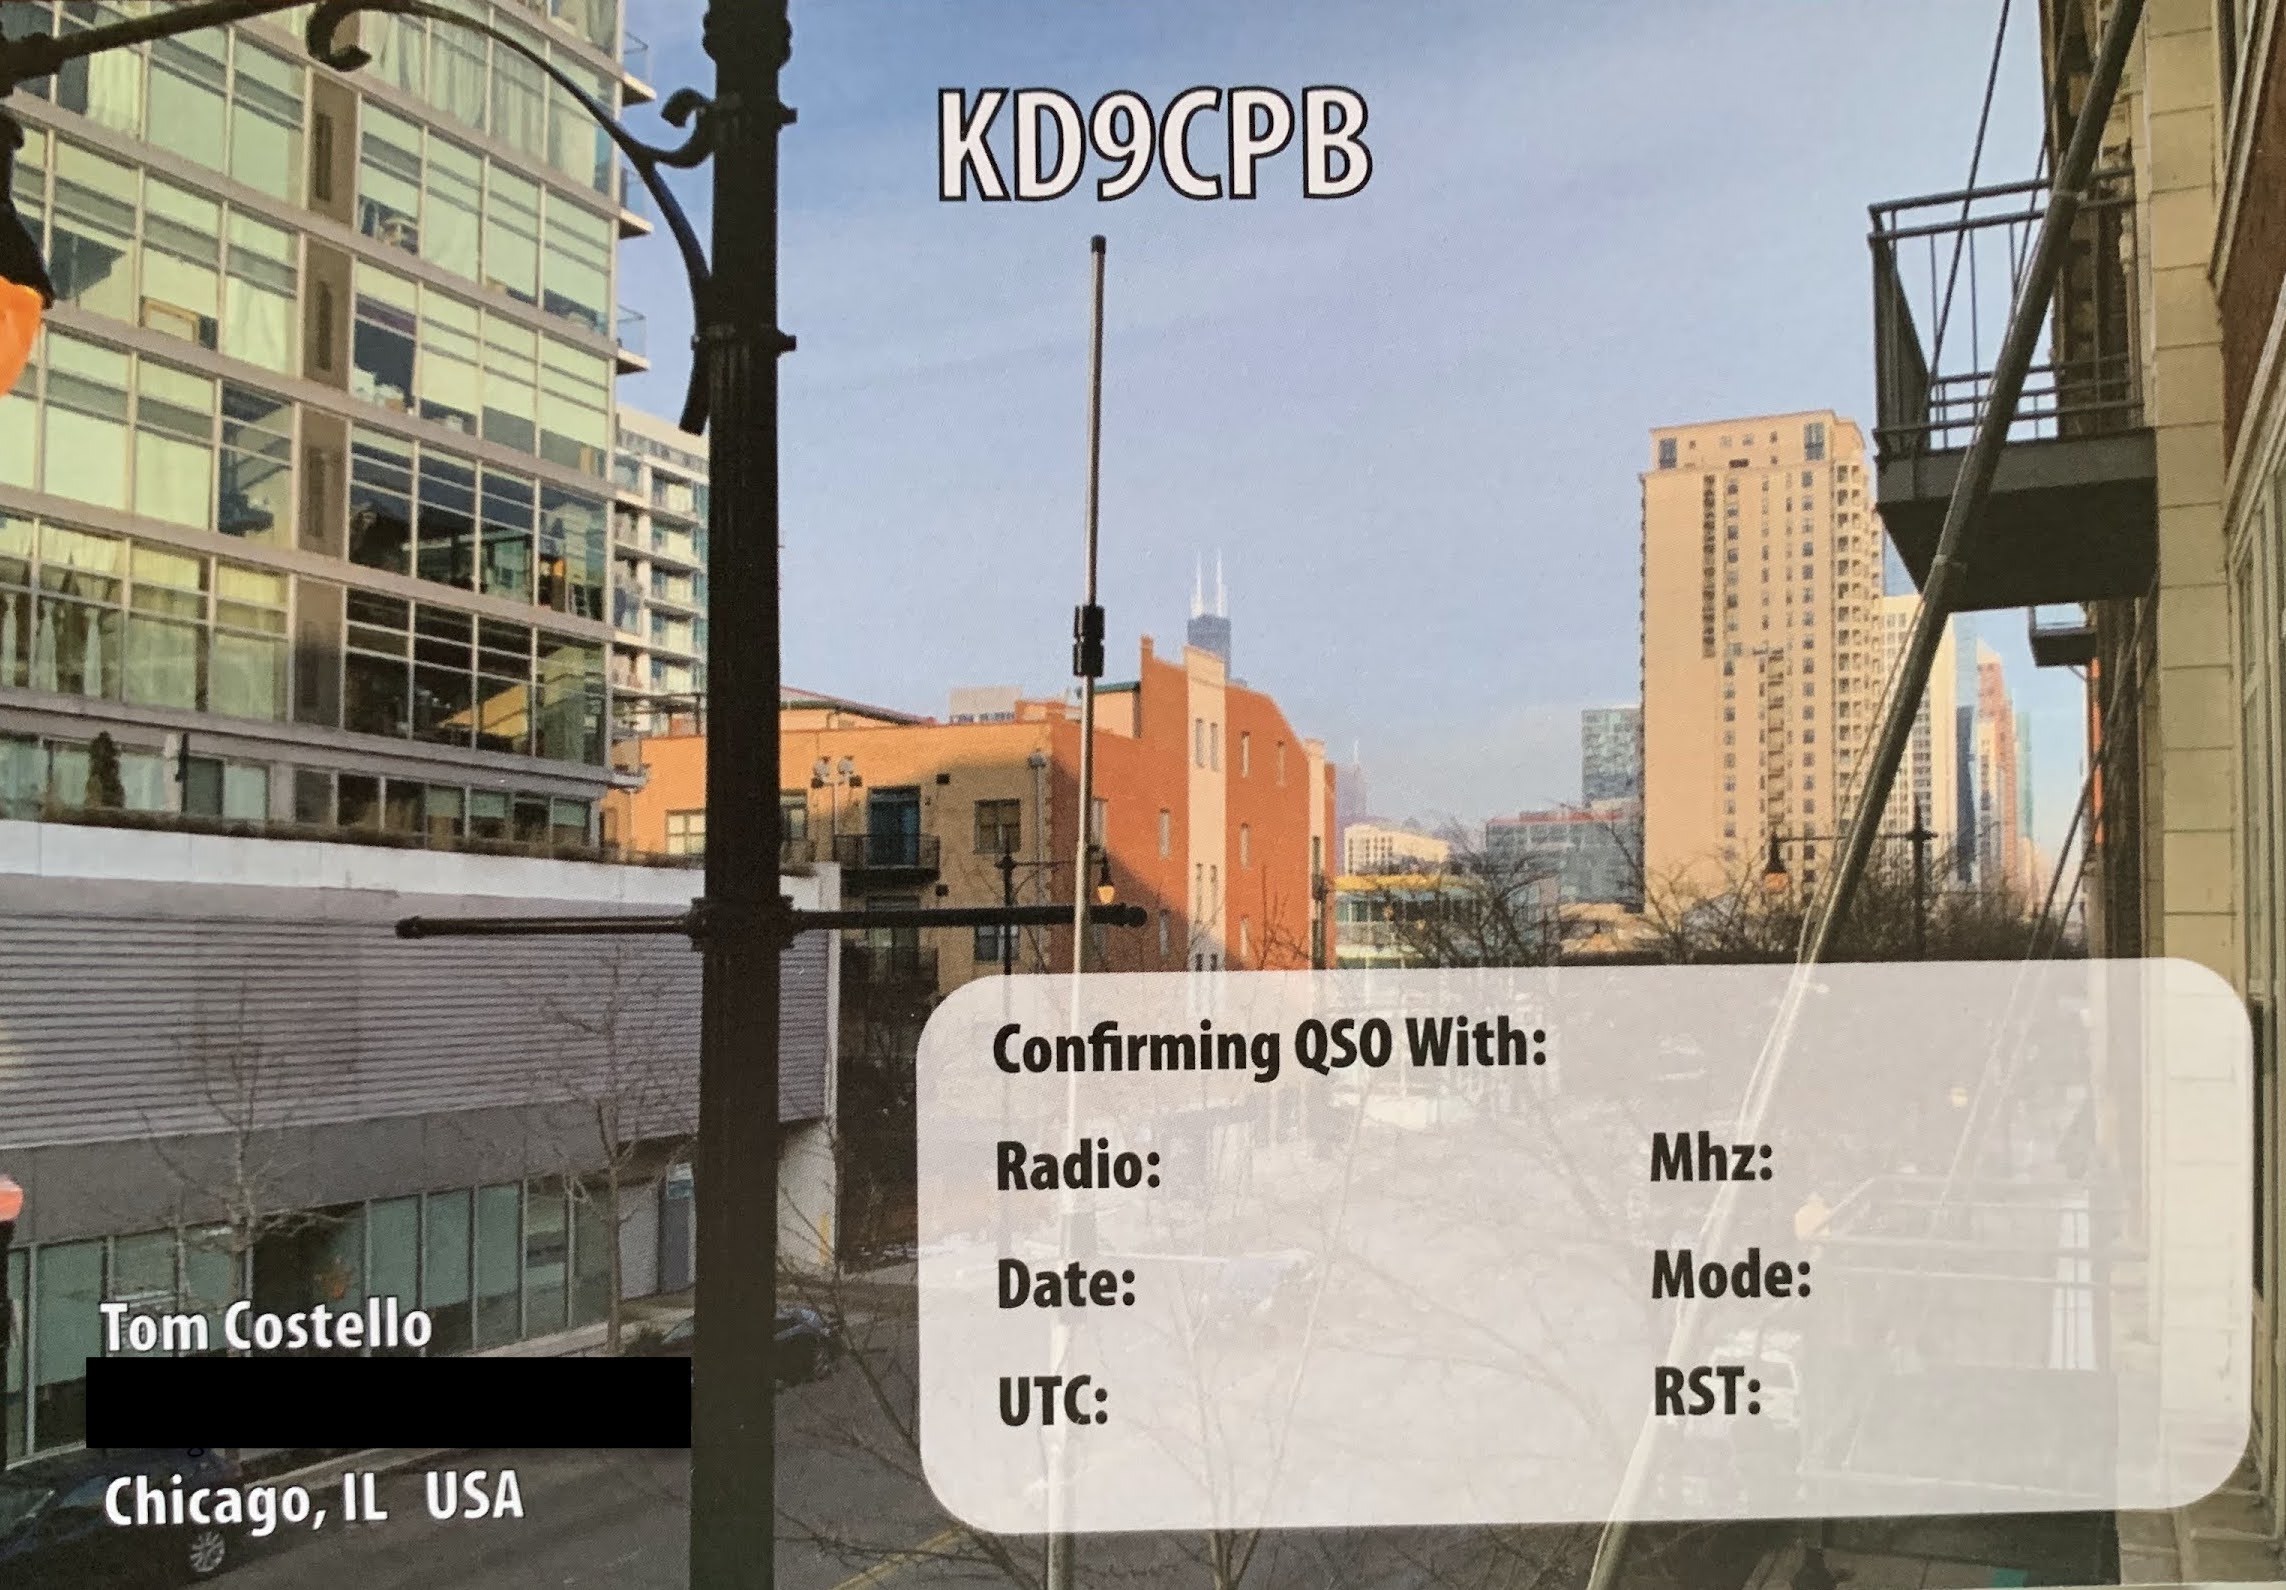
If you want to receive QSL cards nowadays, chances are you’re going to have to send some first! Using the search engine of your choice, it’s very easy to find QSL card generators which provide templates that can be mass printed by yourself or a local print shop. There are also many vendors available that will print & ship QSL cards for your callsign at a reasonable price very quickly. I asked a small local print shop here in Chicago for help printing my QSL cards, and they were so fascinated by the concept that they improved the design for me! Just make sure you can write on the card if you’re printing yourself or through a local print shop, glossy finish is not ideal.
Below the finished QSL card product from my print shop; however, I wish I included fields for Antenna and Grid Square. I often end up writing these in myself in the extra room near the bottom. Alternatively, you can have no space whatsoever for the various reception report fields, simply printing out all the details on a sheet of labels, then attaching to the card before sending. Whichever method you chose, make sure to sign your signature on both the card (and if applicable, the label containing the QSO data) as that’s proper etiquette. The standard card size is 5.5 inches by 3.5 inches, however it’s not uncommon to see QSL cards that are larger or smaller.
Step 6: Plug all your gear together and get some QSOs
From my QTH in Chicago, the 10m band is sometimes filled with FT8 activity spanning from Canada all the way down to Argentina. Other times, I barely see any FT8 activity whatsoever. There are many ways to determine if the 10m band is alive or not, and my favorite is going to pskreporter.info in the web browser of your choosing. If 10m is one of the top bands at pskreporter.info, I’ll hop on the air! If it’s not, I might think twice since I don’t want to waste time getting my station working only to find nobody else on the air.
Once you’ve setup all your equipment, obtained an electronic logbook and printed your QSL cards, it’s time to get on the radio! While it might feel overwhelming trying to configure your radio, computer and accessories to talk FT8 with the world, there’s no shortage of YouTube videos and blogs about FT8 that will help you get going. If you’re stuck, reach out to your local radio club, online ham radio forums, or even the ham radio communities on Discord and Reddit to troubleshoot any problems. I use WSJT-X to do all my FT8 QSOs, but there’s many other programs out there nowadays to meet the needs of any ham radio operator. Even if the 10m band has no FT8 activity at your QTH for a long time, just be patient, and eventually you’ll get a good QSO going with your technician license on the 10m band.
Step 7: Log your QSOs, send out the QSL cards
After you’ve exchanged callsigns, grid location, signal reports & 73s, it’s time to log your first FT8 QSO! If you’re using LoTW and WSJT-X, you can simply use the Trusted QSL program provided by ARRL to upload the log file produced by WSJT-X. I like this method the most because after uploading the logs to LoTW, it’s very easy for other electronic logbooks such as QRZ.com to import the LoTW data. Even if you’re only concerned about exchanging QSL cards via direct mail, I still recommend logging everything to LoTW and QRZ anyways simply because it helps other hams going for awards, and maybe you’ll want to apply for awards too someday.
QRZ biography pages are an excellent way to determine if the station you’ve done a QSO with is interested in sending and receiving paper QSLs or not. Some of the busier stations, especially those on islands, will request you use a bureau or QSL manager. Typically, these busier stations will include specific instructions for that in their bio pages, or they might simply request a self-addressed stamped envelope. Other not-so-busy stations may specifically say they’ll reply to all QSL cards without a self-address stamped envelope, or strictly perform electronic QSL only.
You will find many different opinions on proper etiquette for paper QSL cards, and mine is that if you really want a reply, you’ll have a much higher rate of success with sending that self-addressed stamped envelope. I’ll usually include one if the QRZ bio says the ham I’ve communicated with indicates they QSL by mail. If they don’t have any QSL information in their biography, but they have a picture of their own paper QSL card on the website, I’ll often send my QSL card without the self-addressed stamped envelope in the hopes I might get lucky with a reply. If their QRZ bio is empty or if they indicate electronic-only, I won’t be sending them a QSL card in the mail.
Conclusion
I wish I kept better track of how many QSL cards I’ve sent out over the course of my 100+ QSOs on 10m FT8 in 2021, but I ended up receiving 56 total in return. I would estimate around a 50% return rate is feasible, and it seems to be near 100% when you include a self-addressed stamped envelope to a station that mentions it in their QRZ profile.
10m is more active than ever thanks to the Solar Cycle 25 weather, especially on FT8. That being said, when the solar weather isn’t very good for 10m, you will likely have much more fun getting on the 15m and above bands with a General license. I’m glad that I got my QSL card collection started with just my technician license, but I wish I got my General license faster as the bands above 15m have quite a bit more activity. Whether it’s a cheap 10m-only radio using a small antenna, or an expensive all-band radio with a large antenna tower, the most important thing in building your QSL card collection is to enjoy receiving them in the mail. It sure is more fun to receive a QSL at the mailbox instead of junk mail & bills!
You’ve reached the end of the post! Click here to go back to the list of all Ham Radio posts.
You should also know I may earn commissions on qualifying Amazon purchases made via kd9cpb.com links to defray the cost of otherwise ad-free web hosting.
this is great. I want to start usingbn line logging and digital modes.
This is the kind of writing that inspires new hams to get on the air. Most people see CW only and “fa-get-bout-it!”
Nice to know your doing this neighbor!
Craig in Antioch
Thanks Craig! I’m sure we will cross paths on the air or in person soon enough!
73 de KD9CPB
Keep up the great work!
Thanks Igor!!! Appreciate the feedback!
Don’t forget that with a now active Sun, there will be opportunities on 6 Meters as well. Many new rigs come with 6 Meters (I have a FT-891). 10 Meters will be excellent from September thru’ March for several years, and during April thru’ August you will have some Es (short skip).
I have been a casual DXer for 44 years and 10 Meters is the only band I have an earned LOTW DXCC on, most on SSB and CW. I do a lot of RTTY, PSK31 and yes FT8/FT4 when bored (more often these days). I worked a good number of Europeans on CW this Winter here in Texas. Have fun.
That’s great stuff, thanks for bringing up the 6 meter opportunities! I don’t have a 6 meter radio yet, but clearly solar cycle 25 is a sign that I need to get one 🙂
73,
Tom