
First Posted 12/31/2021
This post is obsolete. You probably want to follow the https://kd9cpb.com/orangepi5 homelab instead. ThePiBay.org project fizzled out, see my BlueTeamCon Online 2023 talk if you’re curious
Earlier this year, I purchased thepibay.org with the intention of creating a WordPress site that encourages Information Technology & Information Security pros to do Raspberry Pi related projects in disadvantaged communities. Thinking about it more, I figured it would be hypocritical of me to run the site on anything other than a Raspberry Pi in the homelab, so we’re going to do exactly that today 🙂
However, running a real-world website off your home internet pipe is usually a terrible idea these days due to security, performance & reliability reasons. Services like Cloudflare’s free offering make it a little less terrible, but for most people looking to build their own website, I’d recommend doing it with something like Hugo + GitHub instead of WordPress + Raspberry Pi. Use caution if you go down the “open port 443 to the web for the Raspberry Pi at home” path, default passwords or not patching your setup can lead to a painful security breach!
For my particular situation, I really want the ease of WordPress’ content management system as there’s a good chance people without the skills to use Hugo will be contributing to the website. Plus I think it’s cool to have total control of the website running on your own hardware instead of running the site on someone else’s cloud infrastructure. We’ll be going over the following steps to securely host your own WordPress website from home:
- Setting up a Raspberry Pi 4 with Ubuntu 20.04 Server, installing WordPress
- Setting up Cloudflare Free with your domain name
- Setting up ddclient to update Cloudflare Free’s DNS records with your dynamic WAN IP
- Setting up HTTPS with Cloudflare’s Origin certificates
- (optional) Configuring firewalld & fail2ban to reduce risk of unauthorized access
- (optional) Setup ImprovMX to forward emails sent to addresses at your domain name
- (optional) Perform additional WordPress hardening
- (optional) Setup both Ubuntu & WordPress to update automatically
- (optional) Run WSJT-X ham radio tool off the same Raspberry Pi
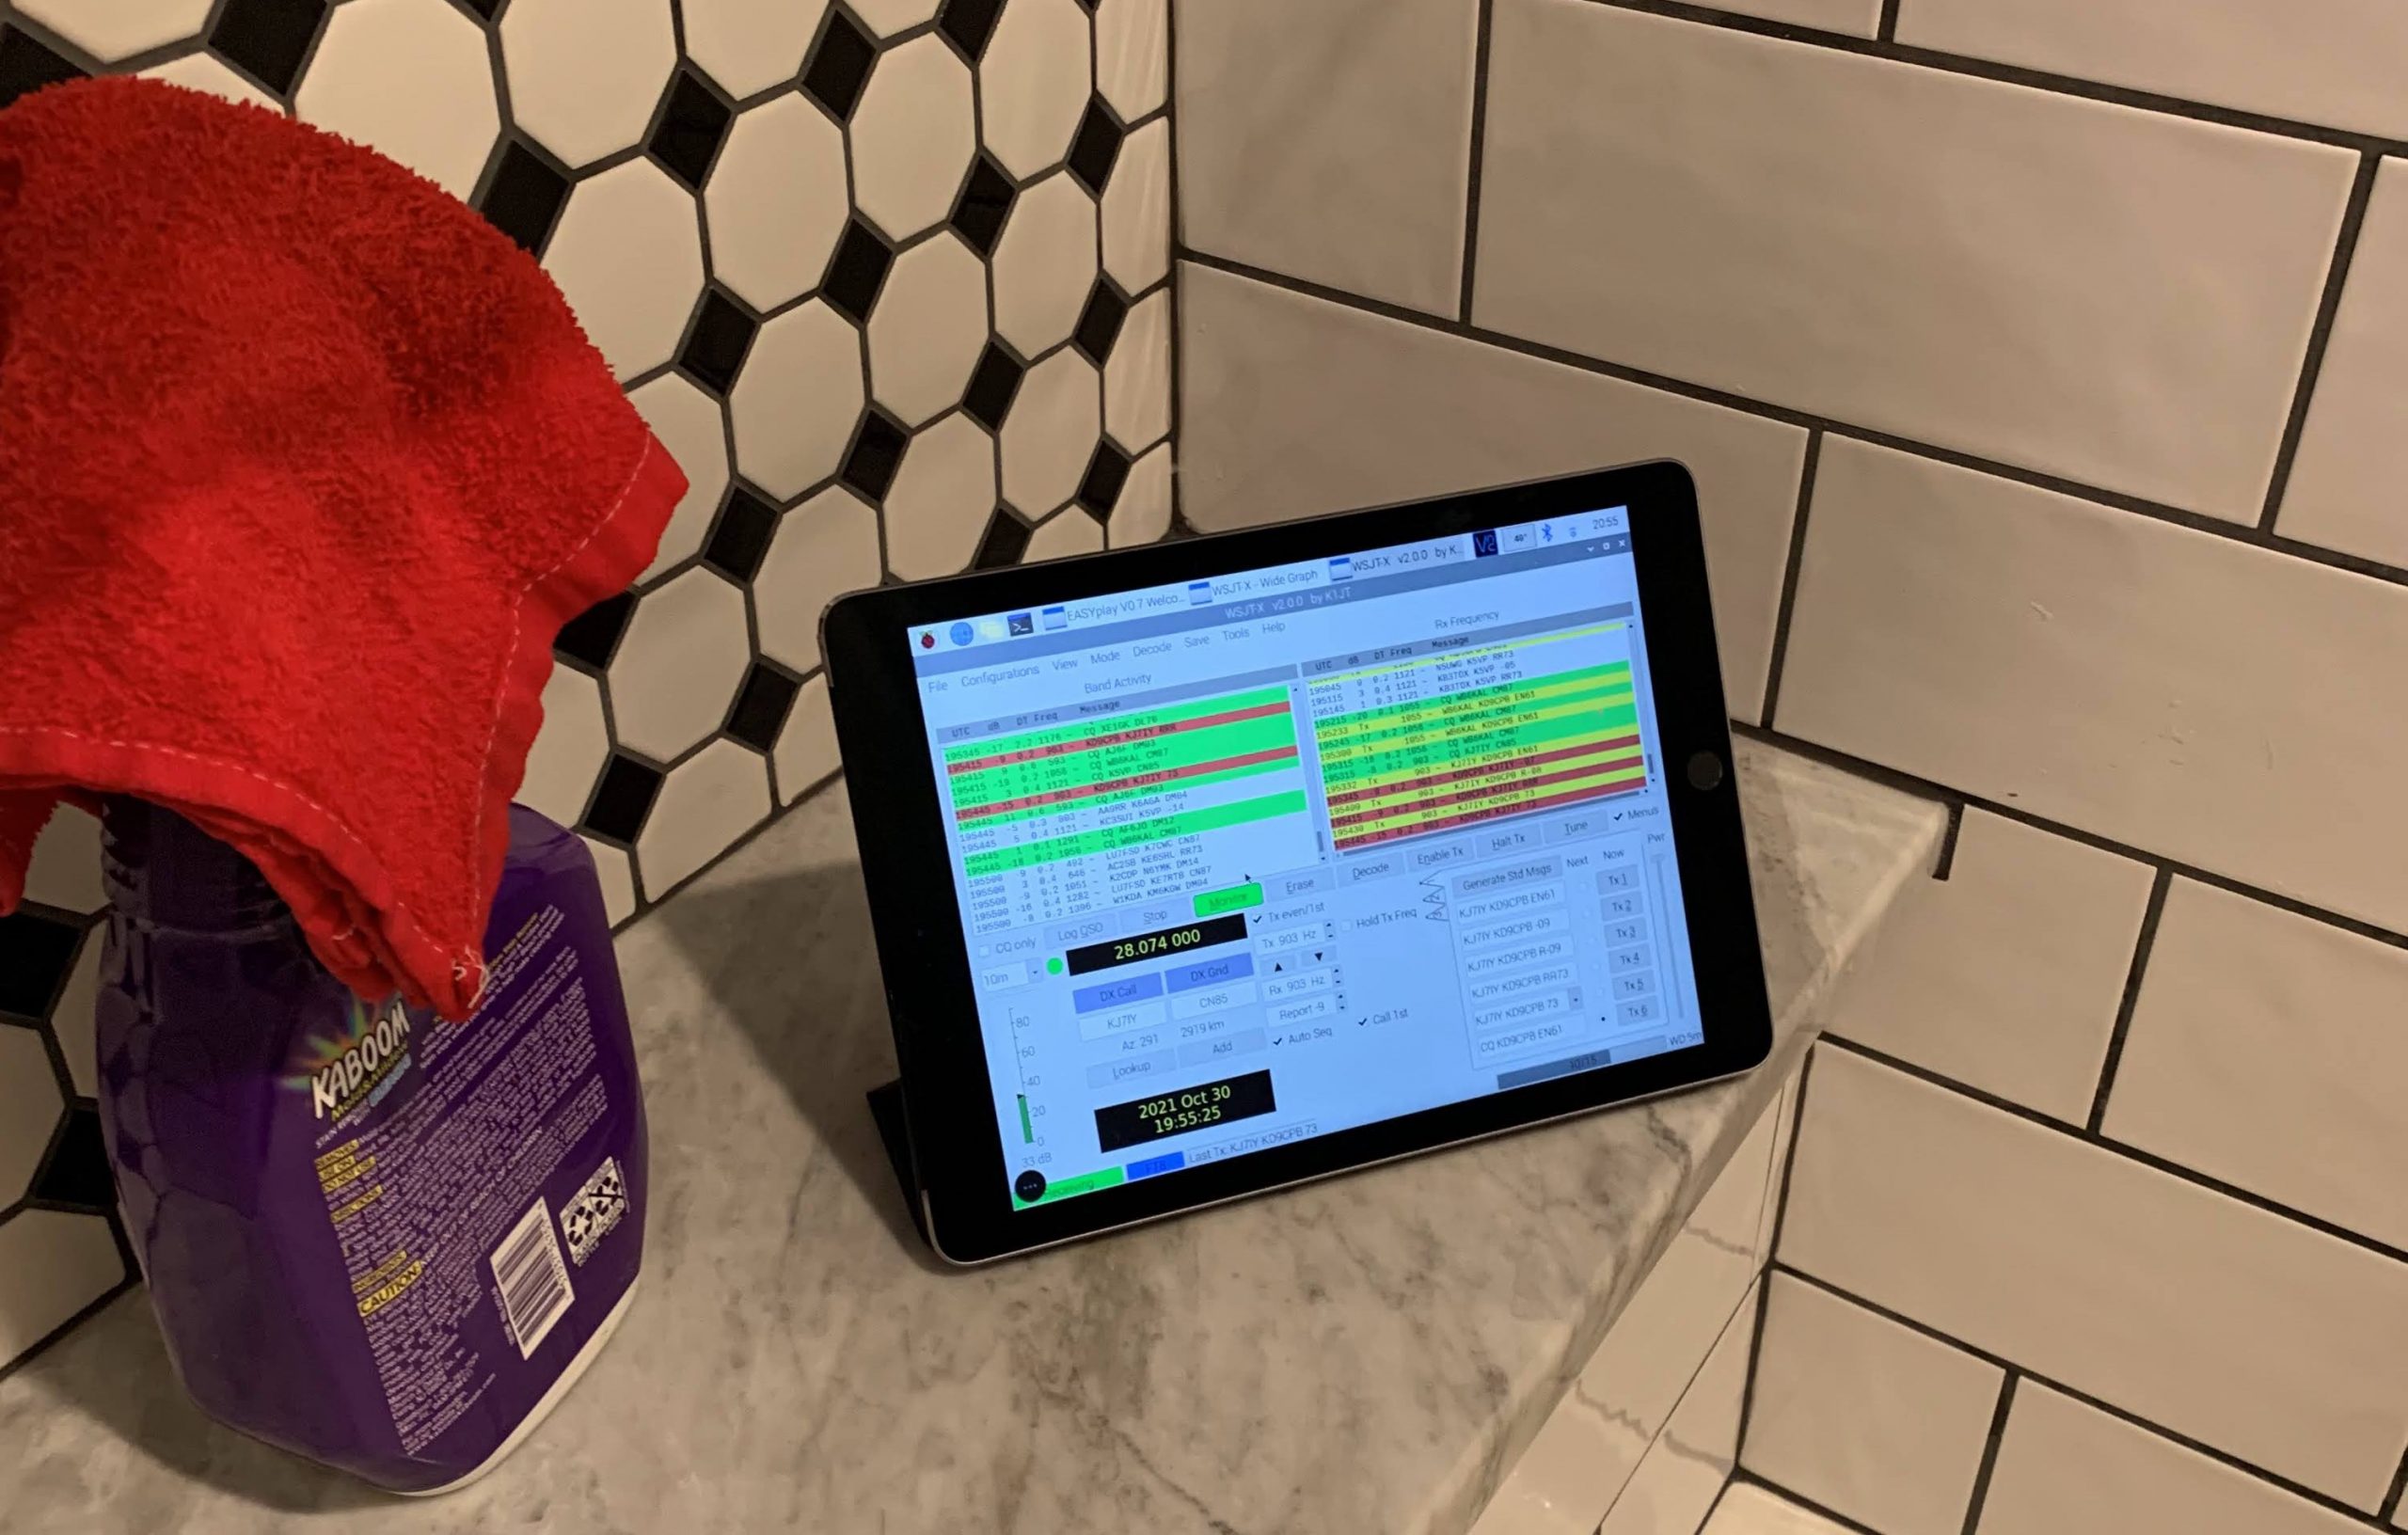
Ok, so step number 9 is not at all necessary for WordPress, but since I only want to have one Raspberry Pi server running in the condo 24/7, it’s a necessary part of my project. I won’t blab about WSJT-X too much this post, but keep in mind running WSJT-X on a Raspberry Pi with VNC allows you to get FT8 contacts anywhere you can bring an iPad. Comes in handy when you want to both clean your shower and work FT8 like I did in the image below 😉
Step 1: Initial Raspberry Pi + Ubuntu + WordPress install
You’ll want a Raspberry Pi 4 with at least 4gb of RAM for this project since we’re running a GUI for WSJT-X (if you’re not doing GUI + WSJT-X stuff, you can easily get away with an older Pi or 2gb Pi3/4). Use the Raspberry Pi Imager to install the Ubuntu Server 20.04 LTS 64-bit image, and boot up your Raspberry Pi (default login is username ubuntu password ubuntu). Why are we doing Ubuntu 20.04? The main reason is I like the long-term support, and the fact it’s 64-bit is kind of nice (Raspberry Pi OS is still pushing the 32-bit version over 64-bit today, maybe that’ll change soon…)
Once you’ve logged in, do a “sudo -s” to stay root, and make sure your Ethernet cable is plugged in to something with basic internet access. Run the “ssh-keygen -A” command so the SSH server can start. Do an “apt-get update”, “apt-get upgrade”, “apt-get install tasksel” then run the tasksel command to install the Ubuntu Desktop GUI. Reboot the pi, and you should be greeted with the graphical login prompt.
If you plan on using the wifi on your Raspberry Pi, make sure to edit /etc/default/crda to have REGDOMAIN=US (or your 2-character country code) so that all the 5ghz bands are accessible.
Before we get too carried away with installing WordPress, there’s three quick tricks I’d like to do so SSH & VNC start working (we’ll need VNC for WSJT-X, if you are not doing the GUI stuff you can skip the following):
- Do the “gsettings set org.gnome.Vino require-encryption false” command so we can use the free RealVNC client on our iPad later (big thanks to the DidYouBounceIt blog for pointing this trick out!)
- Go to the Settings menu in the GUI, click on Users, and enable auto-login for whichever user you want. This makes getting into WSJT-X faster, and ensures the VNC server starts when the Pi reboots
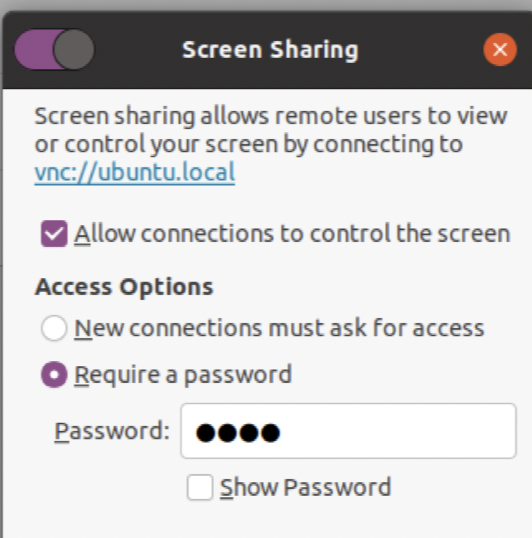
- From the same Settings menu in GUI, click on Sharing, click on Screen Share, enable this and set a weak password (VNC is cleartext auth with a ridiculously low number of characters allowed, the only reason this is OK is because I will be using it on my LAN only, never allow this from the internet!!!). Enable Remote Login (SSH) too if it’s not already checked.
Now that all the GUI-related silliness is complete, we can go ahead and actually install WordPress on Ubuntu 20.04. Simply follow the steps at https://ubuntu.com/tutorials/install-and-configure-wordpress verbatim. I’m only doing two tiny modifications to make things easier during the Cloudflare procedure:
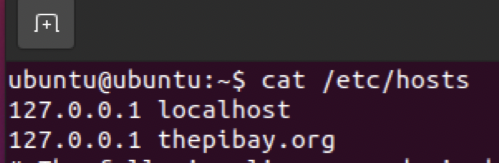
First, edit /etc/hosts to have an entry for your website’s domain name pointed to 127.0.0.1:
Second, edit /etc/apache2/sites-available/wordpress.conf to have a ServerName line with your domain name in the VirtualHost config:

Don’t worry about the site not having HTTPS yet, we’ll get that squared away in the Cloudflare steps. My home ISP does not give me IPv6 service yet, so I’m completely ignoring IPv6 for now. But if you want your site to have IPv6 access (everyone should nowadays!), you’ll want to edit the hosts file & make a few additional firewall changes accordingly. Sadly you’ll have to figure that out on your own as I’d like to focus on IPv4 for today.
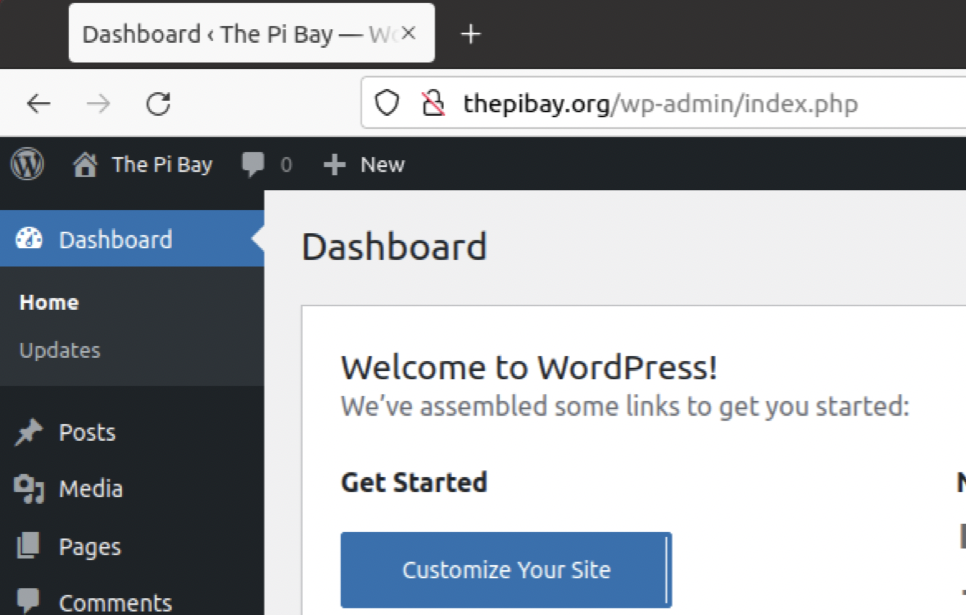
Once you complete the Ubuntu instructions, you should be able to get into the WordPress dashboard by visiting http://(yourdomain.com)/wp-admin on the Raspberry Pi’s built-in Firefox install:
At this point, you’re cleared to start editing the WordPress site according to your preferences. I’m not going to talk about that at all here as there’s a bazillion resources out there for building your own WordPress masterpiece, but the one thing I do want to mention is if you don’t plan on using comments for your website, just disable them globally. That’ll save you the headache of having to block spam comments.
You may have noticed the site is not using HTTPS yet, which is super insecure. Don’t worry, we’re going to fix that shortly, but since we want to use Cloudflare’s certificates, we’ll need to get that squared away on their portal first.
Step 2: Setting up Cloudflare Free for your domain
If you need to purchase the domain name for your project, I’d highly recommend doing that directly through Cloudflare nowadays. If you already bought the domain somewhere else, https://developers.cloudflare.com/registrar/ can make transferring it over as painless as possible. Don’t want to transfer your domain to Cloudflare? That’s totally fine too, Cloudflare support has this article on changing the DNS config accordingly.
It can sometimes take awhile for domain transfer or DNS config stuff to take, so be patient while things happen behind the scenes. Once everything settles, head to the DNS tab of dash.cloudflare.com and make sure there’s a record for www and the domain name pointed towards any IP address, the actual IP doesn’t really matter for now:

Now that we have meaningless DNS records in the dashboard, let’s get ddclient running on the Raspberry Pi to change them into our dynamic WAN IP on a regular basis.
Step 3: Setup ddclient for Dynamic DNS updates via Cloudflare API
At first, I did the steps at this website to get the dynamic WAN IP updating all setup, but it didn’t seem to work in Ubuntu 20.04. Fortunately, I found a different website that had instructions for using ddclient with Cloudflare instead, and this worked perfectly.
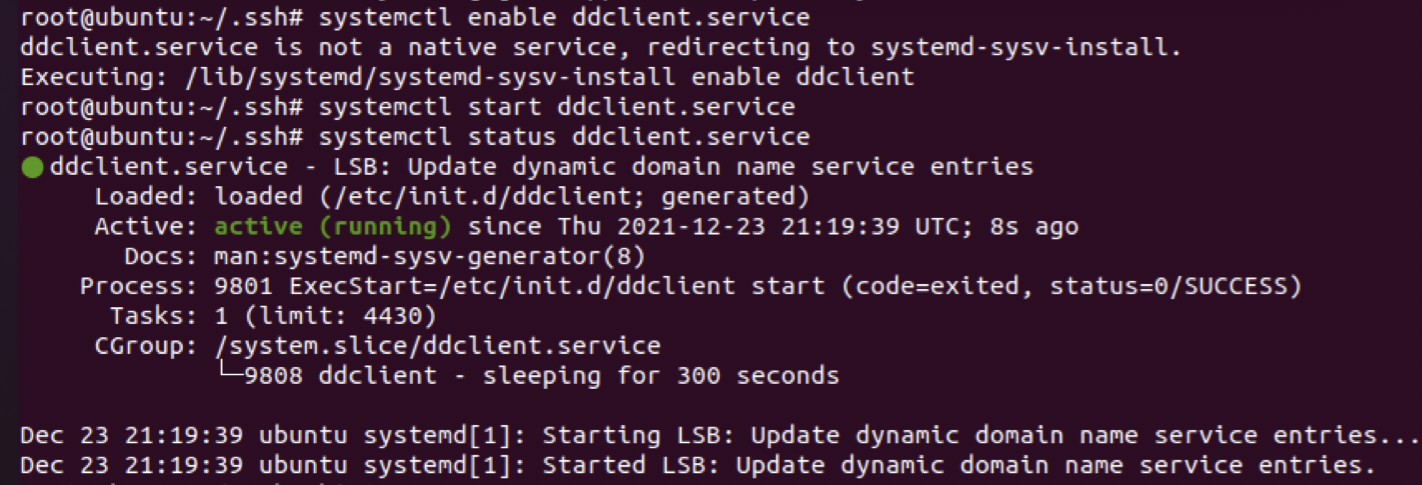
After you follow those instructions over at JPHein.com, do a “systemctl enable ddclient.service” and “systemctl start ddclient.service”. For good measure, I also did a “systemctl status ddclient.service” to ensure the dynamic WAN IP updating is working as planned. The below output looked good, so I went over to dash.cloudflare.com and confirmed the WAN IP updated as expected:
Step 4: HTTPS Setup with Cloudflare Origin Certificates
Now that all our DNS & Dynamic IP woes are resolved, we need to poke a hole in the home internet router’s Firewall/NAT setup to forward connections from port 443 on your WAN interface into your Raspberry Pi. I’m not going to talk about that here because everyone’s home router is different, but there’s really good tutorials for nearly every device available by googling “port forwarding (insert home router model here)”.
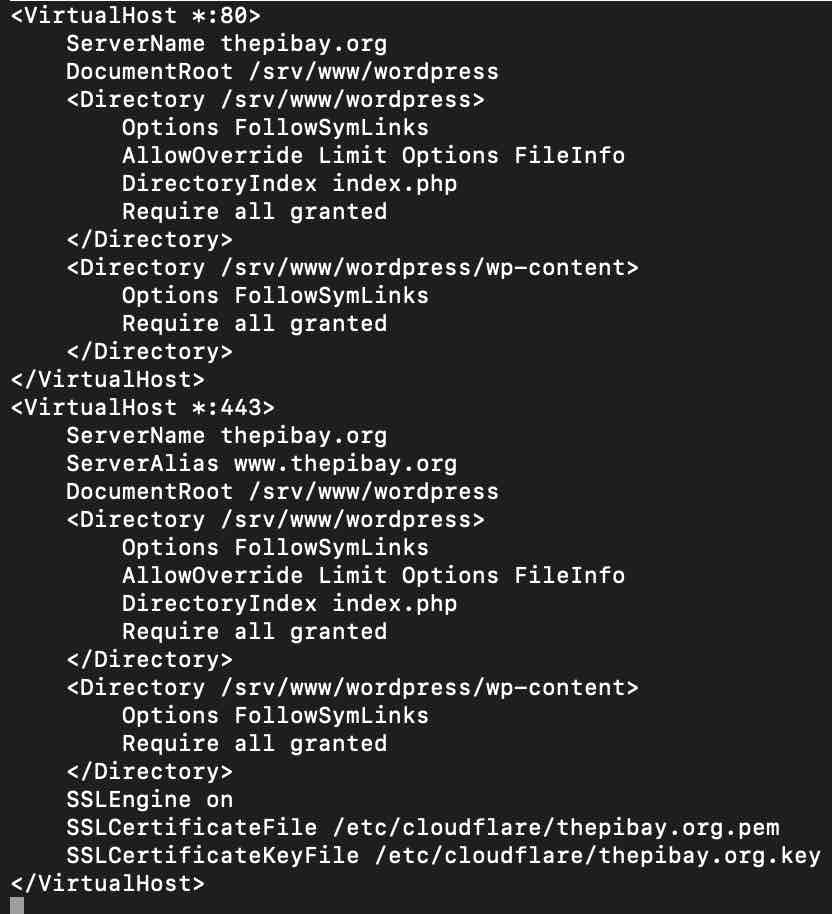
Once the port forwarding is all good, follow the instructions at this DevAnswers.co article to get the HTTPS certificate situation under control. If you followed the guide in step 1, the Apache config is at /etc/apache2/sites-available/wordpress.conf, and it should look something like the following once you’re done:
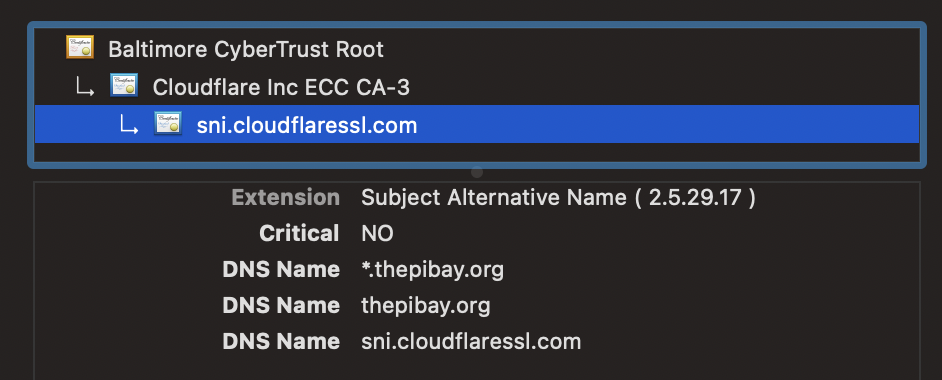
Make sure the SSL/TLS settings in your Cloudflare Dashboard are set to Full (Strict). If all went well, you should be able to access your WordPress website via any computer connected to the internet! Check out the HTTPS certificate in the web browser, it should be nice and Cloudflarey:
I’d recommend going into Cloudflare and redirecting all the HTTP traffic to HTTPS, along with removing the port 80 VirtualHost from the Apache config. If you are going the HTTPS only route, make sure to update the WordPress URL in the Dashboard – > Settings menu to be HTTPS too. You don’t need to do either of these things, but it’s just generally a good practice.
Step 5 (optional): Setup firewalld & fail2ban to better lock down the Raspberry Pi
Cloudflare mitigates many of the risks that go along with hosting a web server these days, but it’s not a bulletproof shield. It’s a good idea to block any internet traffic from coming in on port 443 that isn’t from Cloudflare’s source IP address ranges, and normally you’d want to do this as close to your network edge as possible (typically on the router/firewall itself). If your home router doesn’t give you the option to only allow specific source IP ranges into port 443, check out the guide at https://datacadamia.com/firewalld/cloudflare after doing an “apt-get install firewalld”.
In a perfect world, Cloudflare’s IP addresses would never change and this would be a “set it and forget it” kind of step. But we all know that the only thing certain about the cloud is things will change, so writing something that automatically checks Cloudflare’s list of IPs and updates the firewall rules on a regular basis would be perfect. We won’t be writing such a script today, but maybe that’ll make for a great homelab post in the future. If you see someone that’s done this already or end up writing that yourself, let me know in the comments and I’ll be sure to link it here!
Another great & easy tool to use is fail2ban, which simply scrapes log files and bans any IP addresses that repeatedly look like they’re up to no good. Installing fail2ban is super easy; just do an “apt-get install fail2ban” and it’ll start protecting your SSH sessions immediately. Configuring fail2ban for Apache and other services takes a few more steps, and this article at Linuxize explains this quite well. Check out their thoughts on configuring fail2ban, and with just a little fine-tuning, you can drastically reduce the chances of unauthorized access into your Raspberry Pi.
Step 6 (optional): Setup ImprovMX for email forwarding
If you’re going through all of the pain of buying a custom domain for hosting a website, I feel like you might as well set it up for custom domain email addresses too. Cloudflare doesn’t quite have an email forwarding feature yet, but they will soon. Instead of trying to get into their beta email offering, we’ll go ahead and use ImprovMX’s free service to forward emails sent to specific addresses at the domain into Gmail, Hotmail, etc.
Simply follow the instructions for Cloudflare support over at ImprovMX after getting a free-tier account setup, and you’re good to go!
Step 7 (optional): Additional WordPress hardening
Although it feels like we’ve done just about everything we can to lockdown WordPress, we’ve only scratched the surface with free offerings. There’s a whole world of free & paid-for services like Wordfence which can take security to the next level. Wordfence not only features the same fail2ban feature set for your WordPress wp-admin page, it also makes it easy to enable MFA. Other plugins allow you to change the default wp-admin login path to something harder to figure out.
Updraft Plus plugin can be especially interesting to backup your WordPress install because it supports the “big 3” public clouds. This creates an easy path to migrating the site somewhere else if the Raspberry Pi + home internet connection isn’t enough horsepower should your website become very popular. This is a problem I haven’t had myself yet, but I’m hoping I have someday 🙂
I’m not going to go into much detail on the above ideas for this step as they’re fairly straightforward to implement on your own. There’s quite a few offerings from quite a few vendors that do similar things; you might need to research the best option for your particular scenario as WordPress hardening isn’t a one-size-fits-all affair. Gigantic thanks to CranjisMcBasketball on Disnog.org and Riv3r on the Art of Network Engineering Discord servers for bringing up these additional hardening ideas!
Step 8 (optional): Setup automatic updates for Ubuntu & WordPress
Sometimes WordPress gets a bad reputation regarding security because soooo many vulnerabilities are found for it on a regular basis. I’m not too concerned about this though, because with proper security controls (Cloudflare, Wordfence, fail2ban, automatic updates, etc.), vulnerability risk can be easily mitigated. Automatic updates are wonderful for both the Ubuntu operating system and WordPress, but keep in mind there’s a non-zero chance these automatic updates have the potential to break your install.
For this reason, many people chose to manually update their OS and WordPress on their webservers because you don’t want the website to go down when people might be accessing it the most. However, manually updating opens up the potential of human error too. I don’t trust myself to remember to patch the Raspberry Pi manually, so I did the nixCraft guide to automatic updates on Ubuntu 20.04. I also ensured all automatic WordPress updates are enabled under Dashboard -> Updates and Dashboard -> Plugins.
A happy webserver is a fully patched webserver. Regardless of whether you do it automatically or manually, just remember the only wrong way to do patching is to not do it at all!
Step 9 (optional): Final VNC setup for WSJT-X
We made it, all the webserver stuff is done, and we can run our fun FT8 ham radio app on the iPad via VNC! Installing WSJT-X is a breeze in Ubuntu, it’s simply “apt-get install wsjt”. The only problem is our Raspberry Pi needs a monitor plugged into it for VNC to work. Chances are you’re going to run the Raspberry Pi “headless” in the ham shack with no keyboard or mouse attached, so we need to edit a config file to enable VNC without a monitor present.
Pull the microSD card from the Raspberry Pi and put it back in the computer you used to image it. On the boot partition, edit the pi4 section of the config.txt file to include the following (feel free to change the resolution depending on the model of your device, you may need to do some trial and error to find what works best)
framebuffer_width=1280
framebuffer_height=1024
hdmi_force_hotplug=1
hdmi_group=2
hdmi_mode=82
Big thanks to the folks over at https://indilib.org/forum/general/8994-headless-ubuntu-on-raspberry-pi.html for figuring out the above headless VNC trick. You’re not really supposed to edit that config.txt file, but for some reason that was the missing link for me.
Boot the Pi back up without a monitor attached, and VNC should be good to go, allowing you to WSJT-X away! Set the VNC client to use the lowest possible quality since WSJT-X doesn’t do anything crazy when it comes to graphics. Depending on how you have the sound card setup for FT8, you might want to do a “apt-get install pavucontrol” to fine-tune the audio inputs & outputs more than you can in the Ubuntu 20.04 settings. Fortunately, the audio settings are no different on the Raspberry Pi then they would be on a regular Ubuntu 20.04 desktop, so there’s plenty of google results that can help you solve any WSJT-X audio issues.
Conclusion
The above 9 steps will make for an extra fun Raspberry Pi homelab, but there’s a lot more I could be doing to secure & maintain this installation. Here’s a couple ideas I have to make things better, but many of them would be a sizable amount of time (and possibly $$$) to properly implement. If you have any improvements you think I should add to this list, let me know on Twitter or in the comments! Who knows, maybe I’ll come back and do some of the following someday:
- Implement TOTP authentication for SSH access (if you want to expose your Raspberry Pi’s SSH to the internet, which may be a questionable idea).
- Setup an IDS to better protect inbound traffic into your home network
- Automate the Cloudflare source IP address firewalld config to ensure any updates to Cloudflare’s IP range is detected
- Put the Raspberry Pi in a dedicated DMZ instead of just chilling on my LAN with other home devices
- Do some flavor of Apache Guacamole so we can access WSJT-X from any web browser, anywhere in the world
You’ve reached the end of the post! Click here to go back to the list of all Homelab posts.
I am all in with the small board computer (SBC) wave and thanks for the link to thepibay.org.
I read your post and from 2000m the entire effort doesn’t seem terrible at all. Maybe checkout the Pi Dramble cluster at
https://www.google.com/search?client=firefox-b-1-d&q=dramble+cluster
Thanks Noah!!! Really appreciate the feedback. I’m hoping the supply chain crisis gets better soon so I can get enough Pi4s to do something similar someday, that dramble cluster is such a cool way to get a beginner interested in docker + K8s