
First Posted 12/23/2023
My webhosting provider said my credit card on-file is expiring, and needs to be updated within 7 days. This got me thinking: since our new home’s internet is very reliable, why don’t I stop paying the hosting bill and run it on my underutilized Orange Pi 5 via a Cloudflare Tunnel? Better yet, I can do it on Debian 12 (aka Bookworm) and not have to worry about the OS going end-of-life until 2028! Sure enough, it only took about 3 hours for me to get everything migrated & squeaky clean, so given today is Dec 23, I’m going to call it a Festivus Miracle. Although this took way more time & effort than updating my credit card with the hosting provider, I’m now saving about $5 a month on this hobby site, so figured I’d write up this post for anyone interested in doing the same.
Before you read further, I want to make it abundantly clear that running your own WordPress install at home isn’t a good idea for most people, even with all the awesomeness of Cloudflare & single-board computers. The security & reliability problems associated with running things from your home’s internet service are serious.
Now that being said, this website is truly just a hobby and I don’t mind the care + feeding of self-hosting as I want an extra always-on computer for running SDR things. For my use-case, the home server is sensible, but maybe don’t try this at home unless you’re ok with constantly doing sysadmin tasks. WordPress performance on the Orange Pi 5 feels good enough for loading this blog’s content in a timely manner, and there’s plenty of CPU cores for running GQRX + WSJTX for monitoring some ham radio fun in the background too:

Step 1: Get Debian Bullseye on the Orange Pi 5, perform basic hardening, basic WordPress install
OrangePi‘s website isn’t always the easiest to navigate for operating systems since they have so many different boards with so many different flavors of chips to support. The OrangePi5 OS I chose was the Bookworm desktop one under the “Debian Image” link in the Official Images section (yes, I chose desktop because I want the GUI & PulseAudio stuff installed for SDR fun). After imaging my microSD card, I went ahead and changed the passwords for all users. Unlike the last time I ran WordPress from home on an SBC, there’s no need to harden firewalld because Cloudflare Tunnel takes that burden off your plate!
After a quick apt-get upgrade & apt-get update, go ahead and follow Rose Hosting’s awesome guide on installing the latest WordPress into Debian 12. Kudos to them for writing such excellent & easy-to-follow instructions, I was very pleasantly surprised at how easy they’ve made the proper LAMP stack install.
Step 2: Restore WordPress backup
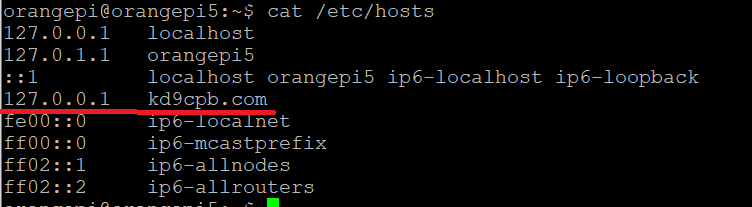
I use UpdraftPlus to backup my site into Google Drive, so natrually that was my first choice for restoring my blog onto the new machine. This worked tremendously well; I only had one small hiccup when restoring the database where a slightly different encoding was required during migration (old hosted server was utf8, new is utf8mb4). Although this probably isn’t best practice, I ended up putting the domain name in the /etc/hosts file as 127.0.0.1 to ensure I wouldn’t have issues getting into wp-admin after the restore:
Step 3: Get your domain into Cloudflare & setup Origin Certificates
I decided to transfer the entire kd9cpb.com domain into Cloudflare, which not only makes my hosting renewal cheaper, but greatly simplifies all the work I needed to do for getting Cloudflare Tunnel to work. Fortunately there’s fantastic documentation for this built-in to Cloudflare’s transfer process.
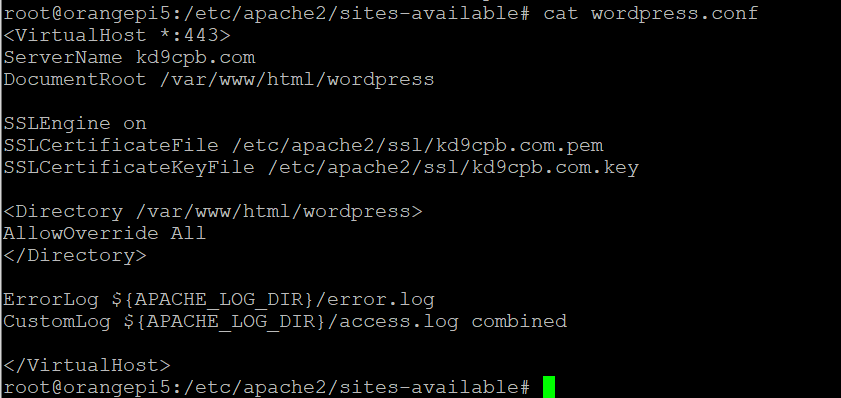
Next I followed this fantastic guide from ScriptsTown on getting the Cloudflare Origin Certificates setup. I deviated slightly on the wordpress.conf file in /etc/apache2/sites-available to only listen on HTTPS under ServerName kd9cpb.com. My thinking is I might run other domains off this setup someday, and the https://developers.cloudflare.com/ssl/edge-certificates/additional-options/always-use-https/ option works well, so might as well keep the Apache config as simple as possible:
Step 4: Verify the WordPress site runs locally, bring up Cloudflare Tunnel
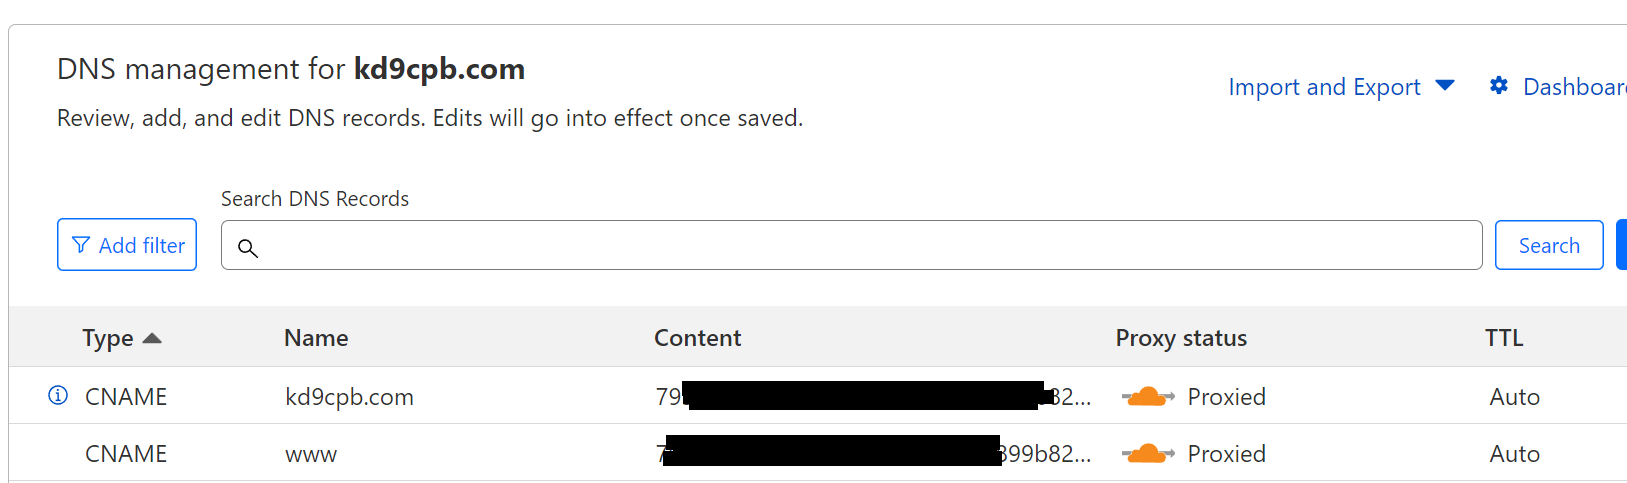
Ensure the WordPress site works on the local OrangePi5 web browser (in my case I can simply hit https://kd9cpb.com due to the host file band-aid in step 2), and proceed to follow Cloudflare’s guidance on creating the tunnel. I had to delete my existing A and AAAA records for kd9cpb.com for allowing the CNAME records (for both kd9cpb.com and www.kd9cpb.com) to be created, then followed their instructions to install as a service. You can then validate the tunnel UUID is present in the site’s DNS settings within Cloudflare Dashboard, and with luck the WordPress install is back alive on the real internet!
Step 5: Setup other services & WSJT-X
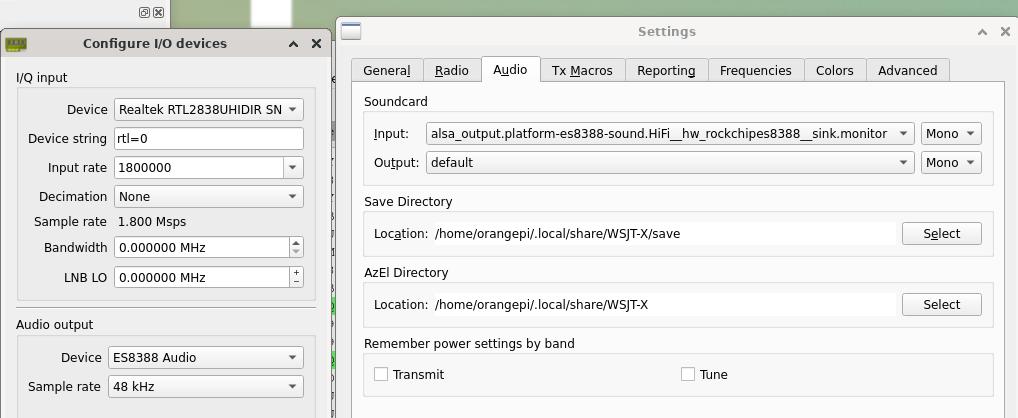
Just because WordPress is fully restored and protected behind Cloudflare doesn’t quite mean we’re done yet! You will still want to ensure tools like Wordfence are working as expected, setup automatic OS + WordPress updates and migrate to Cloudflare Email Routing if desired. Since the Orange Pi 5 octo-core processor has plenty of power for decoding digital ham radio traffic, I went ahead and got WSJT-X with GQRX running simply with “apt-get install gqrx-sdr && apt-get install wsjtx”. After changing the audio device to “ES8388” as shown below, I was decoding FT8 traffic in no time, which makes this machine that runs 24/7 so much more interesting:
Conclusion
This is arguably one of the lowest effort posts I’ve had on kd9cpb.com in quite some time, but when googling my way through the Debian 12 WordPress + Cloudflare Tunnel setup steps, I didn’t see any similar content, hence why I’m clicking Publish on this piece today 🙂 While a free Cloudflare account won’t solve all your problems hosting a website in the 2020s, it sure does solve many of them. In the past, I was never a fan of things like load balancers, web application firewalls & whatnot because they always seemed to make troubleshooting the network more difficult than necessary. I must say that Cloudflare Tunnel has completely changed my opinion; it just works with reliability and greatly simplifies running a web server from almost anywhere.
Everything you see here can likely be done on a Raspberry Pi 5 as well, although I believe the Orange Pi 5’s processor might be just beefier enough to make a noticeable performance impact. If you do the above on Raspberry Pi 5, please let me know in the comments or on Twitter, I’d love to hear how it goes.
I have zero regrets about buying my Orange Pi 5 earlier this year, it’s been fun to play with and exceeded my performance expectations. However, as the Raspberry Pi 5 becomes more available, that platform feels like the better mouse-trap for some (yet not all) use-cases where the extra horsepower is a large factor. There’s nothing wrong with Orange Pi’s Debian Bookworm image, but I was a bit disappointed to see them using Google Drive to distribute it along with http://repo.huaweicloud.com/debian bookworm/ as the main apt-get repo configured. Raspberry Pi OS’s official images feel far more polished, so I think I’ll be sticking with them as the Pi5 stock improves. Anyhow, regardless of whether your Pi5 is Orange flavored or Raspberry flavored, the point is to learn & have fun, and I hope this post results in both!
You’ve reached the end of the post! Click here to go back to the list of all Homelab posts.
You should also know I use Amazon Affiliate links to defray the cost of otherwise ad-free webhosting