
First Posted 3/5/2021, updated 7/18/2021
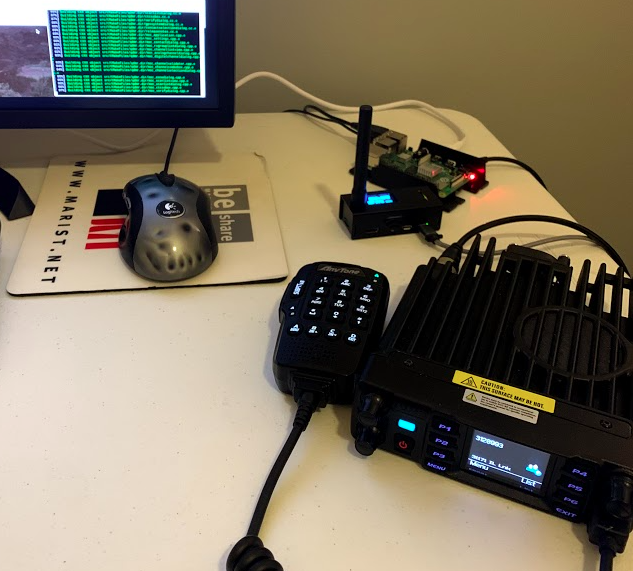
Welcome to the fourth installation of the Linux for Hams series of posts! Earlier this year, I wrote quite a bit about how I’m a big fan of the Anytone 578 radio, but I’m not as pleased with the Windows-only Customer Programming Software (CPS) provided by low-cost DMR radio manufacturers such as Anytone. I got really excited when I heard about qdmr as an Anytone radio programming alternative on Linux this spring, but at the time it didn’t support my Anytone 578 model. Thanks to a brilliant idea from qdmr’s creator Hannes Matuschek DM3MAT, he was able to add support for the Anytone 578 this summer, along with a few other models too. Definitely check his website for the latest compatibility list, there’s a good chance your low-cost DMR radio will work with qdmr!
May 2024 edit: Most of the stuff here is still valid, but with the new Raspberry Pi 5 and Debian Bookworm-based Linux distros, things might be slightly different. These writeups will not be getting revised, check out YouTube & other blogs if you need something more current!
I’m very happy to be one of the first testers of qdmr’s Anytone 578 support: this radio programming tool is much better written than the CPS application included from Anytone in my opinion, and I’m not just saying that because I prefer open source 🙂 I love being able to edit my DMR codeplugs via Raspberry Pi instead of a Windows computer, and I’m sure you will too! If you’re using AntiX Linux 19 (or similar Debian-based Linux) on an old machine instead of a Raspberry Pi, the highlighted text within this article will show you a few minor differences.
Make sure you have working internet on your Linux machine by firing up a web browser and surfing some websites before proceeding; if you’re struggling to get internet definitely check out the techsupport subreddit for troubleshooting ideas.
Step 1: Update your Anytone radio to a recent firmware (I used v1.13 on my 578)
Before we get to the main event of installing qdmr, it’s important to have your radio running a somewhat recent firmware to match the versions that have been tested with qdmr. In the case of my Anytone 578, this is firmware version 1.13. You’ll have to get the firmware update from whoever you purchased the radio from (Here’s the link to Bridgecom Systems) or directly from Anytone. Keep in mind it’s impossible for the qdmr contributors to test every combination of firmware and radio in existence, so your mileage may vary using an Anytone 578 firmware that’s either newer or older than v1.13.
As of this writing, the only way to do the firmware update is via the Anytone CPS app. It is possible to use a Virtual Machine to pull this off, so check out my previous Anytone 578 post if that’s something you would like to try. If you or someone you know has successfully done a firmware upgrade straight from Linux, please let me know and I’d love to share how it’s done here.
Step 2: Install qdmr
We’ll be following the steps from the qdmr readme file to install from scratch, I’ll break it down step by step here for those less familiar with Linux. If you’re well versed in Linux, check out DM3MAT’s install guide as you might be able to install a bit faster using his personal package archive. On your Linux machine, open up a terminal window by clicking the Terminal button in the upper left of the screen:

(AntiX users: Click on Favorite Applications icon in bottom left corner, Terminal should be at the very top of the menu)
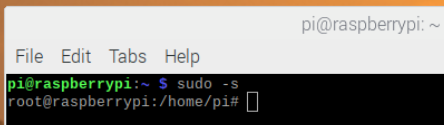
Start off by typing the command “sudo -s” without the quotes, then press enter. Although this isn’t the best security practice, it will allow us to ensure we have proper rights to install qdmr. You may be prompted for your password depending on your security settings. This will result in seeing “root@(your computer’s name)” in the terminal window:
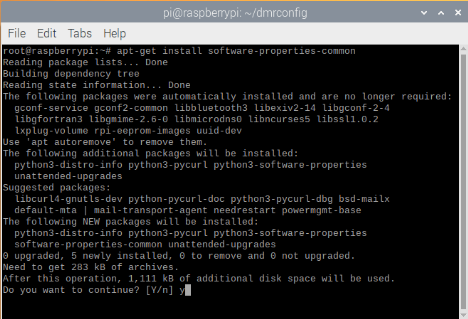
If you haven’t done so already, run the commands “apt-get update” and “apt-get upgrade” to ensure you have the latest updates to software repositories. Next, type in “apt-get install build-essential git cmake” without the quotes into the terminal window, press enter. This will install install the first batch of dependencies for qdmr. You’ll be asked if you want to continue installation, type y and press enter once more:
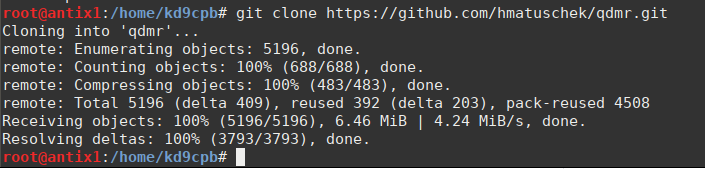
Once that first batch of dependencies, get the second batch of dependencies going with “apt-get install libusb-1.0-0-dev qtbase5-dev qttools5-dev qttools5-dev-tools qtpositioning5-dev libqt5serialport5-dev libyaml-cpp-dev”, press enter, press Y when prompted, and wait until you get the command prompt again. Next run “git clone https://github.com/hmatuschek/qdmr.git” and press enter to download the file containing all the qdmr code:
Type “cd qdmr” and enter so we can get into the newly created directory, then “mkdir build” and enter to create a build directory. Next, type “cd build”, press enter, and run “cmake .. -DCMAKE_INSTALL_PREFIX=/usr/”

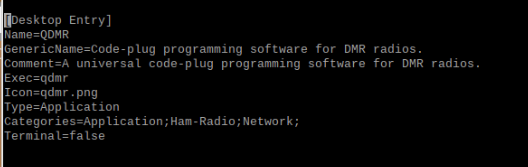
Press enter, type “make”, press enter again. You might get a few warnings in the output from make, this is ok. Next, type “make install”, press enter. Some of these make commands will take a good 5-15 min while the code compiles (I know the output of this looks like cryptic, but it’s taking the source code and making it a super fast executable file specifically for your computer’s processor). Once make completes, you should have a working copy of qdmr installed on your machine! But we’re not quite done yet, fire up “nano /usr/share/applications/qdmr.desktop” plus enter to edit the shortcut. The Categories= line needs to have Application; in front of it in order to show up in the Raspberry Pi applications menu. Make that change so it looks like the following:
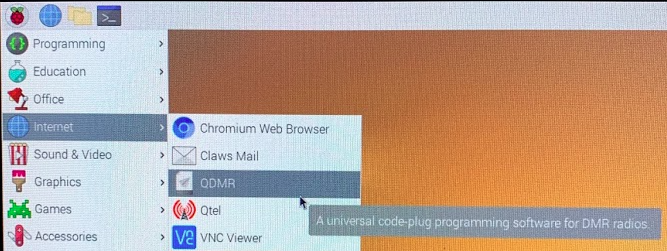
Hold down Ctrl + X to exit nano, press y to save. Reboot the Pi so that the desktop manager refreshes, then you should see qdmr in the application menu!
(AntiX users: You’ll need to make a desktop application shortcut like the one in the CHIRP guide, using the text from the above qdmr screenshot in the file.)
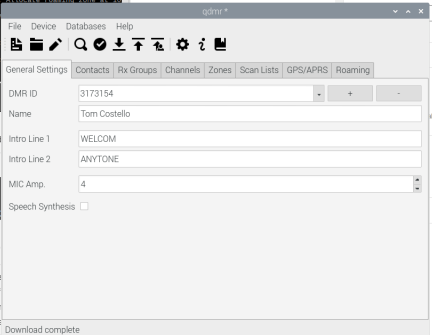
Open up qdmr, plug in your radio via USB, and click download from the devices menu. If everything went well, you should see the codeplug currently present on the radio appear for editing in qdmr’s general settings:
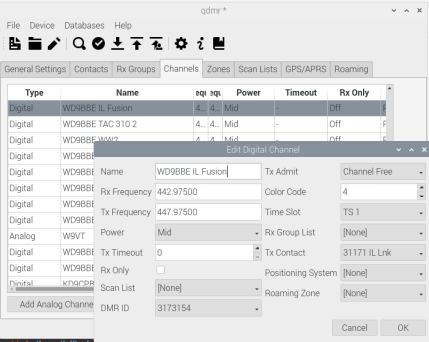
Now that the codeplug is loaded into qdmr, you can edit all the radio’s settings to your desire per Haanes’ manual explaining all of qdmr’s functionality. I won’t be deep-diving into creating or editing a codeplug as his manual is very well written. I will however share a quick screenshot of me playing with the codeplug I use to get on the Chicagoland Control Center’s WD9BBE repeater for Illinois Link Talk Group 31171:
If you’ve spent any amount of time in that Windows-only CPS application included from the low-cost DMR radio vendors, I think you will quickly agree with me that the user experience Hannes created in qdmr is much better looking and more sensible than what’s included with the radio. If you’ve never worked with a DMR codeplug before, I would suggest watching quite a few YouTube videos or reading other blogs before getting too frustrated by all the DMR terminology. Setting up a DMR codeplug, an MMDVM hotspot, and all of the other “nerd knobs” that go with it can be overwhelming at first, but with enough persistence, you’ll be getting QSOs around the world via the DMR network of your choosing in no time!
Gigantic thanks to DM3MAT for commenting on this post back in Spring 2021 and spending the time to support more radios. If it wasn’t for his efforts, qdmr would not exist, and it certainly wouldn’t work on my Anytone 578. Thanks for reading, and happy DMRing!
You’ve reached the end of the post! Click here to go back to the list of all Ham Radio posts.
You should also know I may earn commissions on qualifying Amazon purchases made via kd9cpb.com links to defray the cost of otherwise ad-free web hosting.
Dear Tom,
tanks for featuring my little software project in your blog. Yes, the Anytone 578 is not yet supported. In fact it will be hard to support it unless I can get one in my hands to test any implementation. However, even the support for 878UV is still not really ready yet. There is a development branch for the 878UV called “d878uv” with the most recent version of the 878 support.
The binary code-plug format within the device is pretty hard to reverse engineer: The elements are spread over several MB, and some related elements are not stored together. E.g., zone lists and zone names are located in two totally different memory locations. If you have fun crawling down this rabbit hole, have a look at the current state of my reverse engineering (https://dm3mat.darc.de/qdmr/libdmrconf/class_d878_u_v_codeplug.html).
Again, thanks for featuring qdmr.
P.S.: I’ll have a look at the .desktop file issue. It may very well be a mistake on my side.
P.P.S.: I don’t know AntiX Linux but it appears to be based around Debian. Hence you may be able to use the Ubuntu binary packages at my PPA (https://launchpad.net/~hmatuschek/+archive/ubuntu/ppa).
Thanks so much for the kind words DM3MAT! I feel honored to have open source amateur radio coding royalty such as yourself commenting on this site! Keep doing all that awesome stuff you’re doing on Github, hopefully I’ll be more helpful in that part of the ham radio community someday. Will definitely give your PPA another look soon. 73, Tom KD9CPB
I have a dangerous idea concerning the AnyTone 578: I frequently read that this device is “just” a 878 with a PA and that the codeplugs are compatible (does not necessarily imply that the memory representation within the device is identical). However, in my D878UV development branch (https://github.com/hmatuschek/qdmr/tree/d878uv) I added a command-line option to the CLI tool (dmrconf) to force radio detection.
That is, the communication interfaces of the 578 and 878 are identical (otherwise I would not be able to detect that it is a 578). This option only overrides the type-check and handles any AnyTone device as a 878.
In a first step I would suggest that you try to download and decode the codeplug from the 578. This is harmless as we do not write to the device. In worst case we receive garbage.
So, first get the development version from the d878uv branch and compile it. Then call
$ dmrconf read –radio=d878uv codeplug-578.dfu
this will read the codeplug in binary format as it is stored in the device. You may then try to decode it with
$ dmrconf decode –radio=d878uv codeplug-578.dfu codeplug-decoded.conf
If this works fine, triple check whether the decoded codeplug matches the config written to the device. If it matches, the likelihood of identical memory representations for both radios is very high and I might be able to get it running without owning one.
Feel free to contact me via mail.
Best,
Hannes, DM3MAT
This doesn’t appear to work anymore as you can’t get past compiling as it is looking for a program called yaml-cpp that doesn’t appear to be on any Raspberry Pi repos. Any ideas?
Thanks for letting me know Brian! Can you try “apt-get install libyaml-cpp-dev” and let me know if that makes it any better?
Right now I’m running Ubuntu 18.04 on my main ham radio Raspberry Pi, I’ll re-install Raspberry Pi OS in a few days and poke around further if that libyaml-cpp-dev package doesn’t do the trick
73,
Tom
i am tryuing to program a radioddty gd-77 and for what ever reason QDMR will not find my radio. i tried to follow the instructions in the post but to no avail. i get this error when following instructions
— – Includes: /usr/include/libusb-1.0
— – Libraries: /usr/lib/x86_64-linux-gnu/libusb-1.0.so
CMake Error at cmake/FindYAMLCPP.cmake:52 (message):
Could not find yaml-cpp
Call Stack (most recent call first):
CMakeLists.txt:21 (find_package)
— Configuring incomplete, errors occurred!
See also “/home/cooper/qdmr/build/qdmr/build/CMakeFiles/CMakeOutput.log”.
root@cooper:/home/cooper/qdmr/build/qdmr/build#
Could you try again after running “sudo apt-get install libyaml-cpp-dev“? Please let me know how it goes!
73,
Tom
Hi Guys;
I am trying to program a TYT MD-UV380 and for what ever reason QDMR will not find my radio.
No known radio detected. Check connection?
Error:
Hi KP3AV,
I took a look at https://dm3mat.darc.de/qdmr/#version, appears version 0.9.0-alpha3 is the first that added MD-UV380 support. Can you make sure you’re running at least that version or higher? If so, I’d recommend hitting up DM3MAT via email per his https://dm3mat.darc.de/contact.html page. Wish I could help further but I don’t own any TYT radios 🙁
73,
Tom KD9CPB
With newer versions of QDMR you need to be a member of the “dialout” group to have raw access to the USB devices. This is part of the cleanup I needed to do for getting the software into the Debian repo.
You can check your group memberships with ‘groups’ on the command line. I’ve also updated the install instructions accordingly at https://dm3mat.darc.de/qdmr/install.html#rights
You might want to consider making the yaml-cpp project a submodule to your git project
For windows builds especially, (where there is no apt-get), adding libyaml requires a bunch more work
I’m running Raspberry Pi Bullseye and all commands seem to work without problems until the final command “make .. -DCMAKE _INSTALL_PREFIX=/usr/” give the following error:
CMake Error at CMakeLists.txt:15 (find_package):
By not providing “FindQt5Core.cmake” in CMAKE_MODULE_PATH this project has
asked CMake to find a package configuration file provided by “Qt5Core”, but
CMake did not find one.
Could not find a package configuration file provided by “Qt5Core” with any
of the following names:
Qt5CoreConfig.cmake
qt5core-config.cmake
Add the installation prefix of “Qt5Core” to CMAKE_PREFIX_PATH or set
“Qt5Core_DIR” to a directory containing one of the above files. If
“Qt5Core” provides a separate development package or SDK, be sure it has
been installed.
— Configuring incomplete, errors occurred!
See also “/home/pi/qdmr/build/CMakeFiles/CMakeOutput.log”.
Does this suggest that I may have to revert to the previous Raspbian version
Hi MOIZL!
Great question, I don’t have a Raspberry Pi Bullseye setup handy, but I did find https://askubuntu.com/questions/374755/what-package-do-i-need-to-build-a-qt-5-cmake-application which seems to indicate “sudo apt install qtbase5-dev” might fix this. Could you give that a shot and let me know what happens? If that’s not the fix I’ll try to get a Bullseye Pi going soon, it’s a busy summer over here 🙂
73,
Tom
KD9CPB
Reverted to the legacy version of raspberry pi Raspbian and all the commands now work without errors. After reboot the QDMR appears in the Network tab but when I press this all that happens is the hour glass timer appears for about 20 seconds and nothing happens.
I do not have a DMR radio yet and wanted to see if the qdmr software works.
Do I need a supported DMR radio plugged in and switched on before selecting DMR from the menu?
Hi Tom,
Thanks for the suggestion.
I have been in touch with the ham radio maintainers at Debian and I believe qdmr will be supported in next stable Debian release (it’s in trial at the moment) see:
https://packages.debian.org/bookworm/qdmr
Not sure if qdmr and its dependencies will be a complete package or it will need to be built from source with all its dependencies.
73,
Clive
M0IZL
Wow, that’s great stuff, excellent work! I’ll be sure to check in on that link every now and then. If qdmr does make a package archive like that, I’ll definitely clean up this post to reflect the easier install
73, Tom
TODAY I followed all steps to install QDMR. All went as expected, very nice. I was able to detect and read from Anytone 868 & Open GD77, view & save the existing codeplugs.
Question : Even though Anytone 578 mobile is listed as supported, I was NOT ABLE to have QDMR detect this radio ??? Also My RETEVIS ( Alias MD380) with TY tools also did not get detected. These two (not detected devices), with same cables, still work with original manufactures CPS spftware.
Very happy to get this far using a RPI4 installed in the RASPAD with 10″ touch screen. Interested in using this on all my 4 radios. Just learning to navigate more with Linux – Twister OS. Having fun!!!
Any suggestions / comments on the future updates to QDMR.
Vic
VE3JAR
Thanks Victor! Have you tried running qdmr as root just to see if there’s any universe where it’s a permissions issue? Also lsusb can be your friend; there were a few times when I had to use a different USB mini cable on my Anytone 578 for no apparent reason. Hope you have better luck soon, you’re so close!
Thanks Tom for your support and interest. I did try different cables and same result ” Canot connect ” but the radio 578 does reboot when detect is applied.
I did go to terminal ———–
pi@raspberrypi:~ $ sudo su
root@raspberrypi:/home/pi# qdmr
this did bring up the Qdmr menusand settings page. when cable is attacted to radio 578 the latest new version and pressess detect more lines scroll on the terminal
Debug in radio.cc@55: Try to detect radio at Serial interface ‘ttyACM0’.
Debug in usbserial.cc@90: Try to open Serial interface ‘ttyACM0’.
Debug in usbserial.cc@124: Opened serial port ttyACM0 with 115200baud.
Debug in anytone_interface.cc@306: Anytone: In program-mode now.
Debug in anytone_interface.cc@335: Found radio ‘D578UV2’, version ‘V100’.
ERROR in anytone_interface.cc@156: Unsupported AnyTone radio ‘D578UV2’.
Debug in anytone_interface.cc@355: Anytone: Left program-mode.
Debug in usbserial.cc@155: Serial port will close now.
The radio reboots.
Could it be possible that the NEW AnyTone AT-D578UVIII PLUS Tri-Band Amateur DMR Mobile Radio is not yet supported??
Vic
Hi Victor,
Thanks for sending that over, I think you’re right, seems like qdmr doesn’t like that D578UV2 device type. Honestly I didn’t know they made a slightly different Anytone 578 model, this is good to know and I’m glad others will see your comment here!
I think you have two things that might work: either ping Hannes DM3MAT over at https://dm3mat.darc.de/contact.html to see if he might be able to include that specific device ID in the next qdmr release, or try the trick he posted in the March 13, 2021 at 4:51 pm comment above to force detection of an older 578 model. That forced detection trick could be dangerous though, try at your own risk, I am not responsible for any broken radios 🙂
73,
Tom KD9CPB
Thanks Tom ……as suggested an email has been sent to DM3MAT Hannes.
See what his suggestion and or comments are ….
Vic
A quick reply back from Hannes DM3MAT.
He is aware that D578uv(V2) is slightly different, and he will work on this is issue when time is available. Watch for future UPDATES !
73 Thanks Vic closing this thread!
Hi,
I have been a happy user of qdmr on Linux Mint Mate (ver 20.3). I recently installed Linux Mint Debian Edition 5 on a laptop to try it out. The only app that I could not get to work was qdmr; I just couldn’t install it with the ubuntu oriented methods. I installed the snap store and discovered that “yes, the snap version doesn’t work”.
So, I got brave and tried your “build from scratch” method, leaving out the last steps for adding the app to the menu system. LMDE5 was smart enough to have added the app to its menu system!
The app works perfectly!
Now I feel brave enough to install LMDE5 on 2 other PCs! I’d be glad to send you a log of the terminal session associated with the build and install – if you want it.
Bob Hickman – N2FKW