
First Posted 10/3/2021
After finally taking the plunge into DMR, I was fascinated with the ability to use my mobile transceiver and WD9BBE’s repeater here in Chicago to make QSOs from afar via the Brandmeister network. The ability to log contacts from overseas with only my technician license was exhilarating! However, once DMR stations come in with garbled audio due to internet connectivity issues, the exhilaration often turns into frustration quickly.
To access more DMR talkgroups at home, I purchased a cheap Raspberry Pi based Multimode Digital Voice Modem (MMDVM) hotspot shown below, often known as a “DMR jumbospot” or simply hotspot:
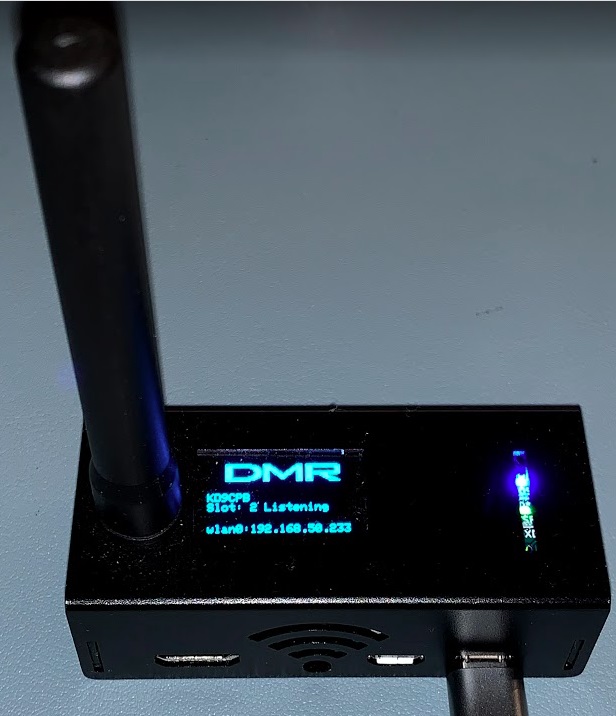
This hotspot converts the UHF DMR traffic on my transceiver into MMVDM traffic over the internet, and troubleshooting this poor quality traffic over the internet may get very complicated very quickly.
Wouldn’t it be great if there was an SWR meter equivalent for the internet protocol traffic coming out of this DMR jumbospot? Although it’s quite a bit more complicated than an SWR meter, an open-source software tool known as Wireshark can help us see exactly what’s going on between the internet and the hotspot. Thanks to this tool, we can see the Bit Error Rate and other information that might be useful when tinkering with the hotspot’s location between your WiFi access point and radio.
You will need to have a rough understanding of either computer networking or the Linux operating system to capture traffic with Wireshark at home. There’s many YouTube tutorials about these topics available for free, or if you know any IT professionals with the CCNA certification, they will most likely be able to assist you. There’s many similarities between wireless computer networking and ham radio, if you find an IT professional willing to help you with Wireshark, I’d be willing to bet you can talk them into getting a ham radio license too!
Entire books have been written about using Wireshark, and it’s not uncommon for the computer network engineers who run the internet to spend a large amount of time with this tool. Today I will show you how to get started viewing some of this MMDVM traffic between a DMR hotspot and the internet, using the features of Wireshark.
Prerequisites
- Download the latest copy of Wireshark from https://www.wireshark.org/, and run the installer
- Download 2E0SIP’s MMDVM wireshark dissector from https://raw.githubusercontent.com/marrold/MMDVM-Dissector/master/mmdvm.lua. Save this file as mmdvm.lua in C:\Program Files\Wireshark\plugins if you are on Windows, or /Applications/Wireshark.app/Contents/Resources/lib/wireshark/plugins if you are on a Mac
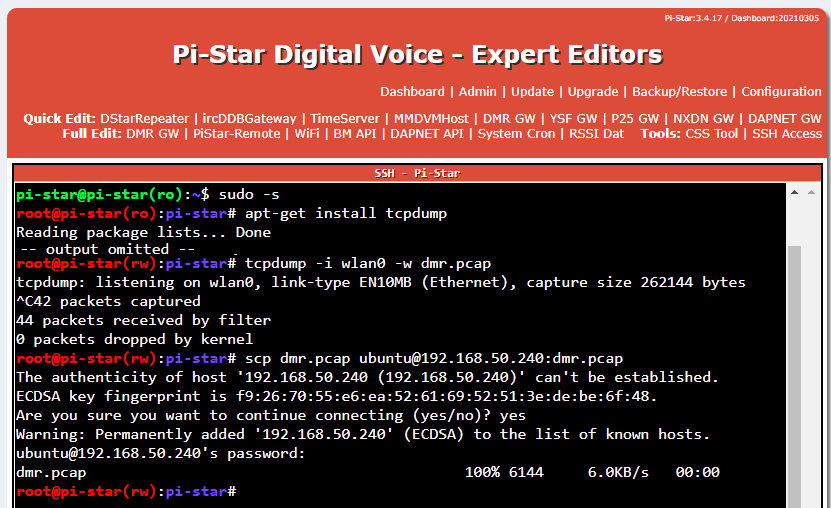
- You will need to capture internet protocol packets using either a network switch that supports Switched Port Analyzer (SPAN) mode, or directly on your hotspot using the tcpdump & Secure Copy Protocol (SCP) Linux utilities within the Pi-Star SSH console tool as shown below:

Getting the data into Wireshark
With Wireshark installed on our computer and Matthew Harrold 2E0SIP’s brilliant MMDVM dissector tool, we are finally ready to produce what’s known as a packet capture containing the digital mode radio traffic. These are files saved on your computer which represent the individual packets sent and received over the wifi or wired Ethernet. Today we will only be looking at the MMDVM packets between my DMR hotspot and Brandmeister network.
If you chose to use a network switch with SPAN capabilities to view the MMDVM traffic, plug your computer’s Ethernet port into the switch port you’ve designated as the SPAN destination. Start Wireshark, double click on your Ethernet interface to begin capturing, and leave this running while you use your hotspot. Click on the stop button in the upper right corner once you’ve gathered some data, and proceed to the next section.
If you chose to use the tcpdump & SCP utilities, simply open up the .pcap file you’ve created inside of Wireshark. The screenshot of the PiStar GUI above can be done with minimal effort if you have another Linux workstation with SCP enabled in your shack, however the intricacies of using these tools is far beyond the scope of this article. I’d recommend searching for tcpdump & scp tutorials on YouTube first if you run into issues getting the .pcap file onto your machine.
Filtering the data
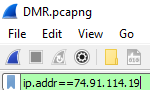
Now that we have our data available in the Wireshark interface, we need to filter out all of the computer network noise that isn’t related to the DMR hotspot. Since I only want to see traffic between myself and Brandmeister Network, I can look up the IP address of the Brandmeister server configured in my Pi-Star configuration, and only display that traffic. To do this, visit https://wiki.brandmeister.network/index.php/United_States_of_America and write down the IP address of the Brandmeister master server you’re connected to.
With your packet capture open in Wireshark, type “ip.addr==x.x.x.x” in the “Apply a display filter” box without the quotes, substituting x.x.x.x with the IP address of your Brandmeister master server. I’m using Master 3102 as shown below:
Analyzing the data
Press enter once you have filled out your display filter box, and you will be greeted with a display showing only the traffic between your hotspot and Brandmeister! If you happened to capture traffic while your hotspot was initially connecting to the server, you’ll be able to expand the packet details to see an MMDVM configuration message containing your DMR radio ID, Callsign, and much more information:
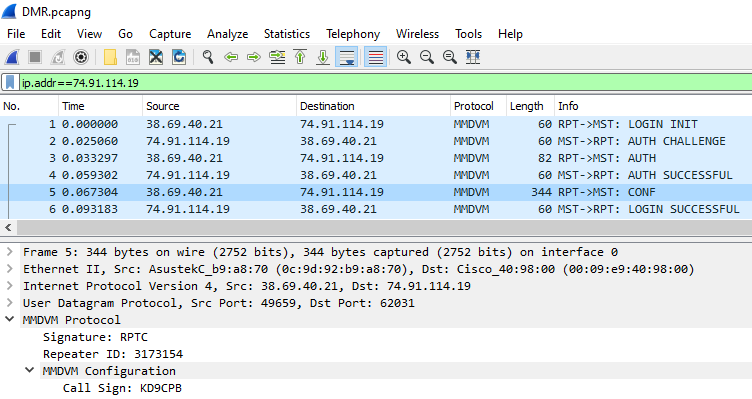
Scroll down in the packet capture output, and try to find some packets where you are transmitting onto a talkgroup (these packets will have your Radio ID and an arrow pointing towards the talkgroup in the info column). Now let’s take a look when I start transmitting DMR voice onto talkgroup 98003:
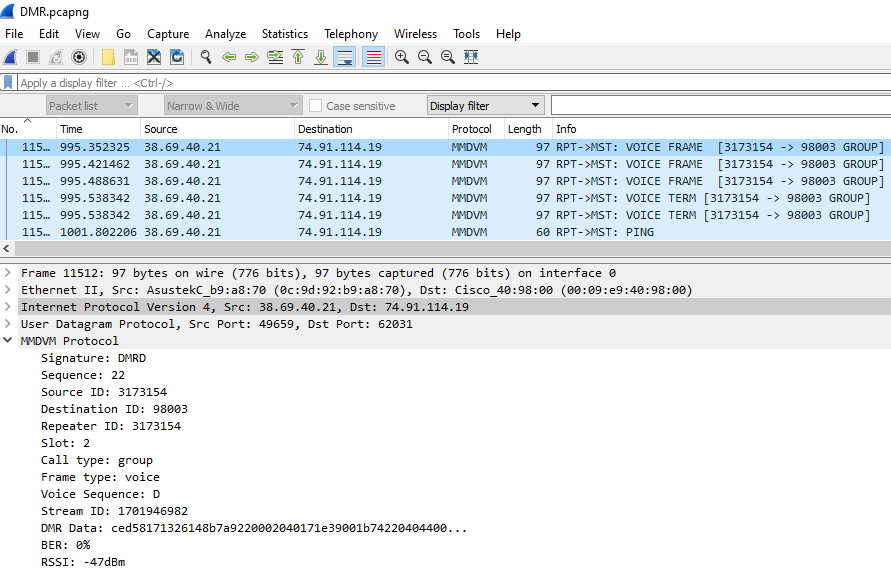
We can see some very interesting information such as my Bit Error Rate (BER), Relative Signal Strength Indicator (RSSI), DMR timeslot in use, and much more. While it sure takes a while to get familiar with Wireshark, this information can be incredibly helpful when troubleshooting, just like that trusty SWR meter we know and love.
Today we are only scratching the surface of analyzing internet protocol data such as the MMDVM traffic used by the DMR hotspot in Wireshark, but with a little practice, this tool can be used to troubleshoot all kinds of network issues. Data such as the BER and RSSI is much easier to see in the Pi-star dashboard, but it’s great to see the raw internet traffic with our own eyes in the packet capture.
One of my favorite things about looking at digital mode radio traffic in Wireshark is getting to see how much less bandwidth MMDVM uses compared to video chat applications. The filesize of capturing an hour’s worth of DMR QSOs is incredibly small. The filesize of capturing an hour’s worth of HD video chat is massive!
Conclusion
Although it’s not as straightforward as the tools we know and love to measure RF signals in our shacks, it is possible to analyze any digital mode radio traffic flowing through your home internet connection with Wireshark. This article was focused on a low-cost DMR jumbospot running Pi-Star, but the same concepts should work on other hotspots as well. Not only is Wireshark a great tool for understanding ham radio internet traffic, it’s also a fantastic way to get the next generation of hams interested in the hobby, especially those within the information technology field.
You’ve reached the end of the post! Click here to go back to the list of all Ham Radio posts.
You should also know I may earn commissions on qualifying Amazon purchases made via kd9cpb.com links to defray the cost of otherwise ad-free web hosting.
Great information. Two questions where does the lua script get added to wireshark on linux? Second, do you have any larger pcaps that you can share? I am interested in see more of the protocol and don’t have a hotspot yet.
Thanks
Thanks Jerry! I’ll get Wireshark going on one of my spare Raspberry Pi’s sometime in the next week or two so I can get you both of those things, sorry for the delay, life outside of ham radio has been keeping me busier than expected these days!
If you haven’t gotten it working yet, LUA plugins go in ~/.local/lib/wireshark/plugins/ on Linux.
Also, nice article!
73, K0HAX
Thanks Michael!