
As always, opinions in this post are solely those of my own, and not necessarily those of any organization I am currently affiliated with or have been in the past.
First posted 1/31/2021
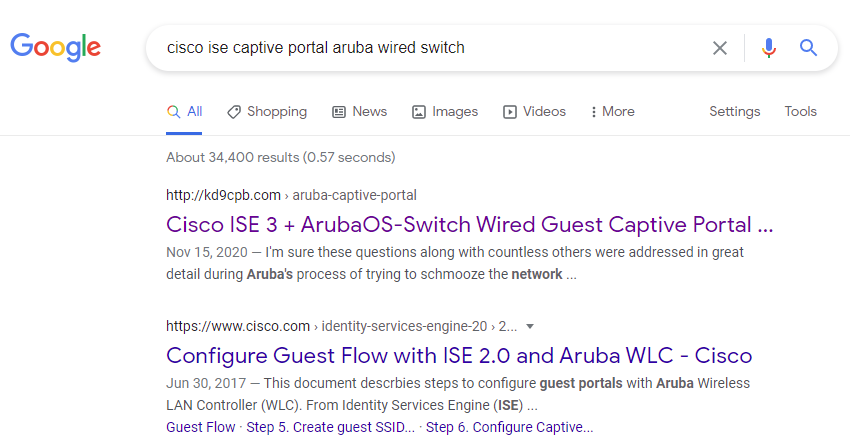
One of the main reasons I started this site last year was to create a better instruction set for those of us trying to do cool things with Cisco ISE captive portal using non-Cisco wired access layer equipment. I never thought kd9cpb.com would be a top Google search result for anything, but as of this writing, it appears I’ve pulled that off for certain ISE captive portal related search terms!
While I’m super happy about this silly Google ranking win, it’s time for me to cut the hubris and get back into the eve-ng homelab: that Cisco ISE 3 + ArubaOS-Switch (aka AOS-S) Wired Guest Captive Portal lab only works on the older Aruba switches, I want to see this working on the newer ArubaOS-CX (aka AOS-CX) models too! The purpose of this lab is to achieve the same wired guest captive portal user experience in AOS-CX as I did last year in the aforementioned AOS-S setup. Today’s focus is on wired guest captive portal, many of the steps I do below lay the foundation for getting fun 802.1x things with Cisco ISE to function on AOS-CX hardware, so hopefully the lessons learned here may be applied to future projects involving futuristic BYOD posturing things.
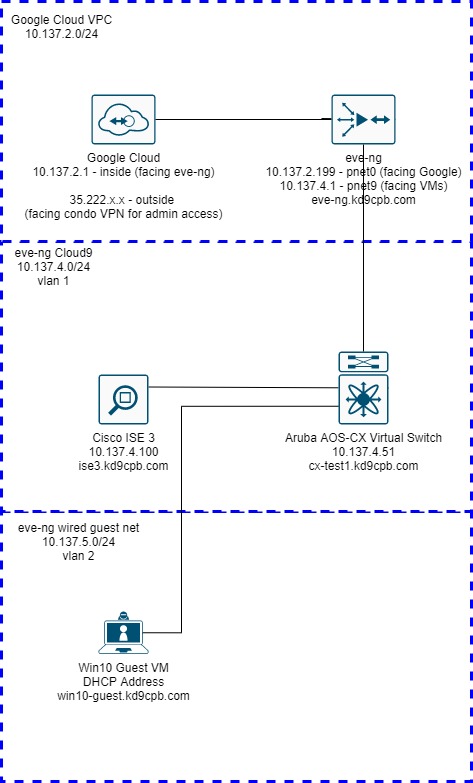
Although this wired guest captive portal might sound very simple at first, it’s actually quite involved as the new AOS-CX switches use a completely different network device profile in ISE. This is because AOS-CX is closer to the Aruba Wireless Controller OS than the old HP Procurve OS (rebranded as Aruba AOS-S). Fortunately, AOS-CX can run directly inside eve-ng, giving us a much simpler topology as I don’t need to jump through hoops getting my ISE VM in eve-ng Google Cloud talking with a physical switch here in the homelab!
Configuring ISE for AOS-CX Support
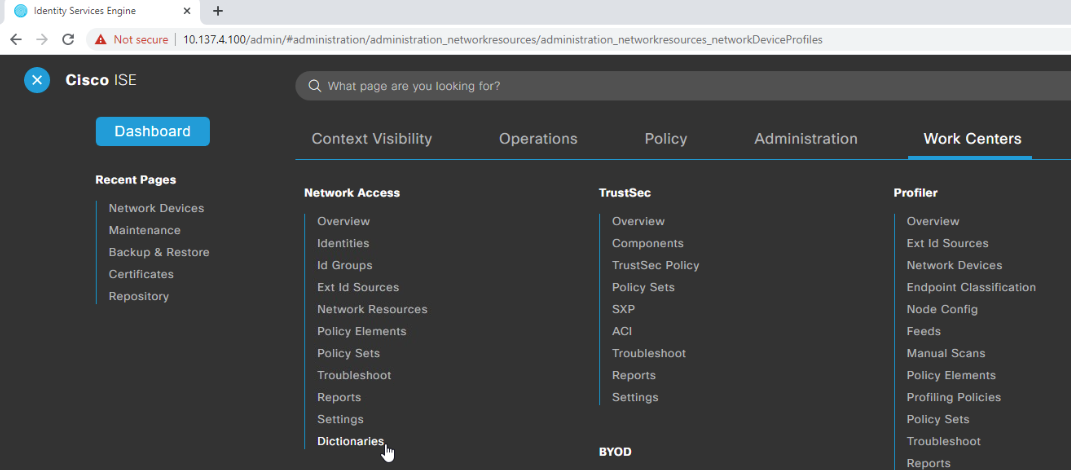
The Win10 Guest VM within eve-ng is going to be our wired guest client, and I’ll be using the VPN from my condo into the GCP eve-ng instance for admin access into everything. Our friends at Aruba Networks made a nice PDF guide on how to add AOS-CX devices into Cisco ISE, the first step of which is making a few changes to the Aruba dictionary. So let’s get the captive portal party started by opening up the ISE dashboard, head to the Work Centers menu, then select Dictionaries under the Network Access section:
Expand out the System section of the directory tree to the left of the screen, expand RADIUS Vendors, then click on Aruba. Click the Dictionary Attributes tab in the main screen section, then click Add:
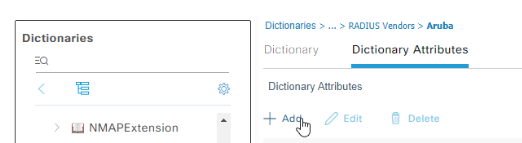
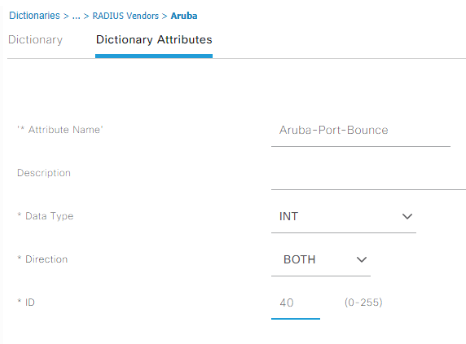
Enter an attribute name of Aruba-Port-Bounce, which will be used to send AOS-CX the command to reset the switchport after a successful authentication. Set the data type to INT, set an ID of 40, then click Submit in the bottom right:
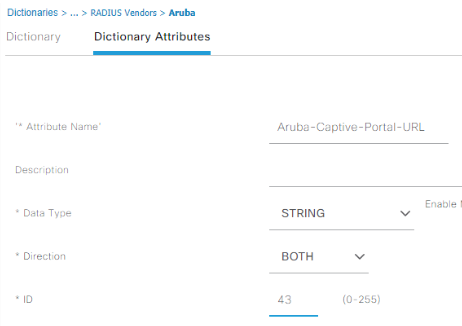
Repeat these same steps for adding another attribute of Aruba-Captive-Portal-URL, data type string, direction both, ID 43. AOS-CX is expecting this string to contain the captive portal redirect URL, so you won’t be getting very far during the testing if this gets skipped:
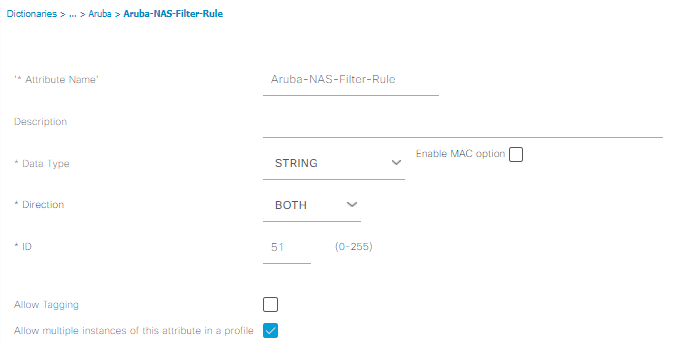
Repeat yet again for adding an attribute of Aruba-NAS-Filter-Rule, data type string, direction both, ID 51. This dictionary entry allows us to tell the AOS-CX switch what traffic to redirect into the captive portal application, something we can’t do with the vendor-neutral RADIUS NAS-Filter-Rule. Make sure you check the “Allow multiple instances box” for this one, then submit. Third time’s a charm!
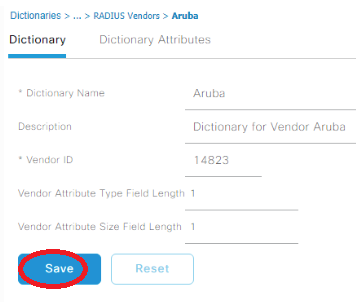
After you click Submit, you will be redirected to the Dictionary tab, go ahead and save the Aruba dictionary for good measure before we move on. I don’t think this step is necessary, but I like saving it just to be safe:
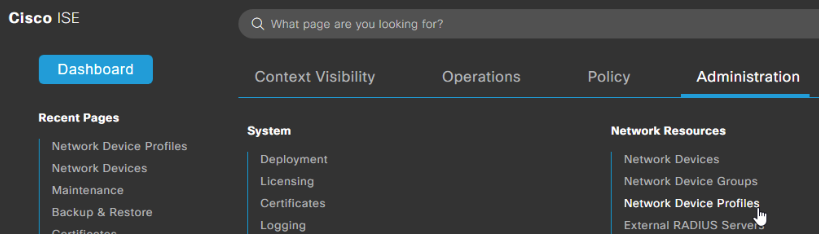
Now that we have our dictionary attributes squared away, head over to Administration -> Network Resources -> Network Device Profiles:
Select ArubaWireless, then click Duplicate.
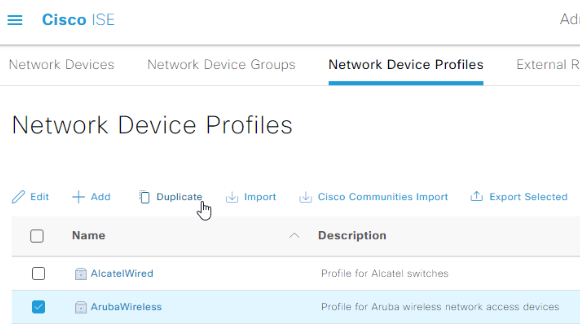
Name our duplicated profile AOS-CX, give it an appropriate description:

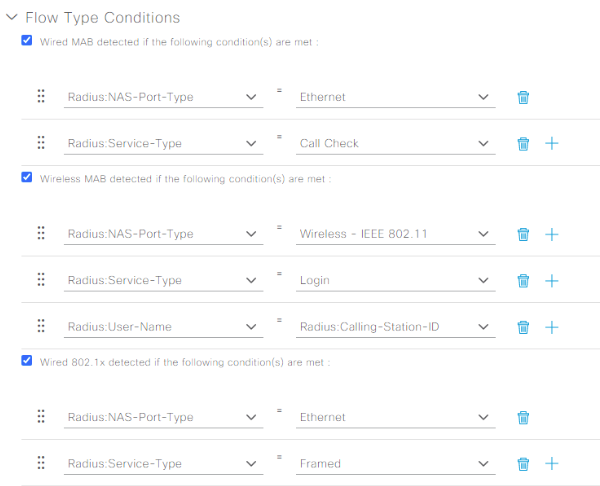
Expand the flow type conditions, and reconfigure the wired sections to look like the following:
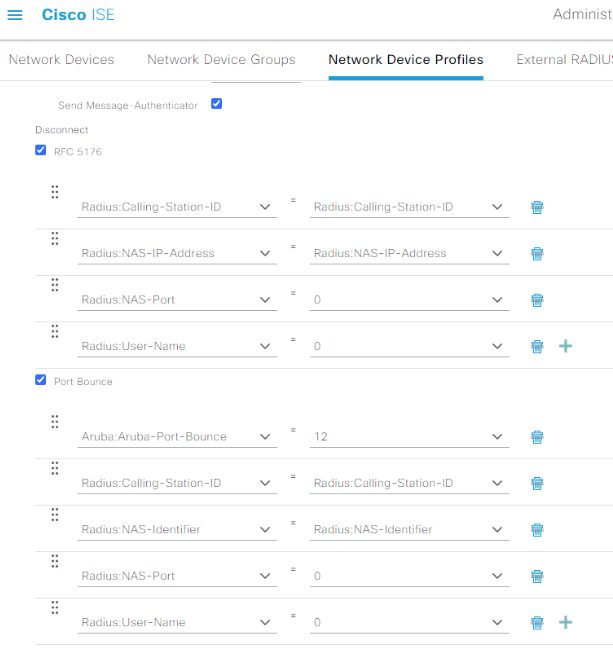
Scroll down a little to the Host Lookup (MAB) section, and ensure the CHAP box is checked. Expand out the Permissions menu, and select the IETF 802.1x Attributes radio button (while we don’t need 802.1x today, this will come in handy if more 802.1x stuff is implemented someday). Proceed to make the RFC 5176 and Port Bounce sections match the following:
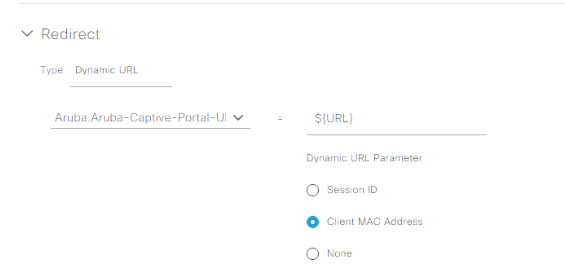
Finally, expand out the Redirect section, and change the type to Dynamic URL. Use the Aruba: Aruba-Captive-Portal-URL VSA and select the Client MAC Address Dynamic URL Parameter, then submit:
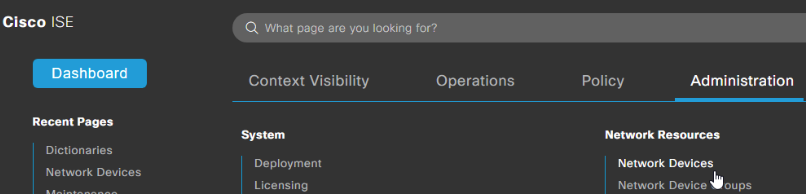
Now that we got all the initial plumbing installed for AOS-CX support in ISE, let’s head over to the Administration menu, and select Network Devices under the Network Resources menu:
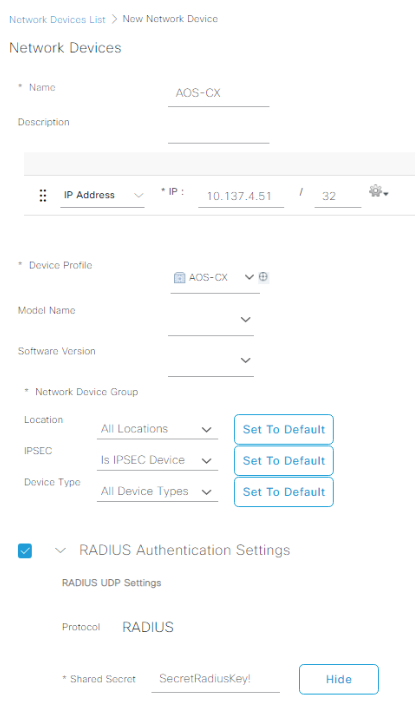
Click on that big beautiful plus sign next to the Add button once you’re at Network Devices, and add the AOS-CX switch with the newly created AOS-CX Device Profile. Make sure you check the RADIUS box and input a good shared secret, then submit:
Creating our Captive Portal Profiles & Policies
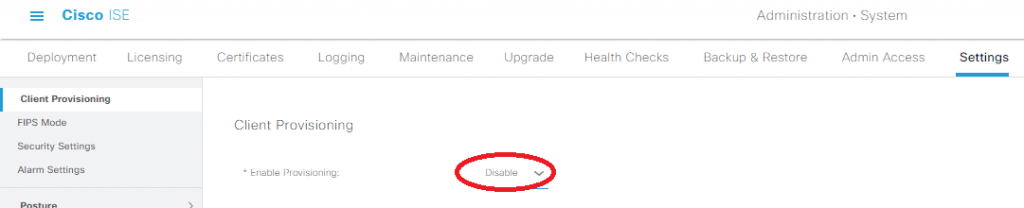
We don’t want anyone getting prompted to install the client provisioning stuff, so under Administration -> System -> Settings -> Client Provisioning, change Enable Provisioning to Disable:
Now it’s time to setup two Authorization Profiles that will properly handle the captive portal behavior for unauthenticated guests, and allow those who pass our portal full access. Head over to Policy menu in the dashboard, then select Results under the Policy Elements section:
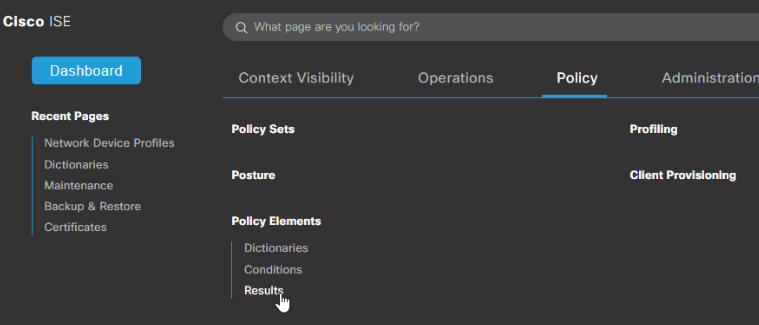
Expand out the Authorization section, and select Authorization Profiles:

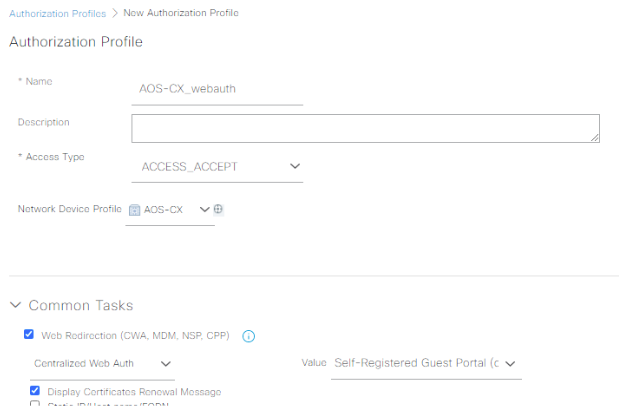
Add a new profile named AOS-CX_webauth, select the AOS-CX Network Device Profile, and check the Web Redirection box. Pick the Self-Registered Guest Portal Value:
Now we must conquer the most manual-labor intensive part of the lab: creating the DACL to redirect web traffic while blocking everything else in the Advanced Attributes Settings. Here’s what I’m using in my setup, it will take you a lot of mouseclicks and typing, but the end result is worth it:
Aruba-NAS-Filter-Rule = cp-redirect in tcp from any to any 443
Aruba-NAS-Filter-Rule = cp-redirect in tcp from any to any 80
NAS-Filter-Rule = permit in udp from any to any 67
NAS-Filter-Rule = permit in udp from any to any 68
NAS-Filter-Rule = permit in udp from any to any 53
NAS-Filter-Rule = permit in icmp from any to any
NAS-Filter-Rule = permit in tcp from any to 10.137.4.100 80
NAS-Filter-Rule = permit in tcp from any to 10.137.4.100 443
NAS-Filter-Rule = permit in tcp from any to 10.137.4.100 8443
NAS-Filter-Rule = deny in ip from any to any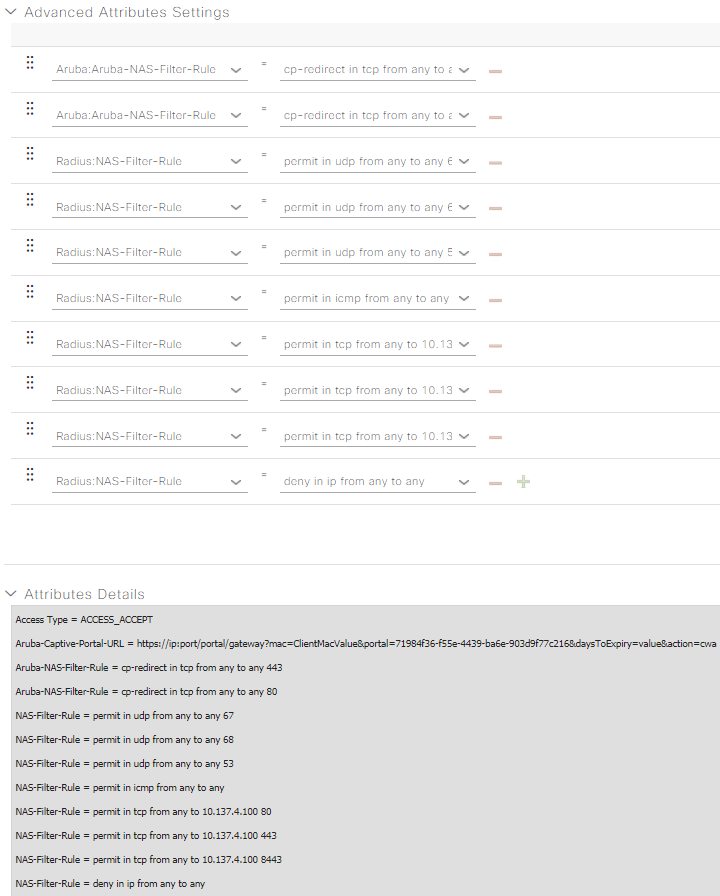
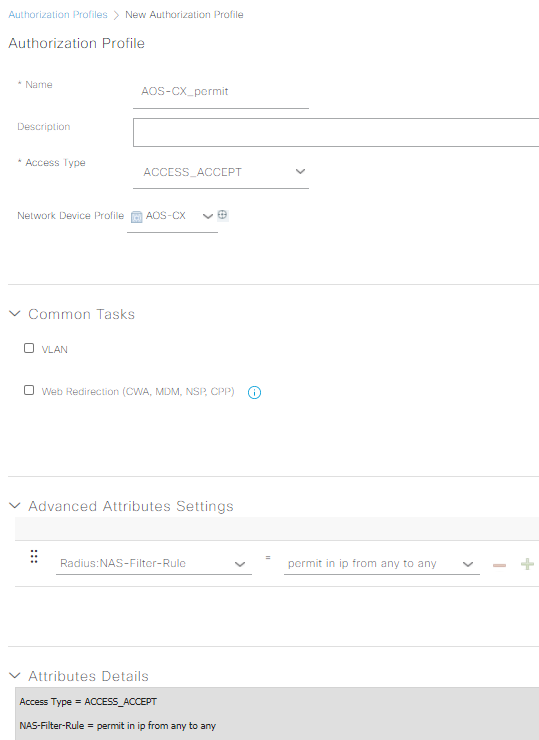
Submit your AOS-CX_webauth profile, then make another one named AOS-CX_permit. Choose the AOS-CX device profile, and just make a single Raduis: NAS-Filter-Rule attribute of “permit in ip from any to any” without the quotes, then submit:
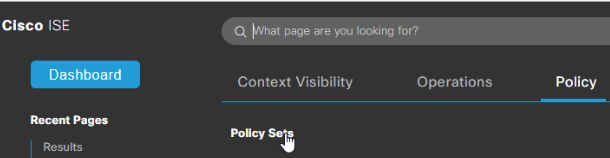
We’ve almost climbed to the top of the ISE configuration mountain! Now all we need to do is build the Policy Set that ties together all of the configuration we’ve been working so hard on. Head over to the Policy menu, then click on Policy Sets:
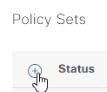
Click on the Plus circle thing next to Policy Sets to create a new one:
I’m going to fly through creating the policy sets; if you need a bit more guidance on what’s going on, Ctrl +F for “Policy Sets” at the AOS-S captive portal homelab, Katherine’s Network-Node.com ISE labs, or better yet her new book at Cisco Press! That being said, name your new policy set AOS-CX Wired Guest, have the conditions match a Network Device Profile of AOS-CX, set the allowed protocols to default, then save:

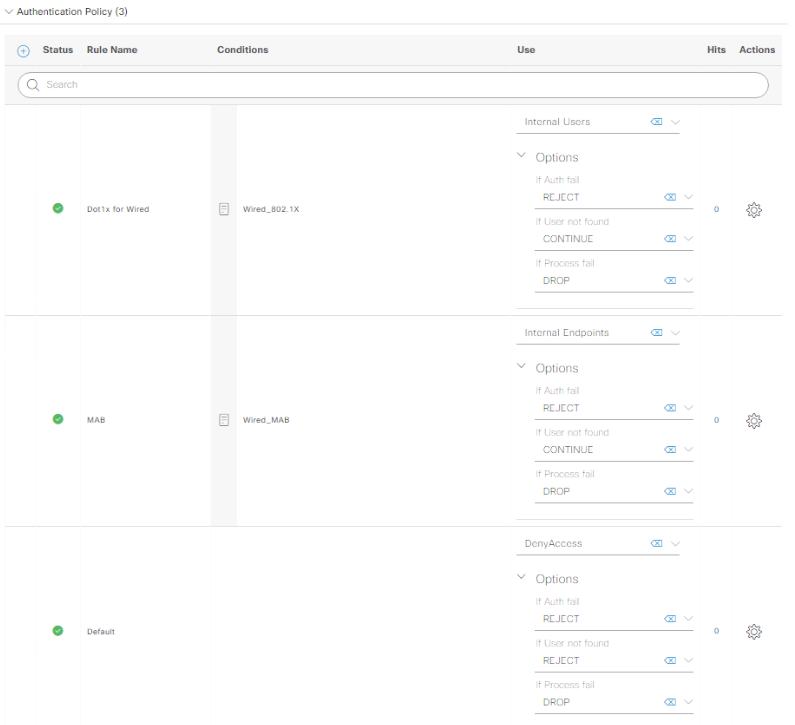
Click on that little blue arrow to view the whole policy, and build one that has an AuthC policy like the following:
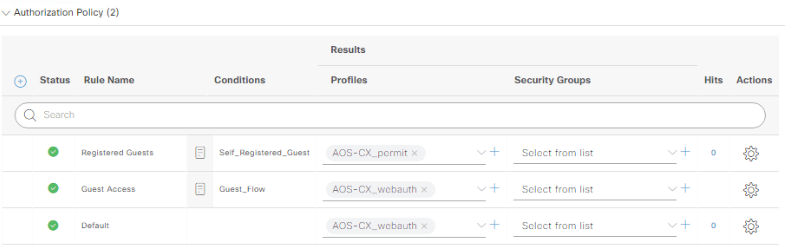
Now get the AuthZ policy looking like this, again looking at the AOS-S captive portal lab if you get stuck, save the policy once you’re done:
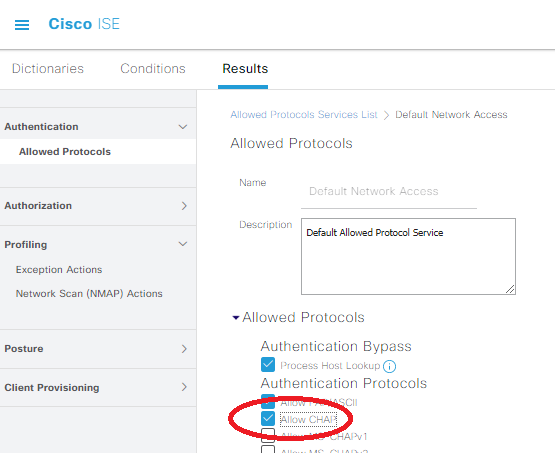
Make sure you’re allowing CHAP in the Allowed Protocols by heading to Policy -> Policy Elements -> Results. Underneath the Authentication drop-down on left side of the screen, click on Default Network Access:
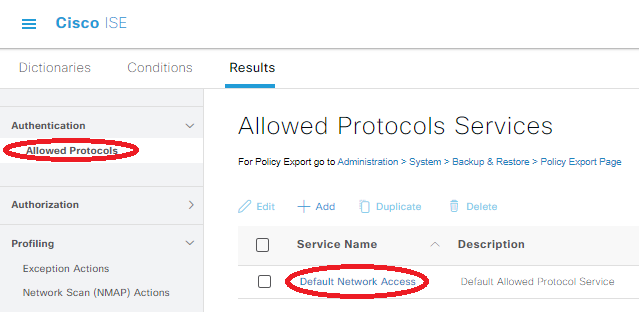
Check the “Allow CHAP” box, which will ensure AOS-CX can talk with the ISE server using its default RADIUS settings, then save the config (this might already be checked if you’ve already been doing ISE things with Aruba gear).
Login to the ISE CLI. Because I’m using the AOS-CX virtual switch in eve-ng as a layer 3 switch for my wired guest, I need to add a static route towards that guest network. In the real world, I’d have a properly configured path to the internet, but I’m going to be lazy with static routes for this lab. To add the static route on ISE via the AOS-CX switch, throw the following into the global config (conf t) mode in the ISE CLI:
ip route 10.137.5.0 255.255.255.0 gateway 10.137.4.51Configuring AOS-CX to get along well with ISE
Alrighty, we’re finally done with all the ISE side of things, now it’s time to get the initial config squared away on the AOS-CX switch. Here’s the base config I’m using, and it’s also available at the GitHub folder for this lab too:
hostname cx-test1
user admin group administrators password (omitted)
!
radius-server host 10.137.4.100 key plaintext SecretRadiusKey!
radius dyn-authorization enable
radius dyn-authorization client 10.137.4.100 time-window 65535 secret-key plaintext SecretRadiusKey!
!
ssh server vrf default
ssh server vrf mgmt
!
vlan 1-2
spanning-tree mode rpvst
spanning-tree vlan 1,2
!
aaa authentication port-access dot1x authenticator
    enable
aaa authentication port-access mac-auth
    addr-format multi-dash-uppercase
    enable
interface 1/1/1
    no shutdown
    description to_wired_guest
    no routing
    vlan access 2
interface 1/1/2
    no shutdown
    description to_ise
    no routing
    vlan access 1
interface 1/1/3
    no shutdown
    description to_outside_world
    no routing
    vlan access 1
interface vlan 1
    ip address 10.137.4.51/24
interface vlan 2
    ip address 10.137.5.1/24
!
ip route 0.0.0.0/0 10.137.4.1
ip dns domain-name kd9cpb.com
!
https-server vrf default
https-server vrf mgmt
dhcp-server vrf default
    pool default-pool
        range 10.137.5.10 10.137.5.100
        default-router 10.137.5.1
        dns-server 10.139.146.200
        domain-name kd9cpb.com
        lease 12:00:00
        exit
    no authoritative
    enable
Before we get too carried away with testing our wired guest captive portal, make sure our wired guest machine on port 1 is able to get a good DHCP address from the AOS-CX switch, without any of the security commands applied on port 1. This way if we’re having a basic connectivity issue, we’ll know it’s not anything to do with the ISE side of things. I like pulling up the HTTPS management page of the AOS-CX switch to make sure connectivity is good all the way up the stack:

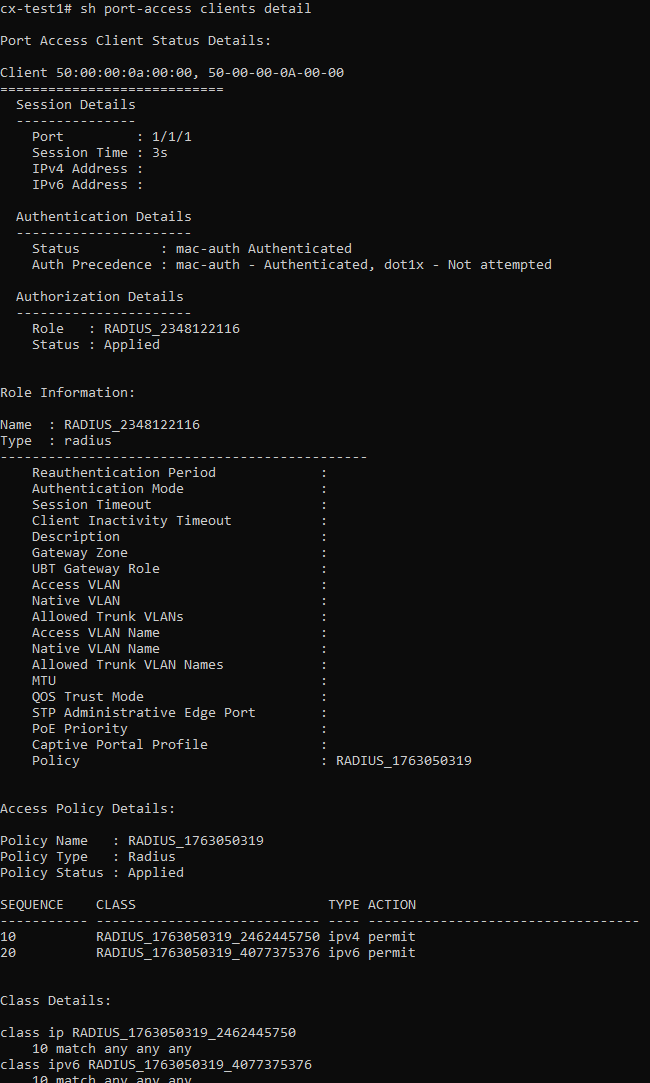
Now that we know basic connectivity is there, let’s toss on the following config on the port going towards our wired guest client. If all goes well, we should see our DACL get applied to the port (validated with “show port-access clients detail on AOS-CX) and traffic towards our switch’s management interface of 10.137.4.51 should now be redirected towards the ISE captive portal:
interface 1/1/1
aaa authentication port-access auth-precedence mac-auth dot1x
aaa authentication port-access client-limit 1
aaa authentication port-access mac-auth
enable
Testing the Cisco ISE + AOS-CX Captive Portal
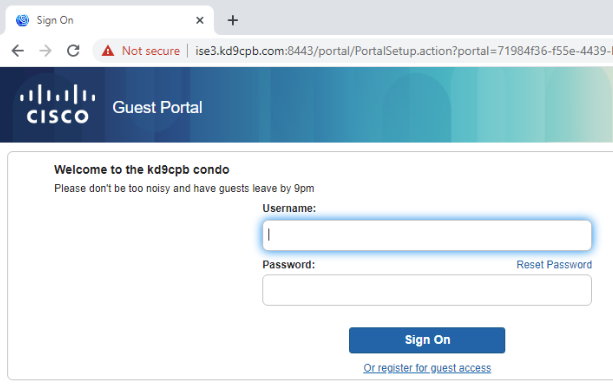
Reload that web browser on the wired guest, and you should now see the captive portal page! Note that if you don’t have working DNS, you’ll need to hack an entry for the ISE server into the Windows machine’s hosts file:
cx-test1# sh port-access clients detail

Port Access Client Status Details:

Client 50:00:00:0a:00:00, 50-00-00-0A-00-00
============================
  Session Details
  ---------------
    Port         : 1/1/1
    Session Time : 3s
    IPv4 Address :
    IPv6 Address :

  Authentication Details
  ----------------------
    Status          : mac-auth Authenticated
    Auth Precedence : mac-auth - Authenticated, dot1x - Not attempted

  Authorization Details
  ----------------------
    Role   : RADIUS_839709875
    Status : Applied


Role Information:

Name  : RADIUS_839709875
Type  : radius
----------------------------------------------
    Reauthentication Period             :
    Authentication Mode                 :
    Session Timeout                     :
    Client Inactivity Timeout           :
    Description                         :
    Gateway Zone                        :
    UBT Gateway Role                    :
    Access VLAN                         :
    Native VLAN                         :
    Allowed Trunk VLANs                 :
    Access VLAN Name                    :
    Native VLAN Name                    :
    Allowed Trunk VLAN Names            :
    MTU                                 :
    QOS Trust Mode                      :
    STP Administrative Edge Port        :
    PoE Priority                        :
    Captive Portal Profile              : RADIUS_839709875
    Policy                              : RADIUS_3731691628


Captive Portal Profile Configuration

    Name                            : RADIUS_839709875
    Type                            : radius
    URL                             : https://ise3.kd9cpb.com:8443/portal/gateway?mac=50-00-00-0A-00-00&portal=71984f36-f55e-4439-ba6e-903d9f77c216&action=cwa&token=aa15b852daa5fe8f12e33dff16d3bde6


Access Policy Details:

Policy Name   : RADIUS_3731691628
Policy Type   : Radius
Policy Status : Applied

SEQUENCE    CLASS                        TYPE ACTION
----------- ---------------------------- ---- ----------------------------------
10          RADIUS_3731691628_670050973  ipv4 redirect captive-portal
20          RADIUS_3731691628_1659008729 ipv6 redirect captive-portal
30          RADIUS_3731691628_1816475554 ipv4 permit
40          RADIUS_3731691628_1777456154 ipv6 permit
50          RADIUS_3731691628_2374322327 ipv4 permit
60          RADIUS_3731691628_1030226461 ipv4 drop
70          RADIUS_3731691628_2275373891 ipv6 drop


Class Details:

class ip RADIUS_3731691628_670050973
    10 match tcp any any eq 443
    20 match tcp any any eq 80
class ipv6 RADIUS_3731691628_1659008729
    10 match tcp any any eq 443
    20 match tcp any any eq 80
class ip RADIUS_3731691628_1816475554
    10 match udp any any eq 67
    20 match udp any any eq 68
    30 match udp any any eq 53
    40 match icmp any any
class ipv6 RADIUS_3731691628_1777456154
    10 match udp any any eq 67
    20 match udp any any eq 68
    30 match udp any any eq 53
    40 match icmp any any
class ip RADIUS_3731691628_2374322327
    10 match tcp any 10.137.4.100 eq 80
    20 match tcp any 10.137.4.100 eq 443
    30 match tcp any 10.137.4.100 eq 8443
class ip RADIUS_3731691628_1030226461
    10 match any any any
class ipv6 RADIUS_3731691628_2275373891
    10 match any any any
Seeing that output on AOS-CX and the captive portal within our guest machine’s browser is exactly what we’re hoping to see! Once you successfully pass the captive portal, you may need to manually shut/no shut the port on the AOS-CX virtual switch. If you were on a physical switch, the RADIUS CoA magic would eliminate the need for this, but things are tricky in virtual eve-ng environments (especially since AOS-CX virtual is for training purposes only). After I bounced the port, we got a really good looking result for our wired guest with full access!
Troubleshooting
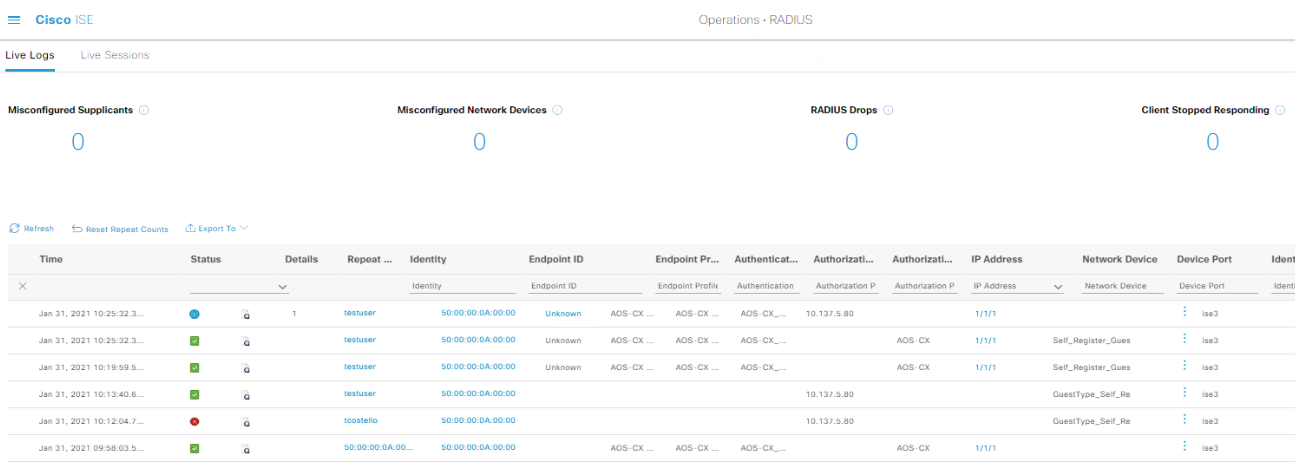
If you don’t get this far, don’t worry, the ISE Live Logs are your friend. Every Authentication Detail report provides clues to where the problem is occurring, and with enough googling & TAC cases, anything is possible. You’ll notice in my live logs that I tried to login with another ISE credential just for fun and got denied, the logs don’t lie!
But what if I’m having some other issue and this isn’t working? Don’t worry; when I first started doing similar guest network things, I had multiple TAC tickets open with multiple vendors! If you run into problems and have Cisco/Aruba/etc support, I highly recommend engaging the vendors as troubleshooting RADIUS can be like finding a needle in a haystack. Lucky for you, TAC has an electromagnet to help you find the needle. If you don’t have support, that’s perfectly fine, you’ll just be spending quite a bit of time digging into the following:
- Deep dive into that RADIUS Live Log output, especially in the authentication detail reports. These are incredibly helpful in determining if ISE is sending the switch good data, or if ISE might be sending the switch garbage. It can be painful to google-through some of the nasty looking auth detail reports, and it’s grueling to flip through one of the many books on Cisco ISE,. Between that and forums like Cisco Communities + Aruba Airheads, you might get lucky and formulate a fix!
- As with many network troubleshooting situations, packet capture is your best friend. Using whatever tool you’re most comfortable with, capture traffic as close as you can to the ISE server, and setup another capture as close as you can to the switch. If you see a packet on one side and not the other, quadruple check all your firewalls and layer 3 stuff to ensure it’s not a misconfiguration upstream. You can also dig really deep into the RADIUS packets themselves, but that’s beyond the scope of this post.
- While this hasn’t burned me in the eve-ng homelab because everything generally is synced to the eve-ng system clock, when you’re using real equipment, it’s not uncommon to have problems due to misconfigured timezone or date settings. Try pointing everything to the same NTP server and checking timezone settings before diving too deep into anything else if you’re stuck.
- Debug commands on the switch are also helpful. “debug radius all” and “debug captiveportal all” in particular can be very informative along with the switch’s syslog.
I hope all of this captive portal fun is helpful in your quest to build better networks. Let me know in the comments if you end up using this info to build something cool!
2 thoughts on “Cisco ISE 3 + ArubaOS-CX Wired Guest Captive Portal”
Comments are closed.