
As always, opinions in this post are solely those of my own, and not necessarily those of any organization I am currently affiliated with or have been in the past.
First posted 11/14/2020
There’s been some recent news about a certain five-sided building adopting Aruba infrastructure that really caught got my attention and had me asking many questions: Can these Aruba rebadged HP Procurve campus switches really do all the fancy security stuff Cisco IOS switches do? Is it a big pain to pull that off? How about if you’re into Cisco ISE and won’t do Clearpass? I’m sure these questions along with countless others were addressed in great detail during Aruba’s process of trying to schmooze the network engineers running the world’s largest office building, but we’ll never know any of those fine details due to very good national security reasons.
Fortunately for us, Aruba has written up some nice network security wisdom within a PDF Guide walking us through some cool stuff with Cisco ISE Web Auth Captive Portal! This allows us to do some awesome things like assign which vlan a user gets placed onto based off their identity, display Acceptable Use Policies before internet access is granted, and allow those with good Active Directory accounts to have more access than a self-registered guest. It’s also the first step towards getting really secure, really complicated 802.1x with ISE Profiling configurations to work.
Sadly in order to follow their PDF guide for use with ISE Captive Portal, you’ll have to make quite a few additional config steps not mentioned in the PDF, and it’s not written for ISE 3, which is why I decided to spend time writing up this lab. If you find yourself saving a lot of time thanks to these steps, please share and let me know in the comments!
For this lab, let’s pretend I’ve leased out my condo to 8 college students majoring in network security. They all want wired connections to the internet for their personal computers. To reduce the legal responsibility I’m taking on by having these 8 students access my internet, I want them to agree to an acceptable use policy delivered by ISE captive portal. I’ll give them ports on an Aruba 2920 switch I just picked up on eBay to pull this off, using the Cisco ISE 3 server in my eve-ng GCP instance.
I’m not going to cover wireless captive portal setup as there’s a zillion guides & labs already out on the internet for that. Wired guest captive portals are far less common these days, but they’re still very much necessary in college dorms, hotels, conference centers, and anywhere else that needs to support guests that require wired access for whatever the reason. Unlike wireless controllers that can do cool SDNish things on the network, wired captive portals require the use of 802.1x or MAC Authentication Bypass (MAB) to pull this off using vendor-agnostic protocols such as RADIUS. If you’re newer to captive portals and/or RADIUS servers, I’d highly recommend checking out the Syngress book about ISE as the first chapters are a fantastic primer to the fundamentals behind these AAA topics. Sadly the book is written for ISE 1.x, so the later chapters are not very relevant, but those fundamentals rarely change!
Update 3/1/2021: I can now recommend the latest ISE Certification book from Cisco too, but that old Syngress book still has one of the best intros to AAA
The big picture

This topology builds upon the initial setup with the big addition being the guest clients & guest switch in the condo. The lion’s share of the lab is going to be on the Aruba 2920 in the condo, the Cisco ISE 3 VM in GCP eve-ng instance, and a few small changes on the condo ASA. Sadly this config will only work on ArubaOS-Switch, you need to follow the steps at my ArubaOS-CX post for that. ArubaOS-Switch devices are basically anything that used to be known as HP Procurve (2920/2930/3810/etc). I would highly recommend installing whatever the most recent firmware available to you would be; there’s been a ton of bug fixes related to RADIUS over the years, and I’d hate to see anyone waste their time on an issue which is solved with a software upgrade.
You’ll find all the initial & final configs at the github folder. Although it’s not in the official topology, I’m using an old Ubiquiti Nanostation loco M5 as a wireless bridge between the ASA Firewall & Aruba switch so I can get connectivity into vlan1 on my desktop computer in the living room. It all looks pretty good in the second bedroom though, I just wish I had shorter cables to clean it up a bit better!

Creating the guest vlan
Let’s get started by creating a new vlan on the Aruba switch for our guest network, and a new interface on the ASA to keep the guests on a separate network. After we get the following lines in, we should be able to plug any of our guest machines into vlan 2 on the Aruba switch, browse the web, but no access to anything on vlan 1:
On the ASA:
interface GigabitEthernet0/2
 nameif guest
 security-level 99
 ip address 10.202.11.1 255.255.255.0
 no shut
 !
 nat (guest,outside) after-auto source dynamic any interface
!
dhcpd address 10.202.11.10-10.202.11.50 guest
dhcpd dns 8.8.8.8 4.4.2.2 interface guest
dhcpd enable guest
On the Aruba 2920:
vlan 2
   name "GUEST"
   untagged 2,12-24
   ip address 10.202.11.2 255.255.255.0
   exit
After plugging a Cat5 cable between port 2 on the ASA and port 2 on the Aruba switch, we can now plug in our guest computers into ports 12-24 and internet away! This guest network can’t access vlan 1 in the condo, and there’s no route to the guest network from Google Cloud, effectively giving us some decent network segmentation. We’ll eventually fix the routing to GCP so wired guests can communicate with the ISE server, but we have quite a bit of prep work to complete on the Aruba switch and ISE first.
ArubaOS-Switch AAA config rough-in with Aruba PDF
Now that we know basic internet connectivity is good on the guest vlan, it’s time to open up that Aruba PDF Guide and start plugging away on the intial commands necessary to get the switch talking with ISE. We’re effectively doing pages 2 and 3 of Aruba’s PDF for now, except I’m removing some of the 802.1x config and replacing “CLEARPASS-WEB” with “ISE-WEB” since we’re being ISE cold here 🙂
On the Aruba 2920:
radius-server host 10.137.4.100 dyn-authorization
radius-server host 10.137.4.100 time-window 0
radius-server key RidiculousRadiusKey2020!!
!
aaa port-access mac-based 12-24
aaa authentication port-access eap-radius
aaa authentication captive-portal enable
aaa authorization user-role enable
!
class ipv4 "DNS"
10 match udp 0.0.0.0 255.255.255.255 0.0.0.0 255.255.255.255 eq 53
exit
class ipv4 "DHCP"
10 match udp 0.0.0.0 255.255.255.255 0.0.0.0 255.255.255.255 eq 67
exit
class ipv4 "WEB-TRAFFIC"
10 match tcp 0.0.0.0 255.255.255.255 0.0.0.0 255.255.255.255 eq 80
20 match tcp 0.0.0.0 255.255.255.255 0.0.0.0 255.255.255.255 eq 443
exit
class ipv4 "ISE-WEB"
30 match tcp 0.0.0.0 255.255.255.255 10.137.4.100 0.0.0.0 eq 80
40 match tcp 0.0.0.0 255.255.255.255 10.137.4.100 0.0.0.0 eq 443
50 match tcp 0.0.0.0 255.255.255.255 10.137.4.100 0.0.0.0 eq 8443
policy user "ISE-REDIRECT"
10 class ipv4 "DNS" action permit
20 class ipv4 "DHCP" action permit
30 class ipv4 "ISE-WEB" action permit
40 class ipv4 "WEB-TRAFFIC" action redirect captive-portal
!
aaa authorization user-role name "ISE-CAP-PORTAL"
captive-portal-profile "use-radius-vsa"
policy "ISE-REDIRECT"
Exit
!
class ipv4 "BLOCK_INTERNAL"
10 match ip 0.0.0.0 255.255.255.255 10.0.0.0 0.255.255.255
20 match ip 0.0.0.0 255.255.255.255 192.168.0.0 0.0.255.255
30 match ip 0.0.0.0 255.255.255.255 172.16.0.0 0.15.255.255
Exit
class ipv4 "GUEST_ACCESS"
40 match ip 0.0.0.0 255.255.255.255 0.0.0.0 255.255.255.255
Exit
policy user "GUEST_ACCESS"
10 class ipv4 "BLOCK_INTERNAL" action deny
20 class ipv4 "GUEST_ACCESS" action permit
Exit
!
aaa authorization user-role name "Guest_Access"
policy "GUEST_ACCESS"
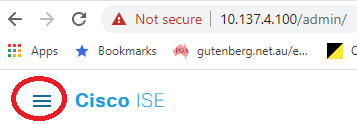
ExitNext head over to the Cisco ISE 3 WebGUI, click on the 3 lines to the left of the ISE logo, click on the Work Centers menu, and select Dictionaries under the Network Access submenu:
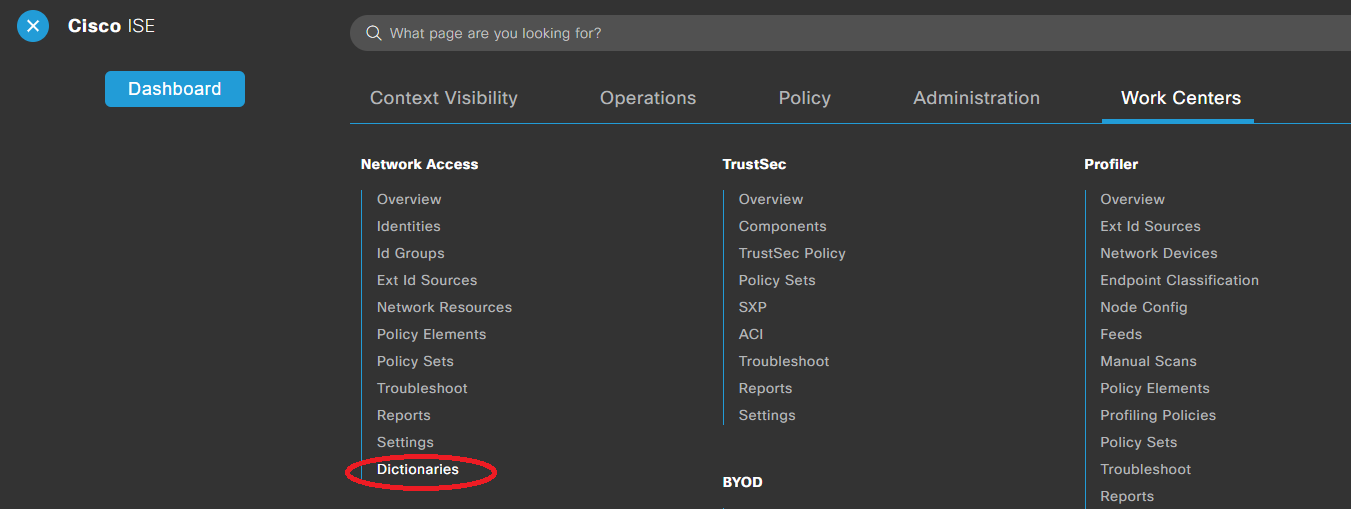
On the left side of the screen, browse to System -> RADIUS -> RADIUS Vendors, click HP, and then click Dictionary Attributes:

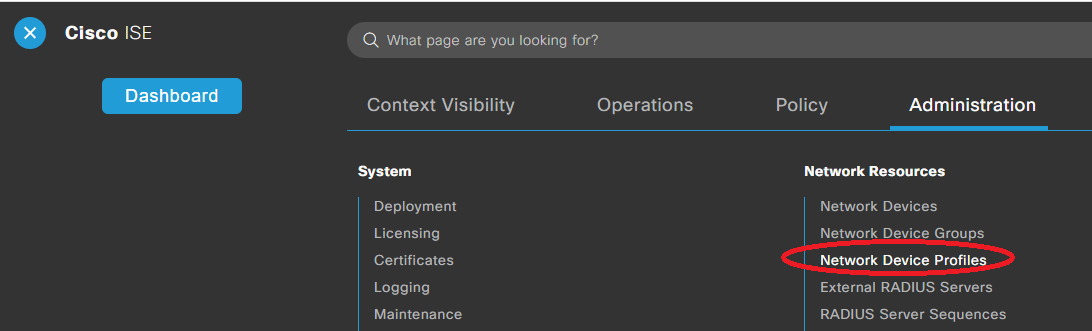
We’ll have to add those two Dictionary Attributes of HP-User-Role and HP-Captive-Portal-URL mentioned on pages 5 through 7 of the Aruba PDF Guide. I’m not going to put screenshots in for this because the Aruba PDF covers it quite nicely, once you’ve got both attributes added, click on the 3 bars to the left of the Cisco ISE logo at the top left, and navigate to Administration -> Network Resources -> Network Device Profiles:
Now that you’ve gotten used to clicking on the 3 bars to the left of the Cisco ISE logo when navigating through all the tabs, go ahead and complete pages 8 through 19 of the Aruba PDF Guide, laying out the foundation for building our policy set. Don’t forget to check the RADIUS box and define your shared secret when you’re following the steps on page 12, check the Acceptable Use Policy box if you’d like on page 17, make sure you select the HPWired_copy Network Device Profile in page 19, then stop when you get to page 20! We’re going to create our policy set a bit differently since we only want Mac Auth Bypass, no crazy 802.1x stuff in this lab. On page 20, instead of naming your Guest Vlan Auth Profile “Guest Vlan 100”, let’s name ours “Guest Vlan 2” so we better match our topology
Cleaning up the ISE config to actually work
We’re going to stop using the Aruba PDF from here on out as I’m going to configure quite a few things differently than how Aruba did things. Meet me at Policy -> Policy Elements -> Results. Underneath the Authentication drop-down on left side of the screen, click on Default Network Access so we can make a quick change there:
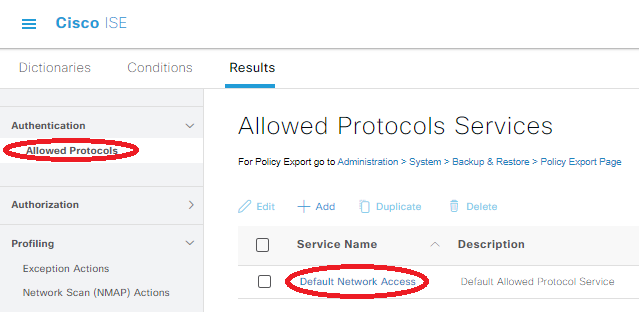
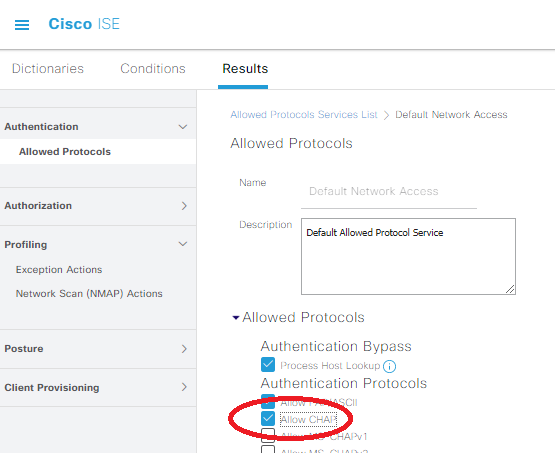
Check the “Allow CHAP” box, which will allow our Aruba 2920 (or any ArubaOS-Switch, for that matter) to talk with the ISE server using its default RADIUS settings, then save the config.
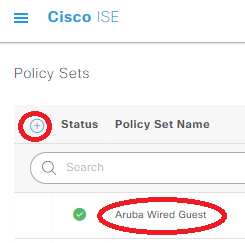
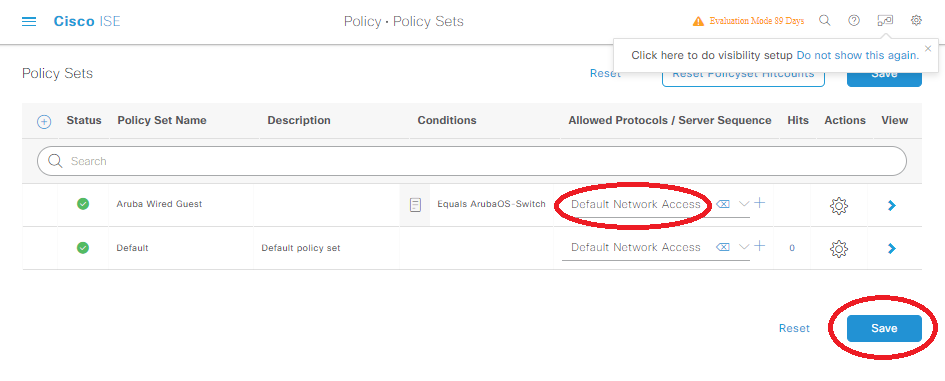
Next, head over to Policy -> Policy Sets, and click on the little + circle in the upper left to create a new policy set, we’ll name it Aruba Wired Guest:
Click on the + in the middle of the row to define a condition, then click where it says “Click to add an attribute” in Conditions Studio. Start by selecting Network Device from the blue button menu:
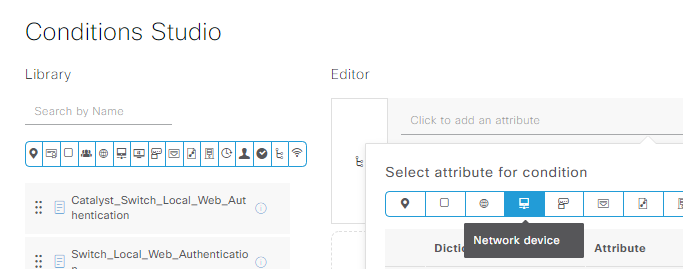
Select the DEVICE: Network Device Profile attribute, set this equal to our HPWired_copy profile built earlier per the Aruba PDF’s instructions, then save. This will ensure the policy is only applied to ArubaOS-Switch devices; if we wanted to add some Cisco or ArubaOS-CX campus switches in the future, we’d have to set a different device profile for those since the RADIUS stuff is a little different:
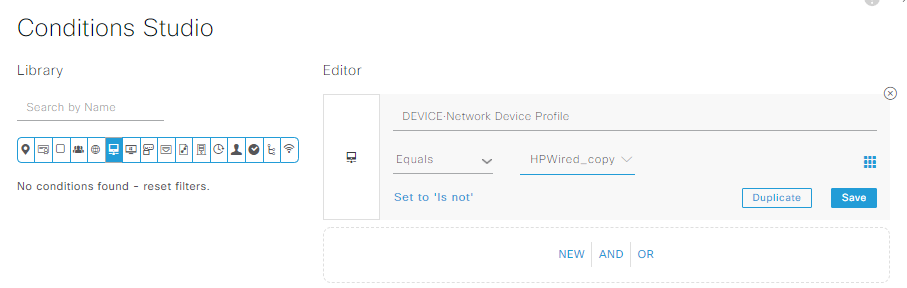
ISE will then ask to save this into the Conditions Library, which we should probably do to make things look prettier. I named these conditons “Equals ArubaOS-Switch” to make it a bit more obvious than the HPWired_Copy name would otherwise indicate. Once you save the conditions to the library, set the Allowed Protocols/Server Sequence to Default Network Access, and you must click save before proceeding:
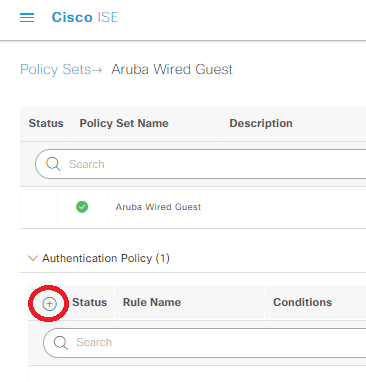
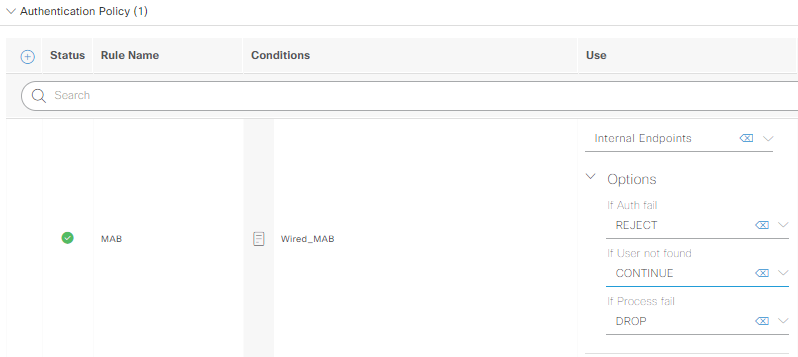
Click on that little blue arrow facing right under the View column of our Aruba Wired Guest policy. Expand out Authentication (aka AuthC) Policy, and click on the small blue plus for this section:
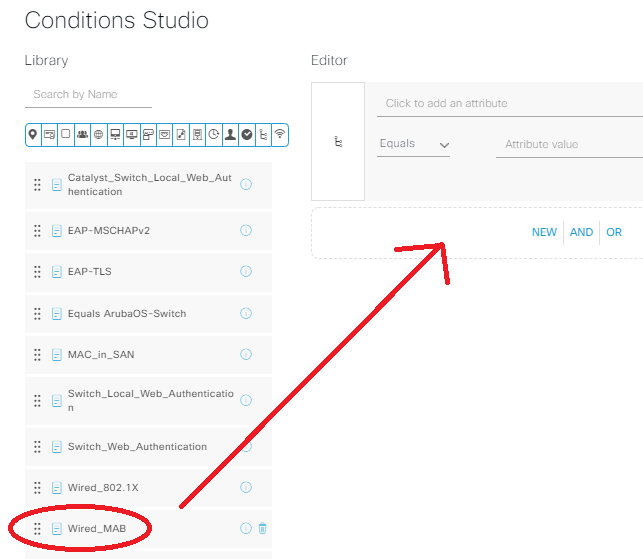
Name this new AuthC Policy MAB, click on the + in the middle of the row to get into the Conditions Studio, then click & drag the Wired MAB option from the library into the “New | And | Or” section of the editor. Click use at the bottom of conditions studio, then under the Use column, select Internal Endpoints. Expand the Options inside of the Use column, and change “if user not found” to continue, then save:
Now that we have our AuthC Policy defined, expand out the Authorization (aka AuthZ) Policy, clicking the small blue plus for this section:
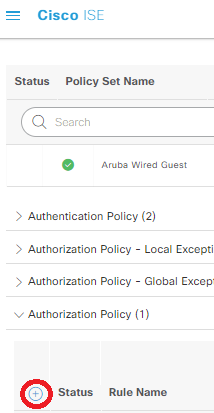
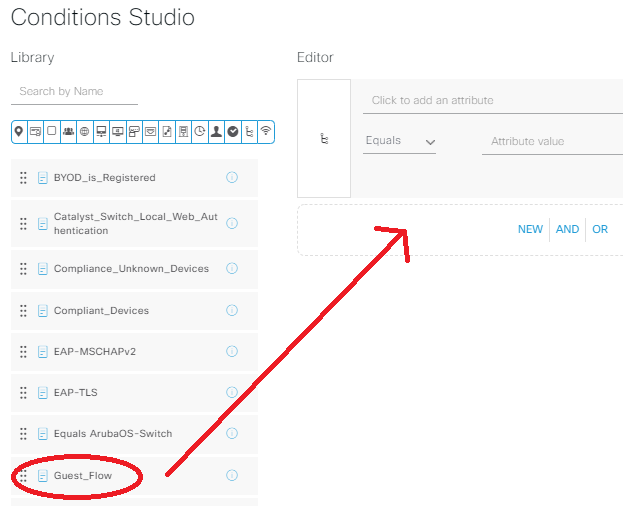
Name the new AuthZ policy Guest Access, click the + in the conditions row, and click & drag the Guest Flow condition from the library into the “New | And | Or” section of the editor, and click Use:
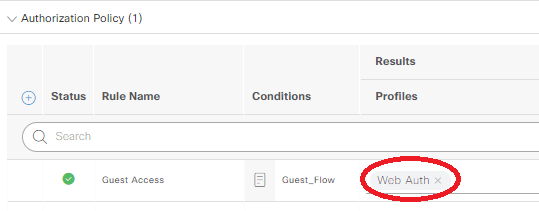
Under the Results: Profiles row, select Web Auth, then save:
Repeat the same steps we just did to create another AuthZ policy named Registered Guests, click the + in the conditions row, click the “Click to add an attribute” section, then click the Identity Group picture of a few people from the blue bar:
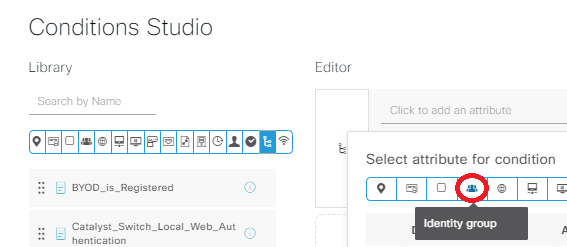
Select Identity Group – Name, and set this to Endpoint Identity Groups: Self_Register_Guests, which is the custom group we made many steps ago in the portal config:
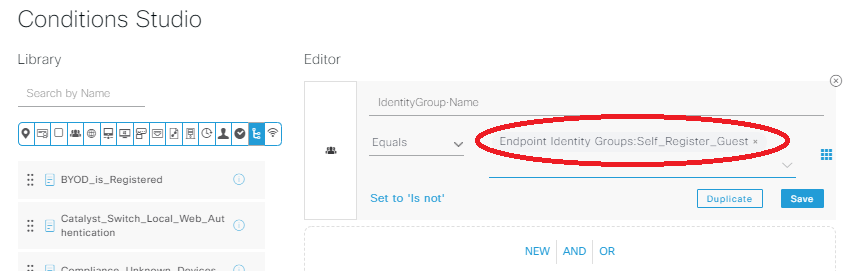
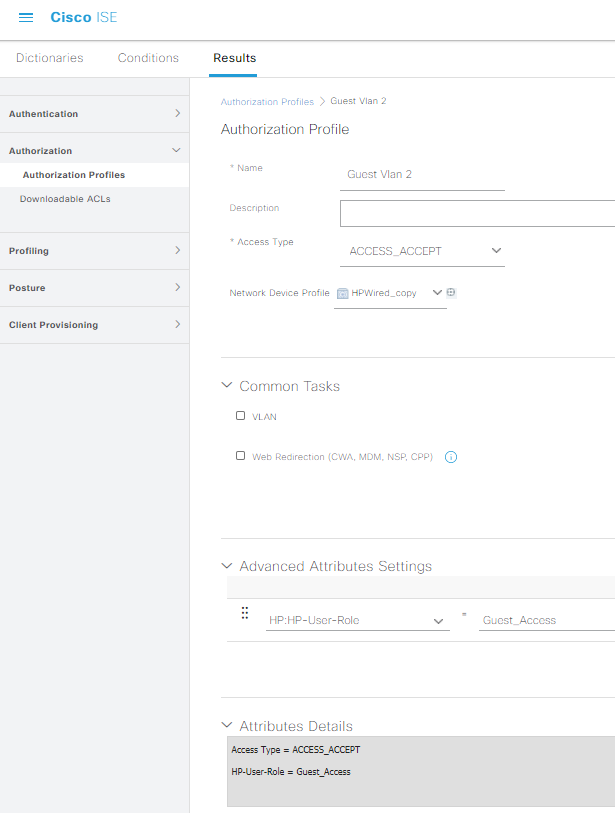
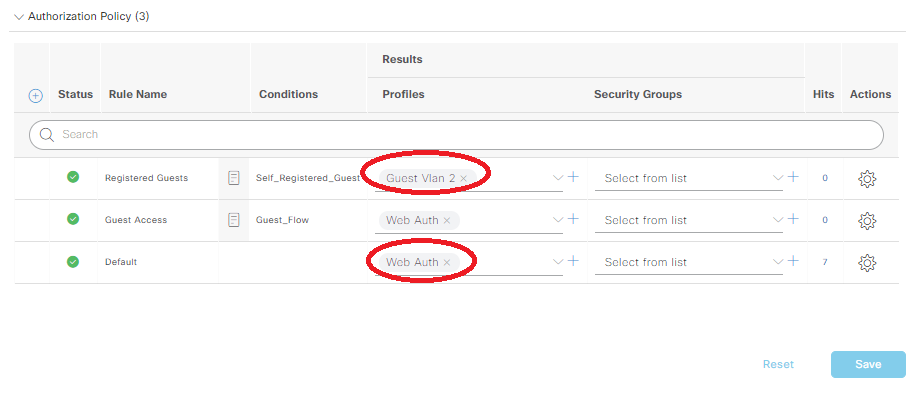
ISE will ask you to name the condition, and I went with “Self_Registered_Guest”. Under the Results/Profiles, pick the Guest Vlan 2 profile we created earlier for this Registered Guests row. Change the Default row to Web Auth as well, click save, and you should have an AuthZ section that looks like the following:
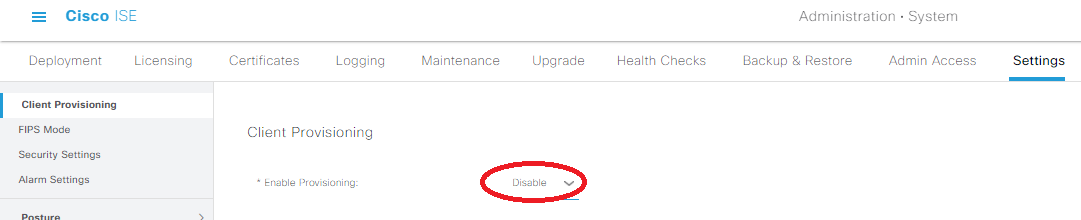
We don’t want anyone getting prompted to install the client provisioning stuff, so under Administration -> System -> Settings -> Client Provisioning, change Enable Provisioning to Disable:
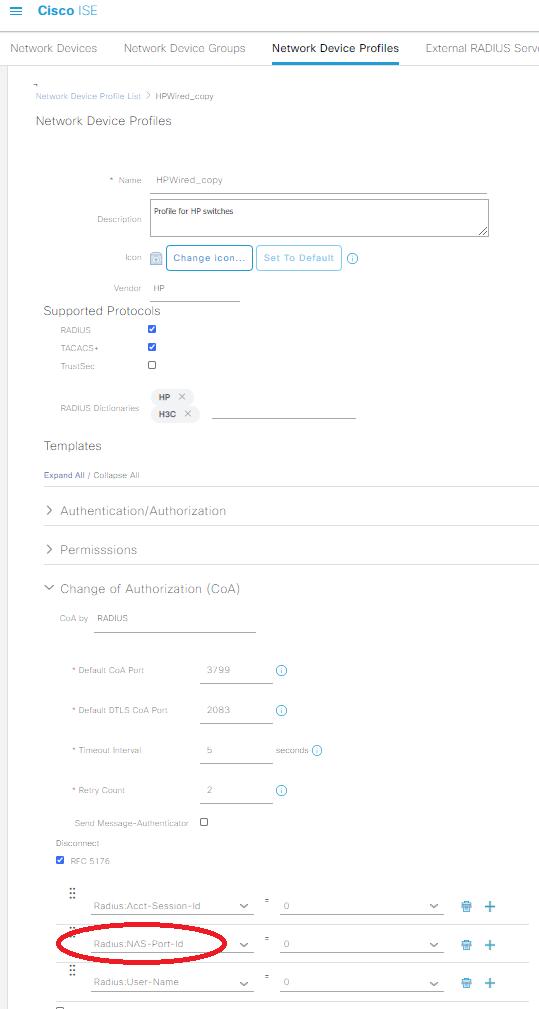
Lastly, head over to Administration -> Network Resources -> Network Device Profiles, and edit the HPWired_copy profile we created earlier in the Aruba PDF. Expand the CoA section, and change the middle option in the RFC-5176 session to NAS-Port-Id. This will ensure the RADIUS CoA to “bounce” the port into the proper policy will work after the user successfully completes our captive portal:
And with that, we’re done configuring the ISE side of the lab! But we’re nowhere near done configuring everything; time to clean up the other stuff on the switch & ASA config.
Cleaning up the ArubaOS-Switch config to actually work
When we laid down the foundation of the ArubaOS-Switch config earlier following the Aruba PDF, we missed a few critical steps regarding AAA and certificates, which can be very painful to troubleshoot. In the config snipit below for the switch, we’re going to make valid certificates for the captive portal service, enable AAA accounting (without this the session-id gets jacked up in RADIUS), and set our guest ports to use the captive portal policies we’ve created:
aaa accounting network start-stop radius
!
crypto pki identity-profile test subject
! (Enter Common Name, Org Unit, Org Name, etc.)
!
crypto pki enroll-self-signed certificate-name kd9cpb usage captive-portal
!
aaa port-access mac-based 12-24
Let’s check to make sure the certificate applied with the following show command, and then it’s off to fix the GCP tunnel to allow guest traffic into the captive portal!

Cleaning up the ASA’s tunnel into GCP to actually work
If you’re doing this lab yourself with Cisco ISE running on your own infrastructure, you can go ahead and skip these steps. If you’re cheap like me and have Cisco ISE running on an eve-ng instance in GCP via a Cisco ASA VTI tunnel, we have a few more steps before the captive portal traffic will work on our guest network. Pop the following into the ASA so that we publish a route up to GCP for the guest network:
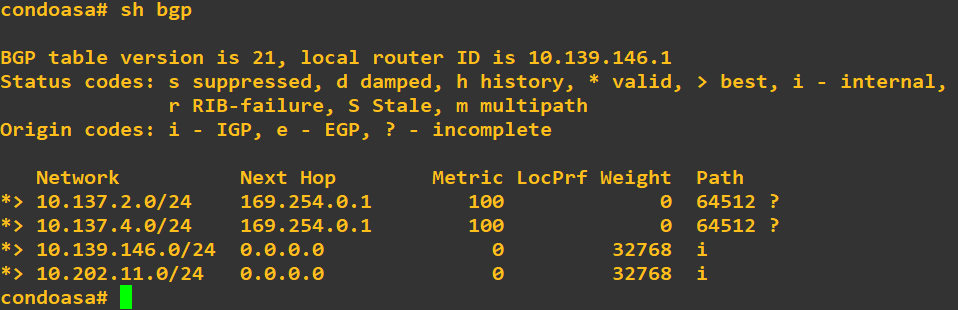
router bgp 64513
address-family ipv4 unicast
network 10.202.11.0 mask 255.255.255.0
We should immediately see the condo ASA publishing the new route up to GCP:
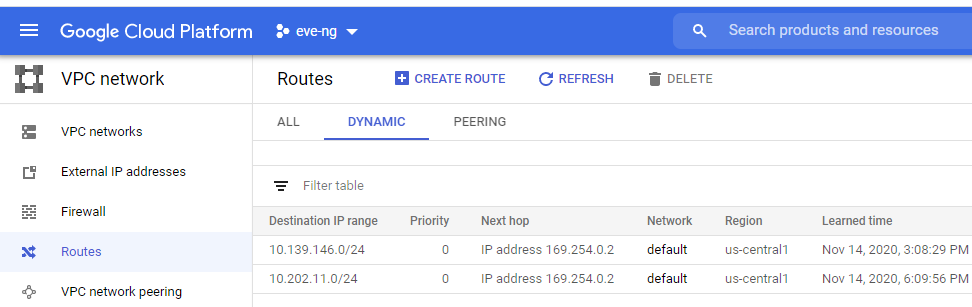
It might take a few minutes, but in your GCP Console Navigation menu, head over to VPC Networking -> Routes and click the Dynamic tab. Make sure you see both routes on the Google side, check that your system clocks are somewhat close to eachother, and it’s time to test!
Testing & Tshooting
Plug in your first guest client to any of the guest ports, “show port-access clients detail” on the switch is your best friend when it comes to validating that we’re on the right track:
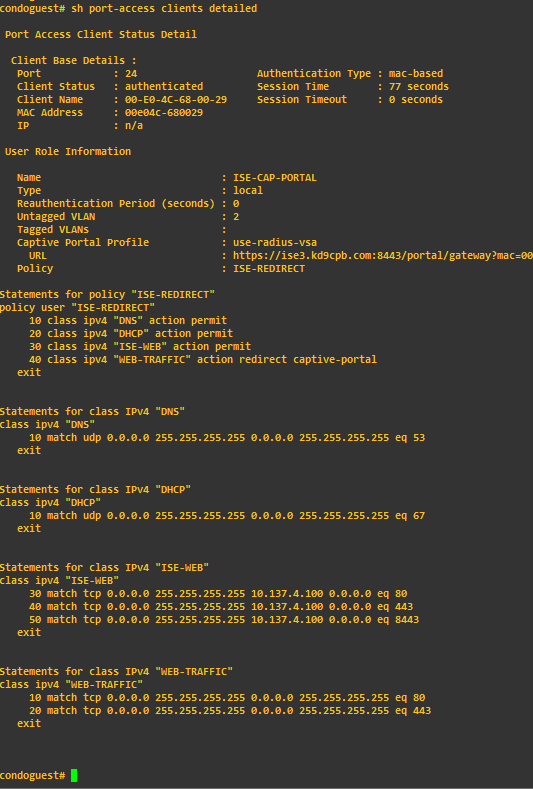
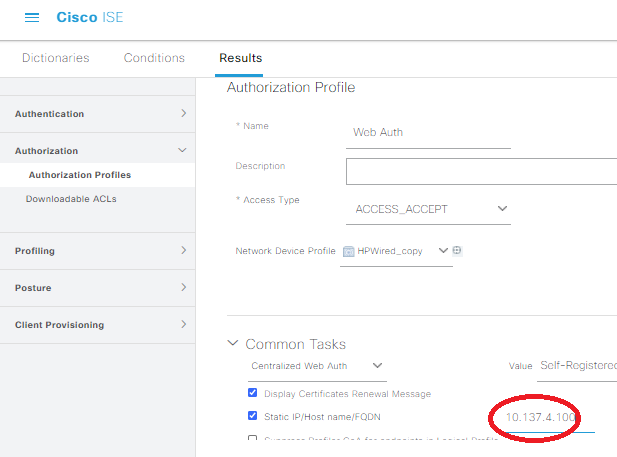
That looks pretty good! Notice how the captive portal URL is big, ugly (so ugly I cut it off from the picture…) and heading to the FQDN of our ISE server! Now this is a really good thing if you have a valid DNS record for your ISE server (we do here), but if you don’t, set a static IP for your ISE server in the Web Auth profile:
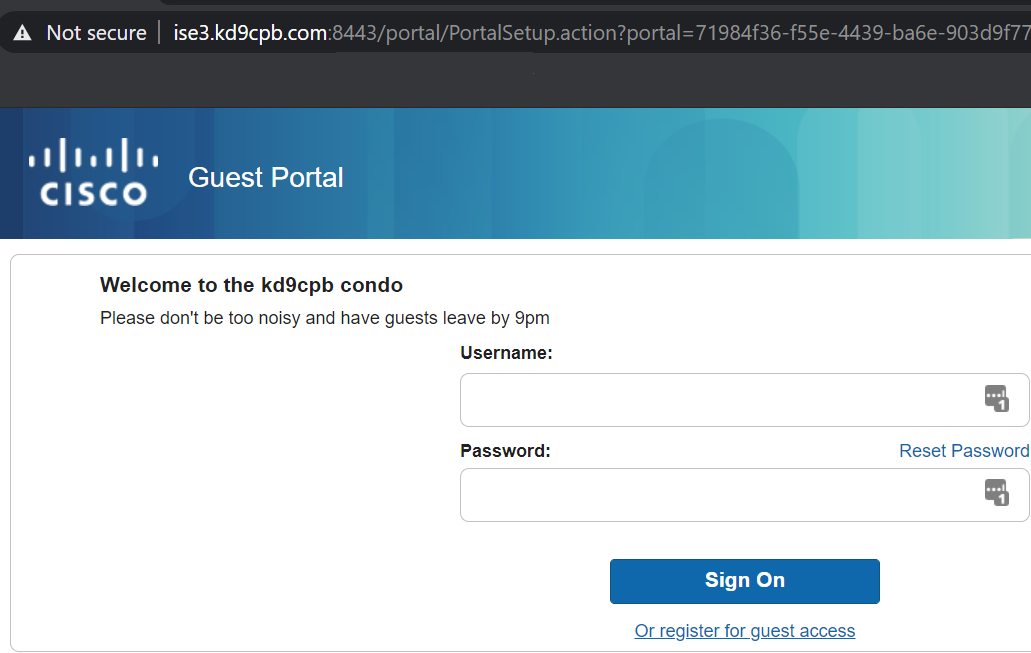
Let’s take a look at what’s happening on our wired guest laptop for my fictional tenants: the AUP is displayed, guests can login, and eventually we can pass through the captive portal and get on the internets! If I was a real organization, I’d buy a real HTTPS certificate to make it more legitimate, but we’re not interested in that for now:

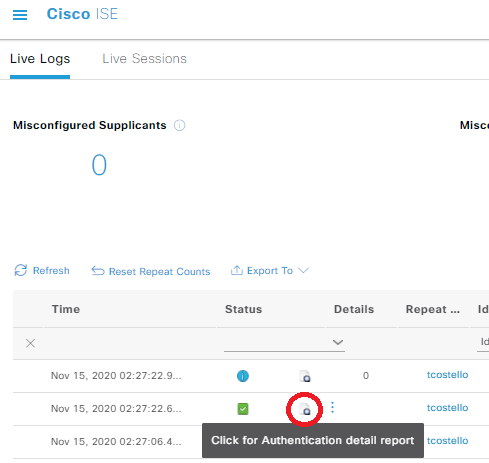
Check out the Operations -> RADIUS -> Live Logs page to see in real-time what your ISE server is seeing from the switch. You’ll notice in many cases there seems to be many more rows of data than expected. That’s because you get a new row for every authentication that occurs (green check in status column for pass, red circle for fail), plus any active sessions also get a row for accounting details (these are the ones with the blue circle in status column). Let’s click on an authentication detail report to check one out:
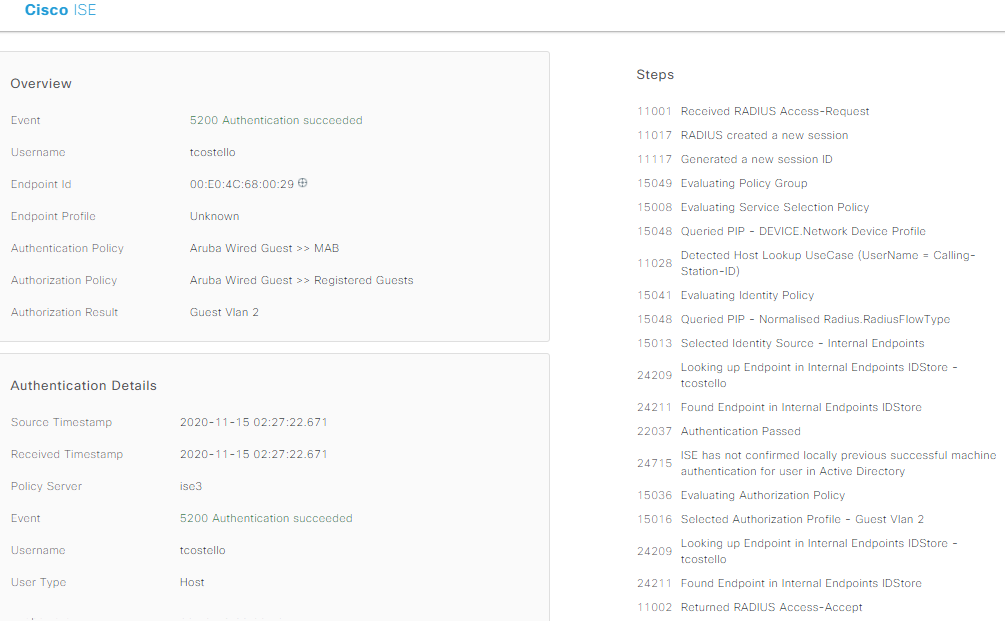
Woohoo! Authentication was successful, our wired guest has internet access after we got some information about who the guest is, they’ve accepted an AUP, and we can go about our lives knowing there’s lesser guest network risk in the condo. I forgot to take a screenshot, but if we did that “show port-access client detail” command after the successful captive portal guest flow, we’d see a nice “permit any” allowed through on the switchport. The final configs for the Aruba 2920 and the Cisco ASA are at the gitlab folder for this post, and let me know in the comments if you do anything cool with this information!
But what if I’m having some other issue and this isn’t working? Don’t worry; when I first started doing similar guest network things, I had multiple TAC tickets open with multiple vendors! If you run into problems and have Cisco/Aruba/etc support, I highly recommend engaging the vendors as troubleshooting RADIUS can be like finding a needle in a haystack. Lucky for you, TAC has an electromagnet to help you find the needle. If you don’t have support, that’s perfectly fine, you’ll just be spending quite a bit of time digging into the following:
- Deep dive into that RADIUS Live Log output, especially in the authentication detail reports. These are incredibly helpful in determining if ISE is sending the switch good data, or if ISE might be sending the switch garbage. It can be painful to google-through some of the nasty looking auth detail reports, and it’s grueling to flip through one of the many books on Cisco ISE,. Between that and forums like Cisco Communities + Aruba Airheads, you might get lucky and formulate a fix!
- As with many network troubleshooting situations, packet capture is your best friend. Using whatever tool you’re most comfortable with, capture traffic as close as you can to the ISE server, and setup another capture as close as you can to the switch. If you see a packet on one side and not the other, quadruple check all your firewalls and layer 3 stuff to ensure it’s not a misconfiguration upstream. You can also dig really deep into the RADIUS packets themselves, but that’s beyond the scope of this post.
- Debug commands on the switch are also helpful. Here’s what I found myself putting on the Aruba 2920 when wanting more details about what the heck is going on with RADIUS and captive portal, just don’t forget to turn it all off afterwards:
! set the debug buffer
!
debug destination buffer
debug security radius-server
debug security captive-portal
!
! look at the debug buffer
show debug buffer
!
! turn it all off when you're done
no debug all
One final note: in this lab, we setup a vlan 2 SVI for the captive portal to work, which makes life infinitely easier since there’s no firewalls and such between the wired guest client and the switch that’s doing the captive portal redirecting. If for whatever the reason you don’t want the switch to have an SVI in your guest vlan, it’s possible to make all this work with a single management SVI on the switch. That being said, you’ll have to spend a lot of time setting up tcp state bypass and ensuring uRPF is disabled if you have any firewalls in-between. I’m not going to be going through all of that here, but if you find yourself needing to do this, there’s some decent advice at Cisco’s community which will help you greatly.
You’ve reached the end of the post! Click here to go back to the list of all Homelab posts.
You should also know I may earn commissions on qualifying Amazon purchases made via kd9cpb.com links to defray the cost of otherwise ad-free web hosting.
first, i would like to thank you for the remarkable blog,
i have a question about the Self_Register_Guests : how did you created this identity group because i can’t find in this tutorial.
thanks
Thanks!!! Creating the Self_Register_Guests group is on page 13 of the PDF over at http://kd9cpb.com/wp-content/uploads/2020/11/ArubaOS-Switch_Web-Redirection_with_ISE_v2019-01.pdf. I know it’s not the easiest to follow, but that PDF from Aruba combined with this blog post should have all the details you need to get the captive portal working. Let me know if you hit any other problems! – Tom
thank you so much for your reply, i tested this on my GNS3 this morning and it’s working.
one thing that i noticed that when i’m logged there is no redirection on my browser for the website i’m trying to visit, when i re enter again a new url, it asks me to enter my credentials again. is this related only to GNS3 or am i missing somthing?
i read also your article about arubacx-captive-portal and i have one last question, why there is not hit for the guest-flow condition ?
Good stuff! Here’s a couple ideas:
1. Dig through all the RADIUS live-logs on ISE when your captive portal user authenticates. You might get lucky and spot an obvious error with the RADIUS CoA.
2. What kind of Aruba switch are you using? Try getting a packet capture of the traffic between it & ISE, and enable those debug commands above. If you’re lucky, you might spot an issue in the RADIUS config or find something simple like a firewall rule blocking that UDP CoA traffic.
3. Great catch on that missing hit counter in the AOS-CX lab! I honestly don’t know why that is. Maybe I resized the window a weird way and the text didn’t update properly in the web browser or something. My homelab is now ISE 2.7 while I prepare for the SISE test, and I do see a 0 in all the hit counts of my authz policies. Sorry I don’t have a better answer.
Good luck and happy captive portaling!
back after few weeks:-), i just want to thank you for your hints, i reconfigured the lab for the second time, and it’s working, seems like i missed something.
Thanks again.
Woohoo, you’re most welcome!
Also great work on figuring this out solo, it took me multiple Cisco + Aruba TAC tickets to get this going the first time, I’m really glad to hear this page saved someone all the extra hassle!