
As always, opinions in this post are solely those of my own, and not necessarily those of any organization I am currently affiliated with or have been in the past.
First posted 3/28/2021
A few months ago, I did a simple network automation homelab creating 150 vlans on my firewall & switch using some craptacular 4th Grade Level Python, Notepad++ & Excel. It was meant to be an example of “bad-old-days” automation with spreadsheets. Highly recommend avoiding this flavor of “automation”, don’t try this at home, there’s far better options here in 2021.
A few weeks ago, I re-did that same simple network automation homelab entirely in 8th Grade Level Python with Netmiko. It was meant to be an example of how powerful Python can be for network engineers, but you’ll need to invest a bit of time getting familiar with writing Python code. Highly recommend trying this at home after completing a Python course.
Today we’re going to re-do that same simple network automation homelab yet again creating 150 vlans on my firewall & switch using Ansible‘s framework with Jinja2 templates. It’s meant to be an example of a more optimal way to automate changes on network devices, without the time commitment of learning a programming language or learning to use APIs. Whether you’ve been a network engineer for decades or just started studying for the CCNA, I highly recommend giving Ansible a try if you haven’t played with it yet. Once you work through the initial kinks of getting started, it’s more fun & friendly than I thought!
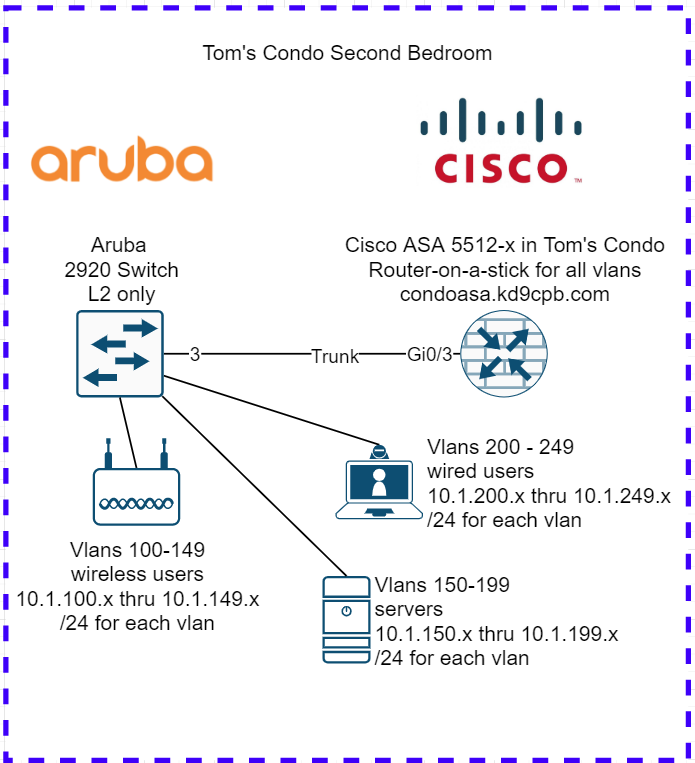
Here’s my homelab topology diagram for today, I’ll talk about it more after we cover the initial Ansible setup:
Initial Configs & Tools
If you’re already familiar with Linux basics, you can safely skip this section, just install Ansible using their instructions along with pip3 (sudo apt-get install python3-pip on Debian-flavored, sudo yum install python3-pip on Redhat-flavored). This homelab was done on Ansible 2.9, your mileage may vary with other versions.
If you’re on a Windows machine, you’ll either need to get Windows Subsystem for Linux (WSL) installed per Microsoft’s instructions, or use a Linux virtual machine to run ansible. If you go the WSL route, just run “sudo apt-get install ansible python3-pip” on your WSL Terminal, and you’re all set! If you’re not wanting to use WSL for whatever the reason, that’s fine too, build a Linux VM of your choosing and follow Ansible’s instructions to get it going.
If you’re on a Mac, you’ll want to follow Ansible’s instructions as well.
If you want to score homelab bonus points, I highly recommend setting up a container for your Ansible environment as described in Josh Duffney’s Become Ansible book. Using things like containers or vagrant for building a dev environment is beyond the scope of my homelab, but I think it deserves an honorable mention as this makes replicating your Ansible setup on some other machine much easier. This also lets you better control how software updates are applied, reducing the odds of a new Ansible version breaking your playbooks, but that’s not something most beginners will need to worry about for now.
There’s many Ansible best practices & Infrastructure as Code words of wisdom that I won’t be writing about today as John Capobiano’s Automate Your Network book contains that information in a far more elegant presentation. His book along with his GitHub repo of Ansible examples have been incredibly helpful for me, and I highly recommend adding this to your reading list. It’s got a great cover photo of a primate making a “wow, Ansible is really cool” face too!

But that’s enough about the development & reading stuff for now, let’s fire up the firewall and get our hands dirty in the homelab.
Task #1: Get 150 subinterfaces created on the Cisco ASA, with proper names & IP addresses
For the sake of time, I’m going to steal the initial configs of the ASA firewall & Aruba switch from my AOS-S captive portal homelab as those already have basic management connectivity ready to go. You’ll find these configs at the github folder for this lab, along with all the Ansible playbook stuff too.
Let’s pretend we are turning my second bedroom into a new branch office for hundreds of users per the diagram at the top of this page. We’re going to have 50 vlans for wireless users, 50 vlans for servers, and another 50 vlans for wired users. All these networks will be using the ASA firewall as a router-on-a-stick, because I’m very cheap and I want to get fancy with ACLs using ASDM someday. But for now, I only want to get basic connectivity working on all 150 vlans, and that’s exactly what we’ll use Ansible to automate. We’ll also pretend I have a beefier ASA, as the 5512-x only has support for 100 vlans 🙂
I want output similar to the following example generated 150 times, so that the ASA router-on-a-stick setup is ready to route our traffic:
interface GigabitEthernet0/3.100
vlan 100
nameif wireless_user-v100
security-level 75
ip addr 10.1.100.1 255.255.255.0
Let’s get the party started by running the following commands in your Linux shell. This installs the Cisco ASA collection from Ansible Galaxy and paramiko to ensure Ansible can talk with the firewall:
ansible-galaxy collection install cisco.asa
pip3 install paramiko
Open up the text editor of your choosing, creating a file named hosts.ini, and getting the following opening lines in:
[condoasa]
10.139.146.1

[condoasa:vars]
ansible_user=tcostello
ansible_ssh_pass="not_the_real_ssh_password"
ansible_become=true
ansible_become_method=ansible.netcommon.enable
ansible_become_pass="not_the_real_enable_password"
ansible_connection=ansible.netcommon.network_cli
ansible_network_os=cisco.asa.asa
ansible_python_interpreter=python3
All we’re doing in this inventory file is telling Ansible our firewall is named condoasa, and all of its personal details to establish a connection. There’s a great overview about what all of this means in detail at Ansible’s blog, and to be honest I should probably store these passwords in something like Ansible Vault instead of in our inventory. But we’re just doing 12th grade level simple stuff today, no need to add vault complexity for now.
Next, get back to that text editor and create a file named asa_test.yml, containing the following Ansible playbook which will be used alongside our hosts.ini file to run an arbitrary command on the firewall:
---
- name: Verify Ansible can SSH into the ASA
  hosts: condoasa
  gather_facts: false
  tasks:
    - name: Show the ASA hostname
      cisco.asa.asa_command:
        commands:
        - show hostname
Just like that, we’ve written our first Ansible Playbook! All we are doing for now is telling Ansible that we’d like to login to the firewall, run the “show hostname” command, and exit using that cisco.asa.asa_command plugin. While we don’t necessarily need to do something like this before having Ansible configure the firewall, I always like testing with a simple playbook first before doing anything too complicated on a new device. Go ahead and run the following on your Linux shell (make sure you’re in the same directory as those two files you created), you should get similar output:
ansible-playbook -v -i hosts.ini asa_test.yml
While that TASK output isn’t the prettiest, looks like we connected into the ASA successfully! The above ansible-playbook syntax is telling Ansible to use verbose mode (-v) so we get the command output returned to us. We also use the -i argument to define our inventory (hosts.ini), then we wrap up the command with our playbook (asa_test.yml). Unlike Python, Ansible takes care of all the “glue code” for you, and has a really nice PLAY RECAP summary of what actually happened. Go ahead and try changing “show hostname” to “show ver” in that asa_test.yml playbook if you’d like. The Ansible output might look ugly without human-friendly text formatting, but it sure is powerful.
Now that we know Ansible can login & run commands on our Cisco ASA, head back to the text editor and make a new file of firewall_vlans.yml, with the following contents:
---
- name: Configure 150 Vlans on our ASA
  hosts: condoasa
  gather_facts: false
  tasks:
    - name: Configure the Wireless vlans
      cisco.asa.asa_config:
        lines:
        - interface GigabitEthernet0/3.{{ item }}
        - vlan {{ item }}
        - nameif wireless_user-v{{ item }}
        - ip address 10.1.{{ item }}.1 255.255.255.0
        - security-level 75
      with_sequence: start=100 end=149

    - name: Configure the Server vlans
      cisco.asa.asa_config:
        lines:
        - interface GigabitEthernet0/3.{{ item }}
        - vlan {{ item }}
        - nameif server-v{{ item }}
        - ip address 10.1.{{ item }}.1 255.255.255.0
        - security-level 75
      with_sequence: start=150 end=199

    - name: Configure the Wired vlans
      cisco.asa.asa_config:
        lines:
        - interface GigabitEthernet0/3.{{ item }}
        - vlan {{ item }}
        - nameif wired_user-v{{ item }}
        - ip address 10.1.{{ item }}.1 255.255.255.0
        - security-level 75
      with_sequence: start=200 end=249
The above playbook uses the with_sequence: syntax to loop through our three sets of 50 vlans. Gigantic thanks to Jon Warbick for writing an Ansible cheat sheet which greatly helped me debug the loops! The double curly brace templating you’re seeing above is Jinja2. I won’t go into too much detail on this as Kirk Byers does a way better job explaining it on his course, but know we’re only using a small fraction of what Jinja2 is capable of today. Our Ansible playbook is using the cisco.asa.asa_config plugin to actually apply commands on our ASA, whereas last time we used cisco.asa.asa_command to run the enable-mode commands. Let’s go ahead and run the Ansible playbook on the firewall, watching Ansible deploy hundreds of lines of firewall config with just one press of the enter key:
ansible-playbook -v -i hosts.ini firewall_vlans.yml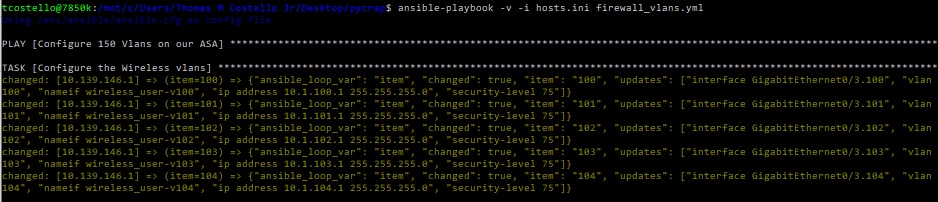
I won’t bore you with the full output, but all 150 vlans were created within a few minutes! However, you may notice this takes quite a bit longer than when we did the same configuration deployment in Python with Netmiko in my previous homelab. That’s because Ansible actually checks every task iteration to ensure it worked, and it also uses idempotency to make your life easier. I won’t dive into the idempotency rabbit hole here as there’s far better resources explaining that on Youtube, Udemy & Pluralsight. For now, just know that Ansible is doing a lot more than you realize in the background to ensure our network automation works as desired.
After your playbook runs, use the SSH client of your choosing to validate the configuration on the ASA, and save the config. Unfortunately my ASA-5512x won’t support more than 100 vlans, so I need to pretend all 150 deployed successfully. But that’s ok, it’s time to take a trip into the tropical world of Ansible on ArubaOS-Switch!
Task #2: Get 150 vlans created on the Aruba switch, with proper names
On my home Aruba 2920 switch, I want output similar to the following example generated 150 times, so that the switch has all 150 vlans properly configured & trunked up to the ASA for our traffic:
vlan 100
name wireless_user-v100
tagged 3
Now that the ASA is squared away, run the following command on your shell so we can get the ArubaOS-Switch collection installed:
ansible-galaxy collection install arubanetworks.aos_switchNext let’s add the following to our hosts.ini file so Ansible knows about the Aruba switch:
# Put this at the top under [condoasa] section
[condoswitch]
10.139.146.3

# Put this at the bottom under the [condoasa:vars] section
[condoswitch:vars]
ansible_user=tcostello
ansible_password="not_the_aruba_password"
ansible_connection=ansible.netcommon.network_cli
ansible_network_os=arubanetworks.aos_switch.arubaoss
ansible_python_interpreter=python3
With our inventory updated, we can return to the text editor and make a new file of switch_test.yml with the following Ansible playbook to ensure basic connectivity is established into the switch before making changes:
---
- name: Verify Ansible can SSH into the switch
  hosts: condoswitch
  gather_facts: false
  tasks:
    - name: Show the switch version
      arubanetworks.aos_switch.arubaoss_command:
        commands:
        - show version
Now that our playbook has been built, let’s give it a shot and see what happens:
ansible-playbook -v -i hosts.ini switch_test.yml
Yikes! Although this looks ok at first glance, Ansible is getting stuck at the SSH fingerprint validation, which is going to screw up our plans to push changes. This makes sense as I don’t think I ever SSH’d into this switch from my fresh WSL install before, and there’s even a mention about the known_hosts prerequisites on the Ansible Galaxy docs. I ended up working around the host key checking by just SSHing into the switch, accepting the fingerprint, logging out, trying the playbook again, and the results looked much better:

Now that our SSHing woes are resolved, let’s go ahead and make another new file called switch_vlans.yml, containing the following Ansible playbook:
---
- name: Configure 150 Vlans on our switch
  hosts: condoswitch
  gather_facts: false
  tasks:
    - name: Configure the Wireless vlans
      arubanetworks.aos_switch.arubaoss_config:
        lines:
        - vlan {{ item }}
        - name wireless_user-v{{ item }}
        - tagged 3
      with_sequence: start=100 end=149

    - name: Configure the Server vlans
      arubanetworks.aos_switch.arubaoss_config:
        lines:
        - vlan {{ item }}
        - name server-v{{ item }}
        - tagged 3
      with_sequence: start=150 end=199

    - name: Configure the Wired vlans
      arubanetworks.aos_switch.arubaoss_config:
        lines:
        - vlan {{ item }}
        - name wired_user-v{{ item }}
        - tagged 3
      with_sequence: start=200 end=249
The above playbook is very similar to what we were doing with the Cisco ASA Jinja2, the only big difference being we’re using the Aruba Networks AOS Switch Config plugin instead of the Cisco ASA one. Pretty cool that we can change a few things around and use this with multiple vendor’s gear, right? Let’s go ahead and run that playbook, if all goes well Ansible will enter hundreds of switch commands on our behalf:
ansible-playbook -v -i hosts.ini switch_vlans.yml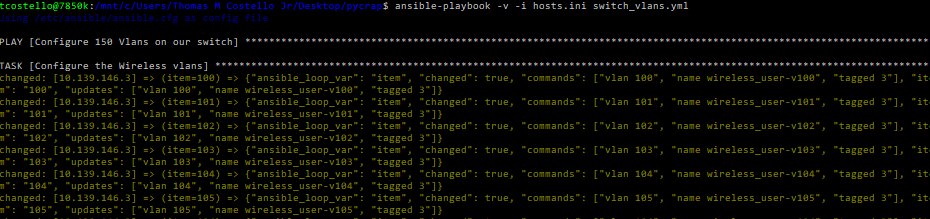
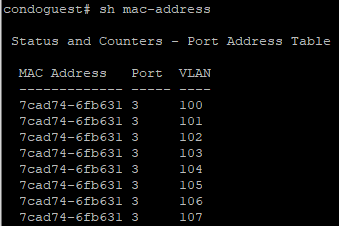
Again, I’ll spare you from the lengthy boring results screenshot, but upon SSHing into the switch to confirm, we can see Ansible created all the vlans exactly how I wanted! The mac address table output looks pretty good too:
Conclusion
Although it might not feel like much, we did some pretty cool network automation things in this simple lab:
- Using only two Ansible playbooks, some plugins and an inventory file; over 1000 lines of CLI config was generated for the network devices.
- We’ve removed a very large number of opportunities for someone to fat-finger the IP address and vlan configurations.
- Configs were written for both Cisco and Aruba devices, demonstrating the multivendorness of Ansible.
- Ansible automated away transferring the configs onto the equipment, further reducing human error opportunities and unnecessary config copy/paste pain. Ansible’s idempotency also helps detect any config transfer issues.
- Even the most stubborn refusing-to-learn-code netadmin out there could accomplish this with only a few hours of Ansibleing!
The reason I consider Ansible/Jinja2 to be more of a “12th grade level” task wheras Python/Netmiko is more “8th grade level” task is because getting the initial Ansible environment setup took me quite a bit of Googling & Stackoverflowing, even with the awesome books written by Josh & John at my fingertips. Although it takes longer to learn Python compared to Ansible, actually setting up Python/Netmiko to run an arbitrary command felt simpler than working through various minor issues getting Ansible to do the same. When I was reading Hello World & doing Kirk’s class to learn Netmiko, I didn’t need to google/stackoverflow anything during Netmiko setup like I had to for Ansible, but maybe I just had bad luck with my network device choices.
Small changes between Ansible 2.x from a few years ago and today’s Ansible 2.9 with the official Cisco ASA collection can make debugging an issue rather frustrating at first. However, once you get over that initial setup learning curve, I’ve found writing Ansible playbooks to be easier than writing comparable Python for many things. However, there’s some stuff where Python’s flexibility makes it the better fit. Fortunately, there’s tons of great blog posts about Ansible for networks out there, lots of cool ASA automation with Ansible stuff too, even if it’s not with that fancy new official Cisco ASA or ArubaOS-Switch collection.
This is the third and final time I’m recycling that “Create 150 vlans in my second bedroom” topology, but there’s one more way we could potentially automate this homelab even better: through the use of APIs or NETCONF instead of command line interface. Nowadays using APIs instead of the CLI is all the rage, especially for doing cool networking stuff inside of public clouds. Even though there is an API for both the Cisco ASA and ArubaOS-Switch platforms, I don’t think I’ll be going down the path of using them for now. As cool as APIs are, I want to focus on improving my Ansible & Netmiko skills for a bit, can’t fit every tool in my toolbox. Someday soon I’ll definitely be warming up to doing more API stuff, but we all have to start somewhere on our automation journey.
Thanks for reading today’s homelab, happy Ansibleing! I’ve come a long way on this topic over the past year, and I sincerely hope this basic Ansible homelab gets network engineers who haven’t Ansibled before into network automation. Even if you’ve been doing network engineering for a long time sans automation, it’s never too late to give it a try, feel free to grab all my playbooks from the Github folder too. You’ll be glad you did!
You’ve reached the end of the post! Click here to go back to the list of all Homelab posts.
You should also know I may earn commissions on qualifying Amazon purchases made via kd9cpb.com links to defray the cost of otherwise ad-free web hosting.
4 thoughts on “Network Automation with Jinja2 & 12th Grade Level Ansible”
Comments are closed.