
As always, opinions in this post are solely those of my own, and not necessarily those of any organization I am currently affiliated with or have been in the past.
First posted 4/14/2021, Updated 1/1/2023
In 2020, I wrote a long-winded guide on setting up a Cisco ASA site-to-site VPN tunnel into my eve-ng Google Cloud Platform (GCP) instance for my second bedroom homelab. Ever since then, I’ve sort of turned into an evangelist about how everyone should burn their $300 Google Cloud New Customer Credit on a cloud eve-ng instance if you haven’t done so already, it’s really fun! Today I’ll be rebuilding my GCP eve-ng setup to be more of a “cyber range” I can use to study for the new Cisco ISE Certification Exam. Regardless of which network or security products you’re tinkering with in eve-ng, I hope you try it out on a public cloud sometime, it’s a real eye-opener as to what’s possible with AWS/GCP/Azure these days. Update for 2023: It seems many of the eve-ng install guides/videos haven’t been updated for the new Ubuntu 20.04 eve-ng release or GCP Nested Virtualization changes. This guide works as of 1/1/2023. If you have issues getting the VM to start up, let me know in the comments.
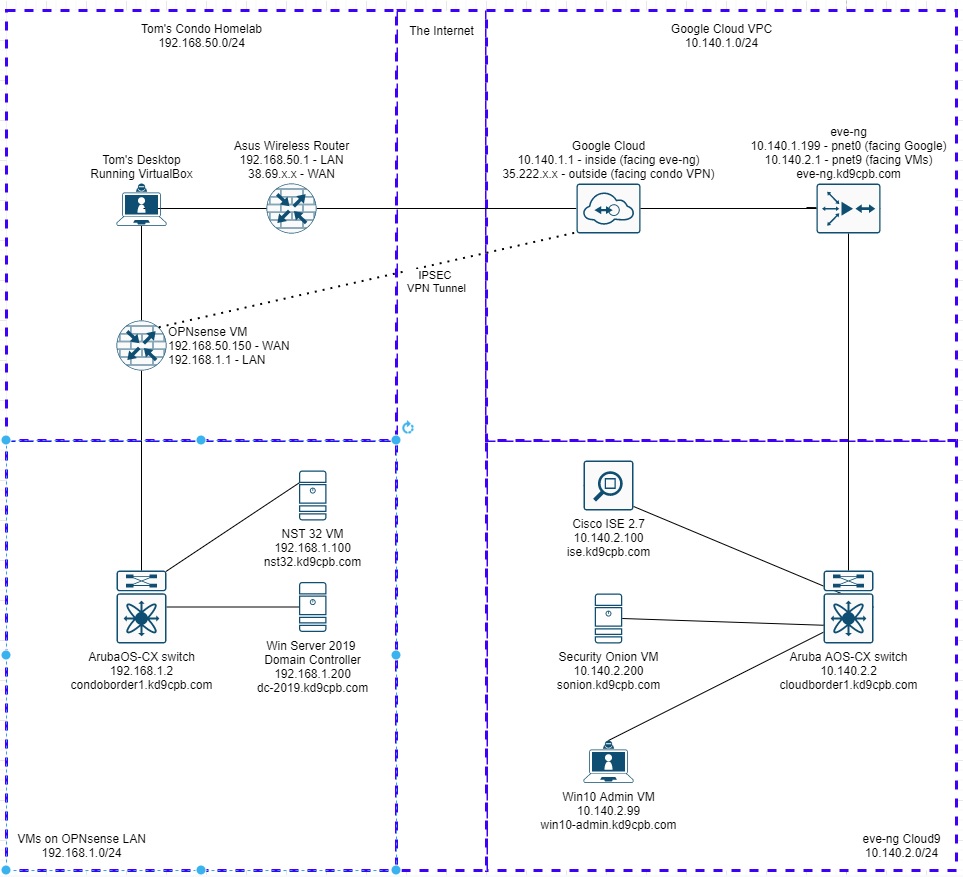
Most tech blog posts about doing things step-by-step in a public cloud don’t age well, things change very quickly. My guide from 2020 is no exception. Instead of re-doing that old blog post, I thought it would be more fun to re-build my whole lab using 100% free network device VMs, no need to buy a Cisco ASA or ASAv to tunnel into your homelab this time! My final topology ends up looking like this, you can skip the Microsoft & Cisco ISE stuff if you’d like:
Update for 2023: The Network Collective video mentioned below is still awesome, but you will want to install the newer Ubuntu 20.04 based eve-ng. Consider watching that video, but follow along with the VM creation instrutions from here or the eve-ng community cookbook instead!
Doing the OPNsense VPN directly into Google Cloud’s VPN Gateway is a bit difficult, it’s actually way easier to use a service like ZeroTier between your Google Cloud eve-ng instance and your homelab. There’s a really good YouTube walkthrough from NetworkCollective covering exactly that, and I would recommend most people follow Tony E’s GCP eve-ng with ZeroTier instructions in that video instead of all my craziness below in this post. If you find yourself answering yes to any of the following questions, you might be better off following this guide. If you answer no to all of the following, go ahead and do Tony E’s eve-ng + ZeroTier YouTube series instead, you’ll be up and running way faster:
- You want to fully automate the setup and teardown of the VPN tunnel using Google’s APIs (this homelab post covers how to accomplish that in detail)
- You have other instances in GCP that you’d like a site-to-site tunnel into without running your beefy eve-ng instance
- You want to gain experience setting up GCP VPN Gateway
- You want to deep dive into how site-to-site VPN tunnels are setup between a homelab/branch location and GCP
- You have OPNsense/pfSense running at your home and have lots of devices that need to use the tunnel up to GCP
- Some other reason I’m not thinking about (please let me know if you have one in the comments!)
Everything will be done with the free community edition of eve-ng. The only things you need to supply for building this lab are a credit card to activate the Google Cloud free trial, and something in your homelab capable of running OPNsense! I specifically want today’s lab to be as low-cost as possible for all the network engineering students out there. That being said, if you’re employed as a network or security professional, I strongly recommend buying eve-ng professional and donating to the OPNsense project. Remember that without financial support, all these awesome tools will fade away. I’ll now step down from my “support the software maintainer community” soapbox so we can start getting our hands dirty with OPNsense 🙂
Step 1: Initial OPNsense setup in VirtualBox at home
Go ahead and skip down to step 2 if you’re already running OPNsense in your homelab. If you don’t already have Virtualbox installed, make sure you have that on your home machine, mine is using version 6.1.18. Download the latest OPNsense DVD release (it was 21.1 when this guide was created) too, you might need 7zip to extract the ISO image if your machine is running Windows.
Fire up Virtualbox, make a new VM, size it according to their guidelines. I’ll be doing 2gb RAM, 40gb HD and two network cards (em0 for LAN, em1 for WAN). If you’ve never used virtualbox or installed OPNsense before, that’s ok! Check out the step-by-step guide to doing this over at KifarUnix if you get stuck.
My WAN interface is a bridged network adapter going towards my cheapo home Asus router/WAP combo, and the LAN interface is simply going to the internal networking mode in Virtualbox. Installing OPNsense is a breeze, all I’m doing for now is changing the IP addresses to match the diagram. I also fired up the NST32 and Windows Server VMs on my desktop, placed their NICs into the Virtualbox internal networking mode, and made sure I can get onto the internet via OPNsense. Once everything looks good and the OPNsense GUI is reachable, we can focus on getting the GCP side of things squared away, coming back to OPNsense in step 4.
Step 2: Initial eve-ng instance setup in Google Cloud
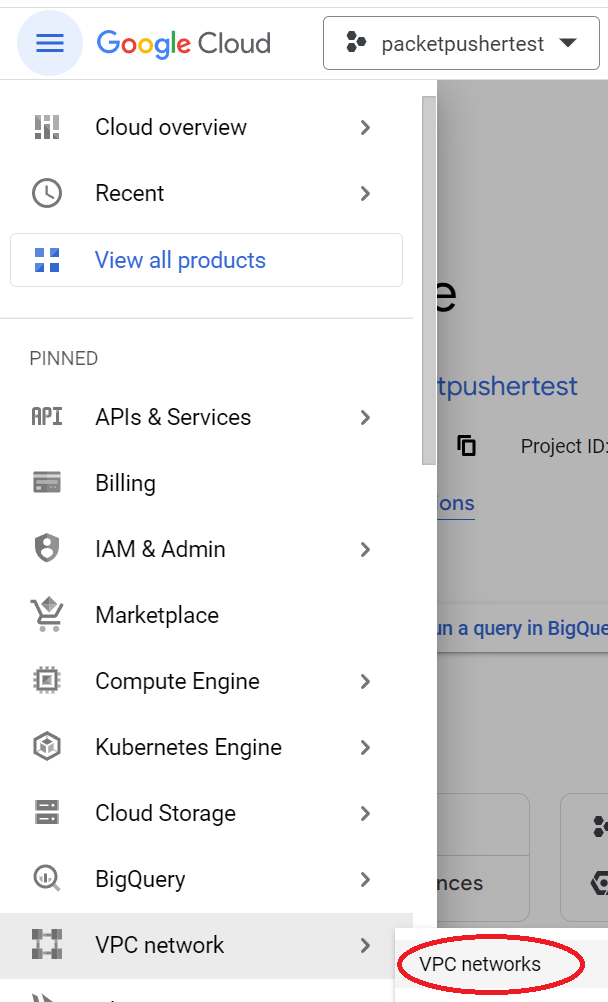
Head over to GCP console and make sure to activate your new customer credit if you still got it! I’d recommend making a new project named eve-ng, but you can use the default “My First Project” if you’d like. Before setting up the eve-ng instance, meet me at the VPC networks page of the GCP project you’re running your eve-ng instance inside of, we’ll want to clean up our Virtual Private Cloud (VPC) situation before things get too complicated:
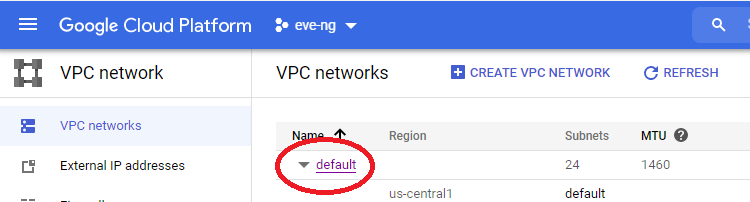
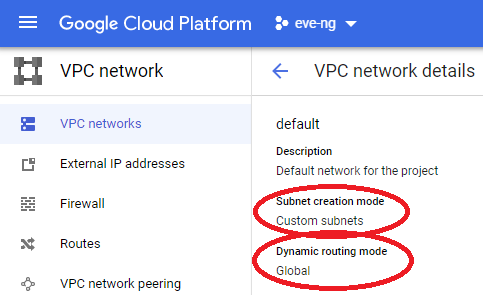
I’m going to edit the default VPC network and remove the auto subnet creation mode, allowing us to remove restrictions on using the 10.0.0.0/8 RFC1918 space. Click on that default VPC:
Then using the edit button, change subnet mode from auto to custom, along with changing the dynamic routing mode to Global, and click Save:
This next step is optional if you’re fine with GCP’s default subnet settings, but I think it’s good experience to set your own subnet regardless. You can now delete any default subnets you don’t want, and edit the entire 10.0.0.0/8 to your heart’s desire! I’m blowing away the 10.140.0.0/20 space as I will never be using the asia-east1 default IP allocation:
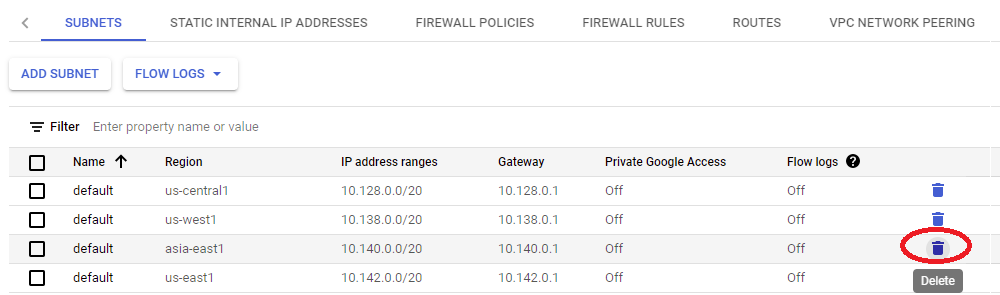
I ended up clicking the “Add subnet” button, using that 10.140.1.0/24 IP address space I carved out in the network diagram at the top of this page in the us-central1 region. Make sure to pick the region that’s closest to you if you’re following along home, and name it something meaningful:

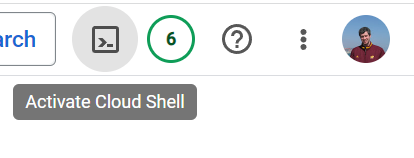
Save the subnet, then click on the Console button (aka “Activate Cloud Shell”) in the upper right of the screen:
At the bottom of the screen, you’ll see a console pop up. It’s not uncommon for some “authorize cloud shell” type messages to appear, make sure to actually read them, but these are likely ok to accept. Copy/paste this exact line into the console, it will get an Ubuntu 20.04 image with all the fancy nested virtualization stuff squared away, allowing us to install eve-ng:
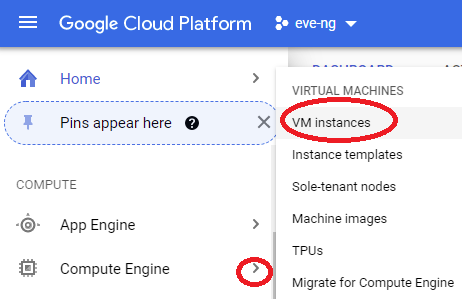
gcloud compute images create nested-ubuntu-focal --source-image-family=ubuntu-2004-lts --source-image-project=ubuntu-os-cloud --licenses https://www.googleapis.com/compute/v1/projects/vm-options/global/licenses/enable-vmxHead back to the main GCP menu, select the arrow next to Compute Engine, and click VM instances:
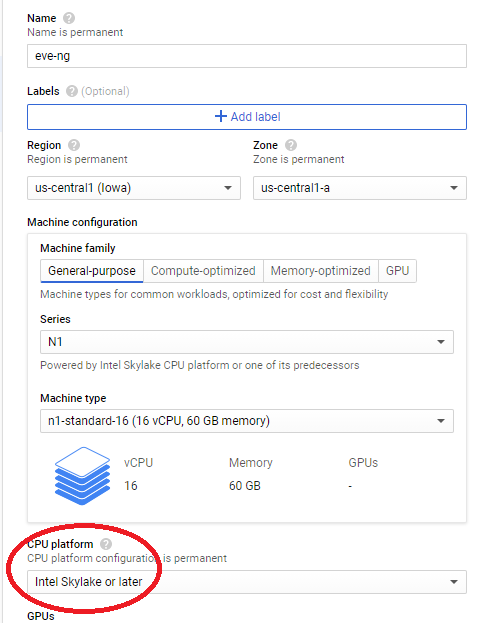
Click on the Create Instance button, then set the name & region to something that makes sense for your homelab. Pick a machine type that makes the most sense for the size of what you want to build, I went with the N1 series 16 core 60gb RAM option since that feels like the best fit for me. Don’t forget to select the newest processor architecture available if you’re given the option! Update for 2023: I am now doing the E2 series CPU platform and e2-standard-16 machine type as it’s about the same price as N1 series, but with newer CPU cores and 4gb additional RAM!
Scroll down to boot disk, click change:
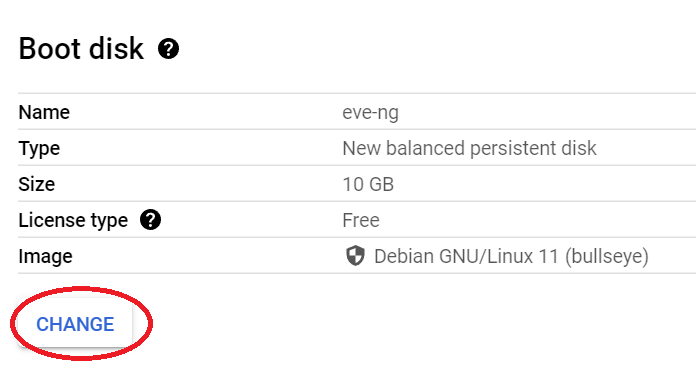
Select the “Custom Images” tab, pick the nested-ubuntu-focal custom image created earlier, pick the boot disk type of your choosing (I go standard because I’m cheap, but you can buy something with better performance), and enter in a sensible amount of HD space (I go with 500gb):

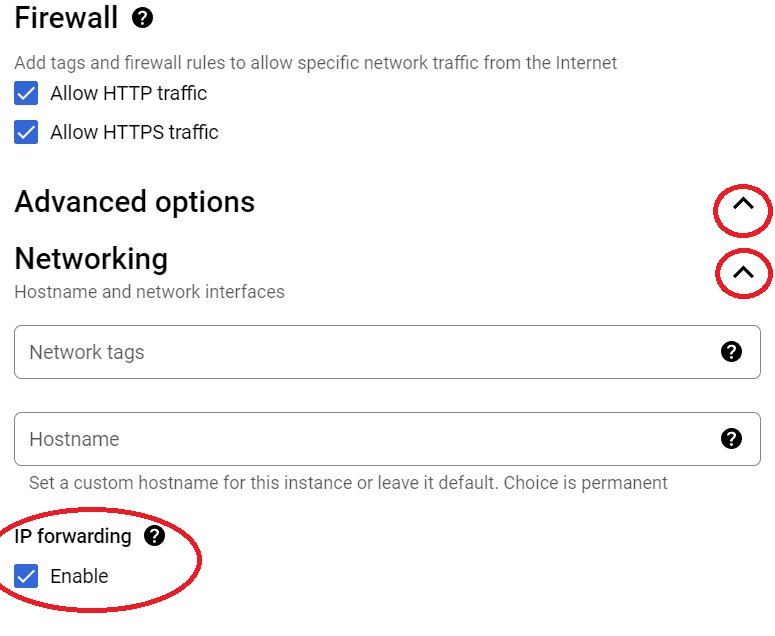
Click the Select button at the bottom of the page, then check the firewall boxes if you’d like (these won’t matter if you decide to remove the eve-ng VM’s external IP address after initial install since VPN connectivity is better. But if you want to keep the VM available from the world wide web, that’s ok too, just be aware of the risks!). After the firewall boxes look the way you’d like, click on the advanced options drop-down, expand networking, and check Enable box under IP forwarding:
Scroll down a little more to the Network Interfaces section. Make sure to select the eveng subnetwork we created earlier. I recommend setting a static custom primary internal IP and changing network service tier to standard, but those are both optional:
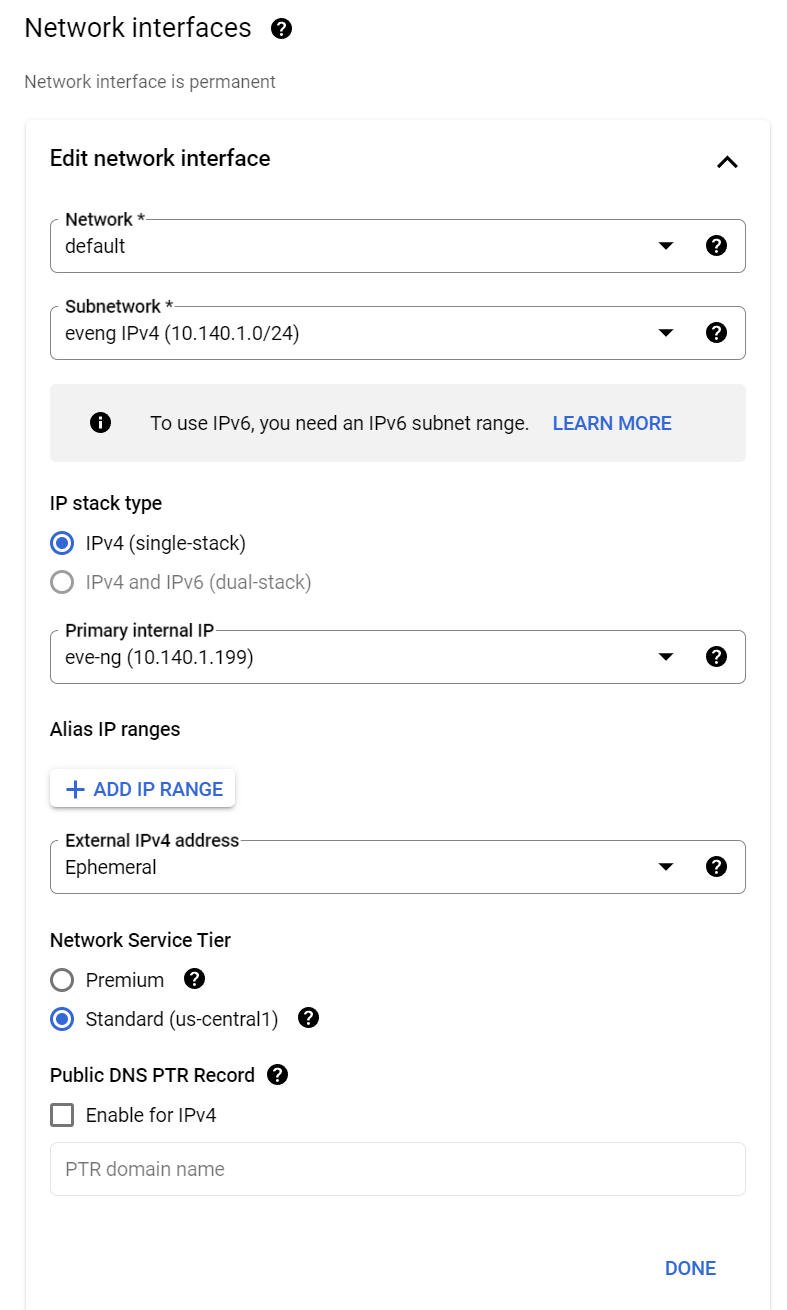
Click Done, then create at the bottom of the screen. You’ll notice a green checkbox next to the eve-ng instance once it boots up. Click on the SSH button, and we’re finally ready to install eve-ng!!

To install eve-ng, run the following four commands in the SSH terminal:
sudo -i
wget -O - https://www.eve-ng.net/focal/install-eve.sh | bash -i
apt upgrade
apt update
If you get stuck, don’t worry, just visit the eve-ng community cookbook for more step-by-step help. Once the install is complete, reboot the server with “shutdown now -r”, and reconnect after it’s rebooted. You’ll be greeted with the eve-ng installer, but don’t put anything in yet! Do a Ctrl+C, then another “sudo -i” to become root. Otherwise things won’t work the way they should (trust me, I wasted a lot of time last year because I didn’t follow this step!) At this point, you can go ahead and configure eve-ng to your liking, just keep the IP address DHCP. You’ll get stuck at this screen about halfway through the install:
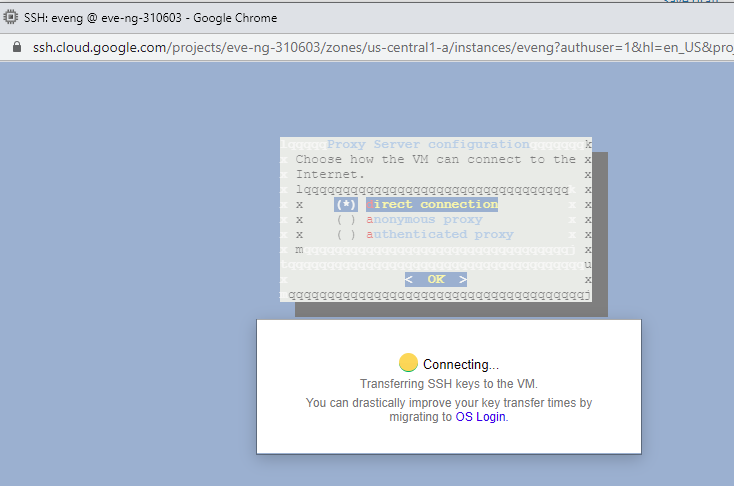
And that’s perfectly fine! Just wait a few minutes, and you’ll be able to reconnect using the GCP SSH web client. Once you’re back in, you can poke around the eve-ng instance CLI and check out the web interface (default login admin/eve). Don’t forget to shutdown the eve-ng instance when you’re done using it, you don’t want to run up the GCP bill because you forgot it’s still running. Trust me, it’s easier to do this than you’d think, automate away shutting down the instance using the framework from this post!
Step 3: Setup VPN tunnel configuration in GCP
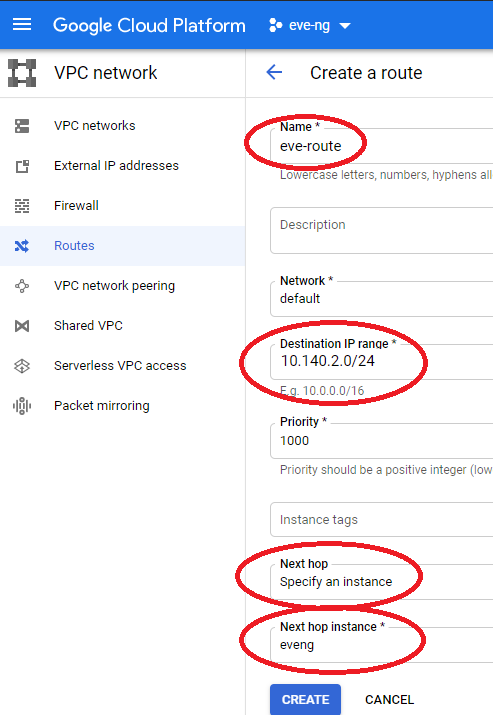
Once your eve-ng instance inside of GCP is running, it’s time to create a route for all the network traffic that will be living inside of the eve-ng topology. Without this, I won’t be able to pass traffic between VMs in the eve-ng instance and our VPN tunnel to the condo, which would make for some awfully boring labs in the future. Head back to the main GCP menu, select VPC Network, select routes, and create a new route pointing to the eve-ng instance as shown below:
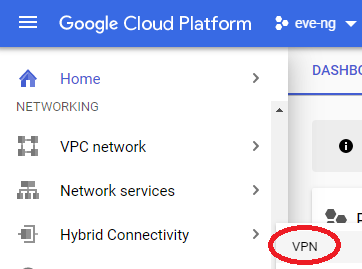
Now that all the VPC network prep is complete, you can go ahead and start setting up the VPN under networking -> Hybrid Connectivity -> VPN in your eve-ng project:
Click on the Create a VPN button, and select the classic VPN option. At the top of the screen, select the default compute engine network, and have Google create an IP address for you:

Next under the Tunnels section, enter your home public IP address (you can find this with speedtest.net), set an IKE key, and set the remote network IP range to your homelab’s subnet:

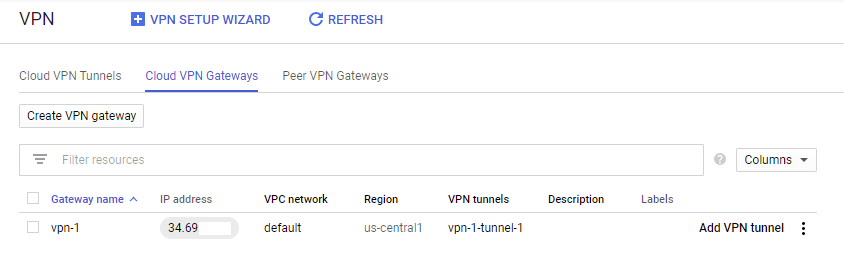
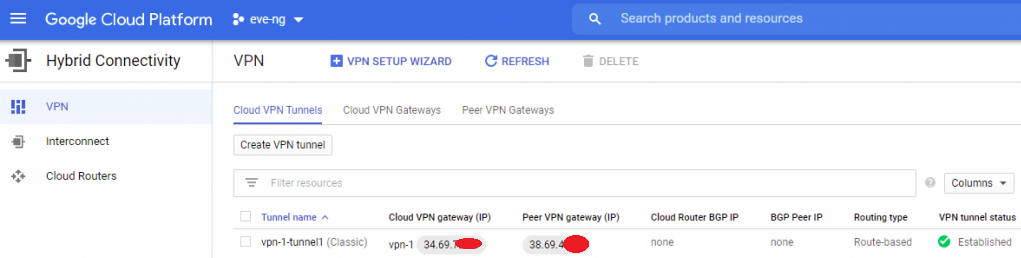
Click on the Create button, and leave this web page open, we’ll be back soon once a few things get configured in OPNsense. Take note of the IP address next to the gateway name!
Step 4: Setup VPN configuration in OPNsense
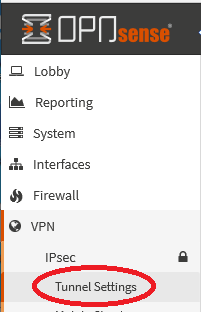
Now that Google Cloud has a good setup for the VPN, get back into one of your VMs that can access the OPNsense web interface. Big thanks to Karin Elatov for writing the guide I based these instructions on! Click on VPN in the left side of the screen, then select IPsec, and Tunnel Settings:
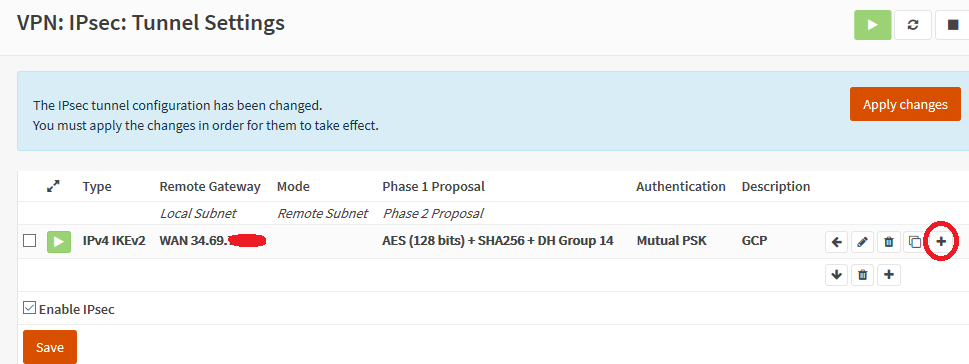
Check the Enable IPsec box, then save. Click on the little plus sign for “add new phase 1 entry”. Enter the GCP Gateway address you got from the web page after setting up the tunnel, and give an appropriate description + the same IKE key you used in the above step. Under the “My Identifier” section, change this to your home public IP address (if you have OPNsense behind some flavor of NAT, it’s important to set this statically! Otherwise you might be able to get away with “My IP Address”). Click save, then click on the little plus next to your new entry to define a phase 2 entry:
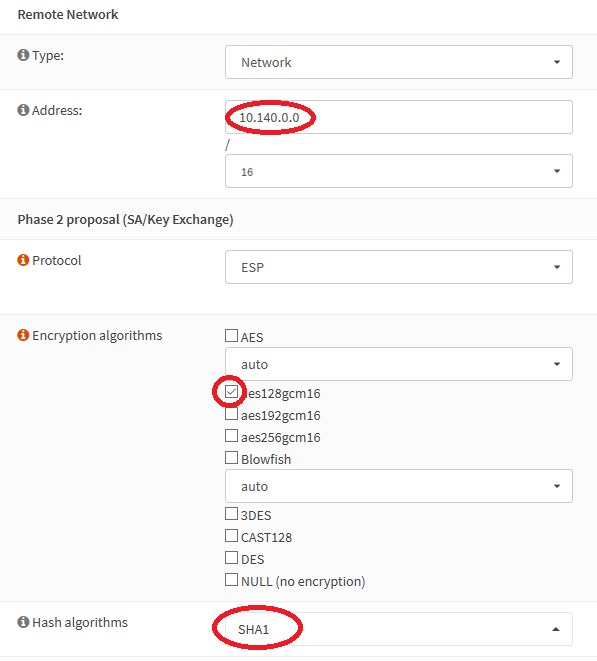
Enter a big fat /16 for your remote network address, this will ensure all of the networks we’ll use in Google Cloud will get passed down our tunnel. Change the encryption algo to AES128gcm16, and the hash algorithm to SHA1, then save:
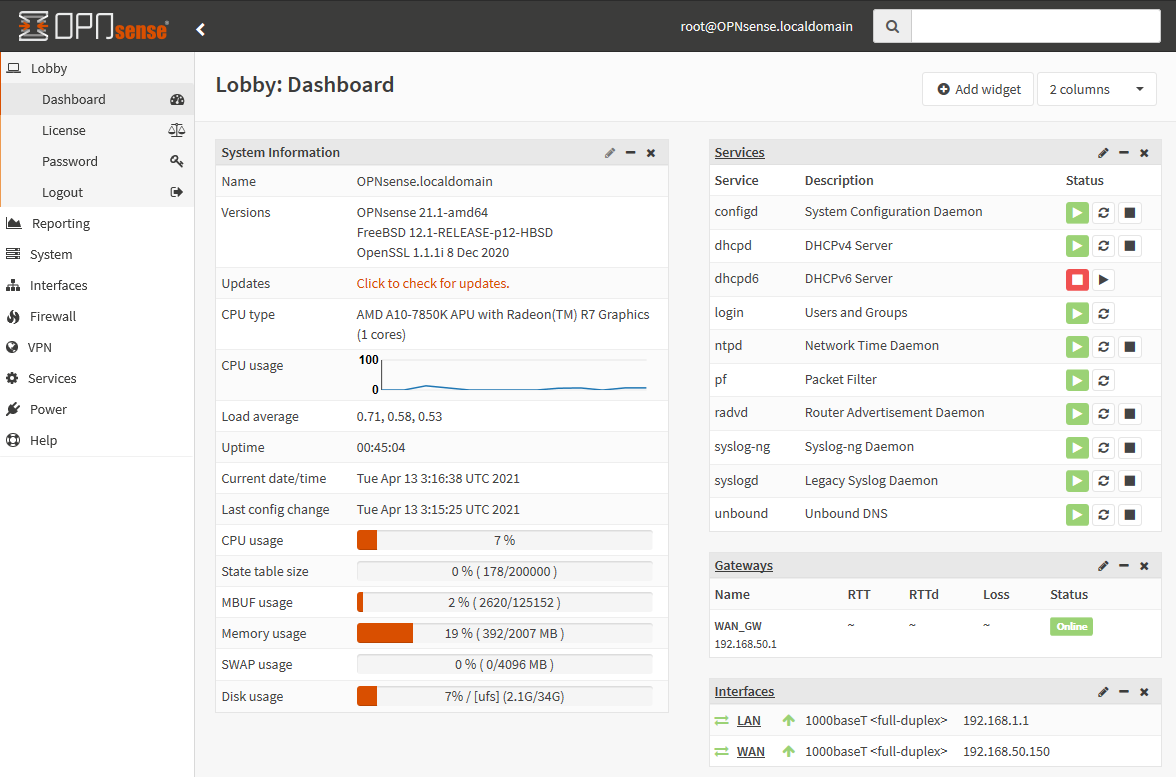
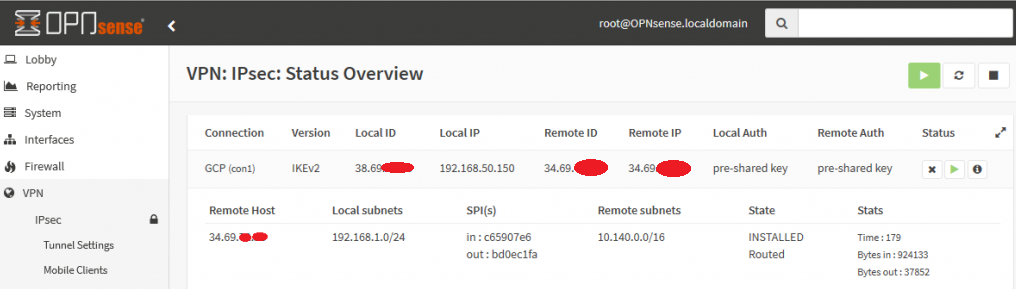
Click on apply changes, and keep your fingers crossed. Head to the Status Overview page of IPsec in OPNsense, and try to visit your eve-ng instance’s HTTP management page using one of your homelab VMs getting internet via OPNsense. With a little luck, you’ll see the green checkbox of awesomeness in GCP!
Step 5: Finishing Touches on eve-ng
Before we get too carried away into passing traffic between our VMs in the GCP eve-ng instance and devices in the condo, there’s one last critical step we must do to allow the VM traffic. and I need to thank Daniel Herrmann Techblog for pointing this trick out:
Unlike the condo’s bare-metal eve-ng instance where you can just throw a virtual switch into the cloud0 network and hit the ASA’s inside interface, you need to set an IP address on any of eve-ng’s cloud interfaces (I chose cloud9) and enable IP forwarding inside of Linux for traffic to enter/exit the GCP subnet. You can use the following two commands in your GCP eve-ng instance to fix this like Daniel’s blog mentions, but this will only work until the next time you reboot the GCP eve-ng instance, it’s not persistent:
ip address add 10.140.2.1/24 dev pnet9
echo 1 > /proc/sys/net/ipv4/ip_forward
How do you make these changes persistent so you’re not doing this manual labor every reboot? Two easy steps, with kudos to askubuntu.com and debian.org for having solutions that were easily googleable:
- Edit /etc/sysctl.conf to include the following
net.ipv4.ip_forward = 12. Edit /etc/network/interfaces to the following for pnet9, then reboot the instance to ensure the changes are working as desired:
iface pnet9 inet static
    address 10.140.2.1/24
    bridge_ports eth9
    bridge_stp off
Now that all of these little tricks are done, we can begin copying network device images up to the eve-ng instance in GCP! The howtos section of eve-ng’s website is really well put together, you should have no problems getting many different flavors of lab toys going in no time. Don’t forget to change default passwords and delete the custom Ubuntu image used during eve-ng install so everything stays squeaky clean.
Conclusion
Although it was a ton more work than setting up a ZeroTier VPN, now that the OPNsense tunnel is up, we can do some really awesome things between the eve-ng instance in Google Cloud and our homelab. Here’s a small list of ideas & resources you may find helpful once you start kicking the tires in GCP eve-ng:
- Network Collective’s video on getting GCP eve-ng topologies internet access. Alternatively, you could use Squid Proxy to do this via your VPN tunnel, but the Network Collective solution is cleaner in my opinion.
- If you don’t need internet access and want to better lock things down, search my guide from last year for “unnecessary”, and you’ll find steps on how to accomplish that in GCP console.
- My guide on moving a GCP eve-ng instance from one GCP account to another if you want to gift your setup to someone else after the $300 new customer credit is gone
- With a little effort, you should be able to follow these VPN instructions for use on pfSense.
- With a lot of effort, you could probably setup a High Availability VPN tunnel similar to the one I had on my Cisco ASA VTI tunnel on OPNsense
The one big issue with this lab is the setup & teardown of the VPN tunnel is quite ugly. While this isn’t a problem with your free GCP $300, getting nickle & dimed on hourly VPN fees isn’t fun. Same goes for if you accidentally leave your eve-ng instance running for a few days at $0.55 an hour! Also if your home IP changes, the tunnel goes down. My next homelab post addresses all of these issues by scripting out everything to ensure the VPN tunnel is up, eve-ng instance is started, and everything is torn down cleanly once you’re done homelabbing for the day. Definitely follow those steps if you plan on using eve-ng in GCP long-term after the new customer credits are exhausted. Until then, happy homelabbing!
You’ve reached the end of the post! Click here to go back to the list of all Homelab posts.
You should also know I may earn commissions on qualifying Amazon purchases made via kd9cpb.com links to defray the cost of otherwise ad-free web hosting.
3 thoughts on “Google Cloud eve-ng setup with OPNsense homelab tunnel in 2023”
Comments are closed.