
As always, opinions in this post are solely those of my own, and not necessarily those of any organization I am currently affiliated with or have been in the past.
First posted 6/20/2021
A few weeks ago, I went to download a copy of Cisco NX-OS. Upon noticing version 10 is now available, I took a look at the release notes of 10.1.2, and noticed this very cool new feature:

Sounds quite Juniper-esque, and I’m very happy to see one of my favorite JunOS features made its way into NX-OS! Cisco’s documentation on this new two-stage config commit feature is pretty decent and I’m surprised nobody has done a homelab blog post or YouTube video about it yet. I’m even more surprised there’s nothing written about invoking NX-OS two-stage config commit mode from an automation tool. So I’ll be doing exactly that today: getting Netmiko to perform two-stage configuration commits on a free-to-download Cisco NX-OS 9000v node in eve-ng.
Initial Setup
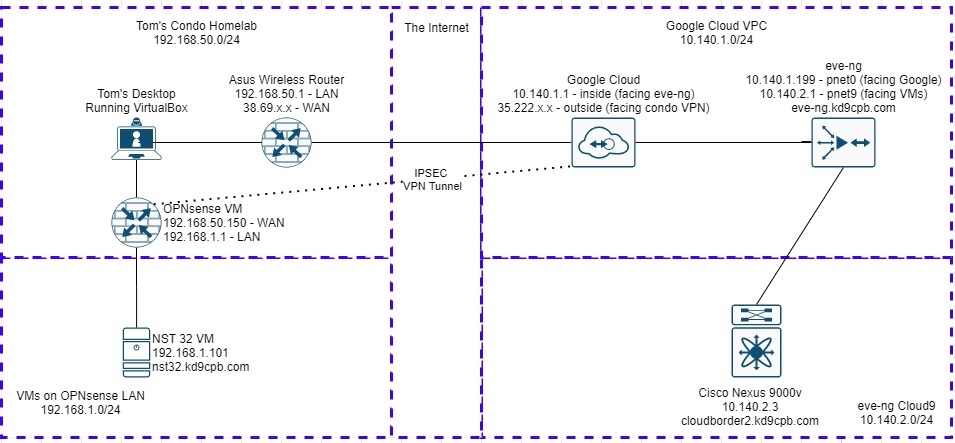
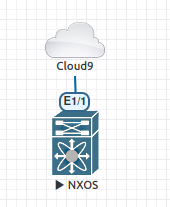
The topology above is near identical to what I did in my OPNsense VPN tunnel to an eve-ng instance in GCP cloud homelab a few months ago. Only difference is I’m now running a Nexus 9000v node up on the GCP eve-ng instance with NX-OS 10.1.2, which is really easy thanks to the eve-ng official instructions. The topology within eve-ng is simple; I’m only plugging Eth1/1 of the Nexus switch into the “Cloud9” cloud network device so I can SSH into it via my NST32 virtual machine at home:
Check out my first Netmiko homelab or the OPNsense to GCP eve-ng tunnel write-up if you’re newer to this sort of thing and would like to follow along home. I’ve also made a folder on GitHub for this homelab that contains all the Python scripts, NX-OS configs & whatnot used in today’s write-up. So feel free to head over there and download everything directly instead of copy/pasting off this webpage.
Be advised that NX-OS may take a very long time to boot up depending on your eve-ng setup, be patient if you don’t see all the Ethernet interfaces show up right away. Let’s go ahead and get started by getting the following base configuration applied on the Nexus 9000v switch:
feature interface-vlan
interface vlan 1
ip addr 10.140.2.3/24
no shut
desc demo_vlan
ip route 0.0.0.0/0 10.140.2.1
username netmiko password Netmiko1! role network-admin
hostname cloudborder2
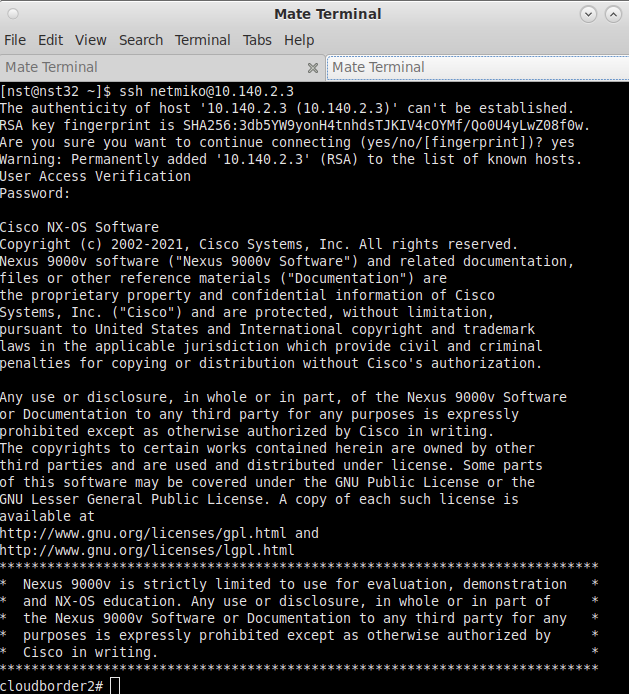
ip domain-name kd9cpb.comAfter getting that applied, I could immediately start pinging the NX-OS switch up in the GCP eve-ng instance from my NST32 VM running on my desktop. For good measure, I always like SSHing into the switch before starting any real homelab automation stuff. This way, I know the SSH key fingerprint is in my list of known hosts, my new user account for Netmiko works, and I get some instant gratification seeing the 9000v login working via my IPsec tunnel to the cloud 🙂
Now that I’m in the switch, I can go ahead and try out the “config dual-stage” mode, entering in a few changes that will not immediately get applied into the running-config. Once I’m ready to apply the changes, I can do a “commit confirmed 300” along with the “commit” or “abort” commands to make config changes ala JunOS with a 5 minute timer before automatic rollback. This works well, but it’s 2021, typing CLI commands into an SSH terminal is kinda boring. So let’s do something more fun by using Netmiko to apply two-stage config commit changes!
Getting Netmiko to make a good two-stage configuration commit
I’ll start off by making a file named testcommit.py, and getting all of the information Netmiko needs to connect into the NX-OS switch defined:
#!/usr/bin/env python3

from netmiko import Netmiko

# setup Netmiko
nxosvars = {
            'host': '10.140.2.3',
            'username': 'netmiko',
            'password': 'Netmiko1!',
            'device_type': 'cisco_nxos',
            }
nxosconnect = Netmiko(**nxosvars)
Next, I’ll add a low-stakes change (adding a description to port eth1/8) using Netmiko send_command. Normally, it’s best practice to use Netmiko send_config for making changes. But for today, I need to use send_command with cmd_verify=False in order to get into the two-stage config commit mode, and send “commit confirmed 300” to rollback any bad changes after 5 minutes:
# get commands together
nxoscommands = """
config dual-stage
int eth 1/8
desc hello_from_netmiko
commit confirmed 300
"""

# send commands into nxos
output = nxosconnect.send_command(nxoscommands, cmd_verify=False)
print(output)
I’ll finish off the Python script with some dirt simple conditionals to ask the network engineer how things went. If everything is good, Netmiko will send NX-OS the “commit” command to permanently apply the changes. If things went poorly, Netmiko will send NX-OS the “abort” command, which is the equivalent of doing “rollback 1, commit” in JunOS to immediately backout a bad change. Because “abort” gets me out of two-stage config commit mode and will drop me off at privileged exec, I need to use send_command with expect_string=r”#” so Netmiko doesn’t throw an exception:
# use two-stage config confirm
commitanswer = input("Did the change work as planned? (y/n)")
if commitanswer == "y":
	output = nxosconnect.send_command("commit")
	print(output)
if commitanswer == "n":
	output = nxosconnect.send_command("abort", expect_string=r"#")
	print(output)

nxosconnect.disconnect()
When I launch the script, it appears to connect and I get prompted to either commit permanently or abort! In my script’s output, I only see the first line entering two-stage config commit mode instead of all the commands I asked Netmiko to send. Usually I’d expect Netmiko to give me more info about what it’s doing, but if I login to the switch and check the running-config, I can see my commands did indeed get pushed to the switch. So I’m not going to spend too much time digging into the lack of output for now:

A quick show command on NX-OS proves the change was applied successfully too!

I pressed y in my script to send “commit” into NX-OS, and if I look at the syslog, the commit ID is there:

Everything went well for this example, and I’m very happy Cisco kept the “commit confirmed” syntax close to JunOS. That being said, there’s two tiny annoyances I ran into which would be awesome to see improved in future NX-OS releases someday:
- JunOS uses minutes by default for their “commit confirmed” command, wheras Cisco uses seconds. So if I’m jumping back and forth between JunOS and NX-OS, I could easily see myself putting in “commit confirmed 30” on an NX-OS switch, thinking I get 30 minutes to validate changes, only to have everything rolled back 30 seconds later! This isn’t a big deal, but it’s another opportunity for human error.
- I can’t seem to find a way to do the equivalent of “show | compare” in JunOS with NX-OS’s two-stage config commit mode. You can compare the current config to a previous one with NX-OS’s “show configuration commit changes (commit ID)” command, but you’ll need to enter a previous commit ID to make it work. You can’t just do a super quick (and easily scriptable!) command like JunOS’s “show | compare” to diff the candidate config with the most recently committed one without knowing what the last commit ID was. If you find a way to pull this off, please let me know in the comments!
Getting out of a bad change ASAP with Netmiko
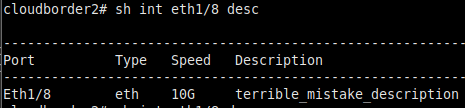
The above example was fun, but let’s say I modified the Python script to make a network change that I’ll instantly regret after applying. To illustrate this, I made a copy of testcommit.py named badcommit.py, changing the eth1/8 port description to “terrible_mistake_description”. Upon running the script, I can see right away the change has been applied to my NX-OS config:
I want to correct the mistake, so I’ll tell Netmiko things didn’t go as planned, which sends NX-OS the “abort” command right away:

Sure enough, I can get back into the NX-OS switch and confirm the erroneous change was reverted! The syslog will also tell us the rollback was a great success:

I did make sure to verify just waiting the full 5 minutes for the commit to rollback works as expected without having Netmiko tell NX-OS anything after appling a two-stage config confirm mode change. Making an extremely dumb change that knocks out management connectivity will get reverted automagically after the commit confirmed timer runs out too, just like JunOS.
Today’s Netmiko scripts are incredibly simple, but prompting the network engineer for input doesn’t really scale at all, and to be honest I think it’ll be awhile before NX-OS 10.1.2 or above finds its way into widespread production use. This is fine for my homelab, but in the real world I’d imagine most network engineers will wait until NX-OS 10 becomes the “gold star” release before tinkering around with it in production. Hopefully by then, many of the network automation frameworks out there will have two-stage config commit support for NX-OS baked in. That way we don’t have to do the Netmiko.send_command sins I’ve done above to apply JunOS style changes in NX-OS 🙂
Well that’s cool, but wouldn’t Ansible be cooler?
When I first started writing this homelab, I originally planned on using Ansible’s nxos.command module to sneak us into two-stage commit mode instead of using Netmiko. It didn’t work, but I figured I’d share what happened in case any Ansible gurus out there have thoughts on this matter. I quickly cooked up a hosts.ini file:
[cloudborder2]
10.140.2.3

[cloudborder2:vars]
ansible_user=ansible
ansible_ssh_pass="Ansible1!"
ansible_connection=ansible.netcommon.network_cli
ansible_network_os=cisco.nxos.nxos
Then made a playbook named twostagetest.yml, using two-stage config commit to add a port description on eth1/5 along with “commit confirmed 300”:
[nst@nst32 lab11]$ cat twostagetest.yml
- name: test applying a dual-stage config
  hosts: cloudborder2
  gather_facts: false
  tasks:
    - name: test changing an interface desc
      cisco.nxos.nxos_command:
        commands:
        - config dual-stage
        - interface eth1/5
        - desc crazy_port_name_from_ansible
        - commit confirmed 300
After kicking off the playbook with the following, I got this output:
ansible-playbook -v -i hosts.ini twostagetest.yml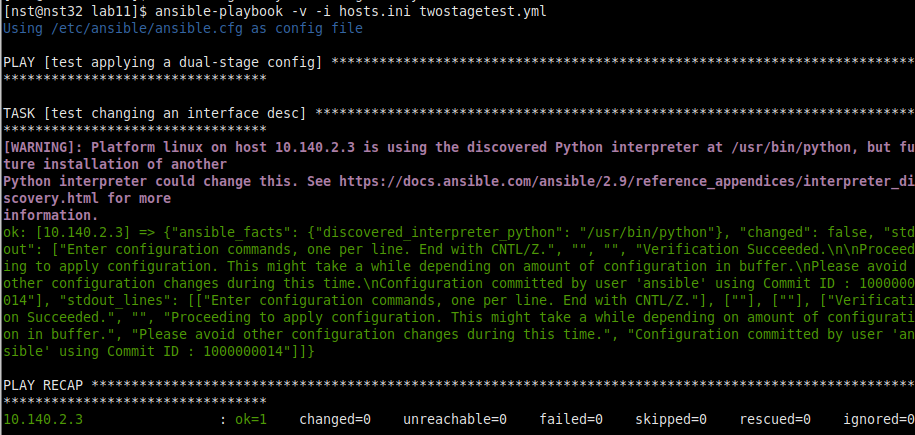
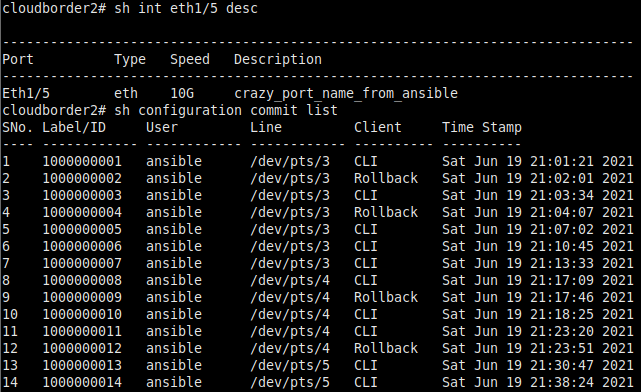
This was really exciting! I could see in the verbose Ansible output that commit ID 1000000014 was committed. When I SSH’d into the switch, I could validate my change with “show int eth1/5 desc”, and I saw the commit ID in the new “show configuration commit list” command (ignore commits 1 thru 13 as those are just me playing around):
Awesome! So then I proceeded to try and confirm the commit from my SSH session, but much to my surprise, it appears NX-OS already did that for me:
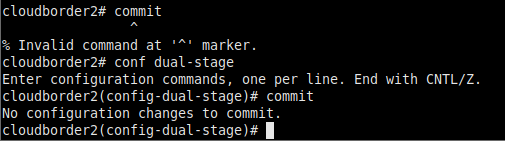
Well that sure isn’t very Juniper-esque, then I remembered, this isn’t JunOS. It looks to me like NX-OS confirms the commit immediately once the SSH session is gracefully closed by the nxos.nxos_command task in my Ansible playbook! In Cisco’s defense, their documentation for NX-OS two-stage configuration commit clearly states “This feature is supported only for a CLI interface in a user-interactive session.”, so they don’t appear to have nerds like me trying two-stage change commit via Ansible in mind as their primary use-case. I can understand why they’d want a gracefully-closed SSH session to have any unconfirmed changes get committed; that’s actually quite nice if you accidently do a ~. + enter on the wrong SSH session. But I personally prefer the JunOS style “someone needs to login to this device and type commit or I’m going to throw your config in the garbage” attitude, that’s just my $0.02.
I messed around with the playbook for a good hour or two trying to hack together a way to make two-stage config changes work from Ansible. Since I’m not super talented in this neck of the woods, I decided to just complete the homelab with Netmiko instead, as I knew it would keep the SSH session open until I send disconnect(). Maybe the nxos Ansible collection will be improved to support two-stage config changes soon, and this becomes a moot point. Maybe there’s some other way to do two-stage config changes from Ansible that I’m not thinking about. Overall I’m very happy that Cisco spent all the time + money and effort to implement a “commit confirmed” way of thinking in NX-OS. I hope they update their Ansible collection to allow this cool new feature to be used as easily as you can do “commit confirmed” on JunOS’s Ansible collection too. If you find a way to get two-stage configuration commit working in NX-OS via Ansible, please let me know on Twitter or in the comments.
You’ve reached the end of the post! Click here to go back to the list of all Homelab posts.