
As always, opinions in this post are solely those of my own, and not necessarily those of any organization I am currently affiliated with or have been in the past.
First posted 12/13/2020
If you asked me about automating Cisco IOS/ASA/NXOS/etc tasks that I was doing manually via the CLI a few years ago, I probably would have sent you a link to this amazing XKCD, as it accurately described my experiences trying to automate network stuff:

Sadly, I was stuck in my ways of not embracing automation tools other than Excel, Notepad++, and a tiny bit of tmux for way longer than I should have been. “It’s not that I don’t want to get better at automation, I’m just so busy with firefighting, this site refresh, a new business requirement, etc. that I never have time to complete the Kirk Byers’ python course” was my MO for way too long. If you find yourself in that position, it’s ok, but I’m going to challenge you to at least try the first couple chapters of Hello World rev. 3 as it might just change your outlook on learning python like it did for me. Everything I’ll be doing today is caveman-style, bad-old-days, barely-counts-as-automation type stuff. There’s far better ways to do this homelab fully in Python using Netmiko, or better yet using an automation framework like Ansible.
The problem with those newer, more robust automation tools is the learning curve can be quite steep for a traditional no-coding-knowledge network/systems technician. These new tools allow you to make big changes like you’re AWS, but they also allow you to fail at scale like you’re AWS too! I bet many network folks out there feel the same, resulting in sticking to the simpler tools within your comfort zone, even when you’re well aware it’s not the most efficient way to go. So I’ll only be taking baby steps into a very tiny amount of Python today, using my good ol’ favorite tools of Excel, Notepad++, and network CLIs to automate creating a large number of VLANs.
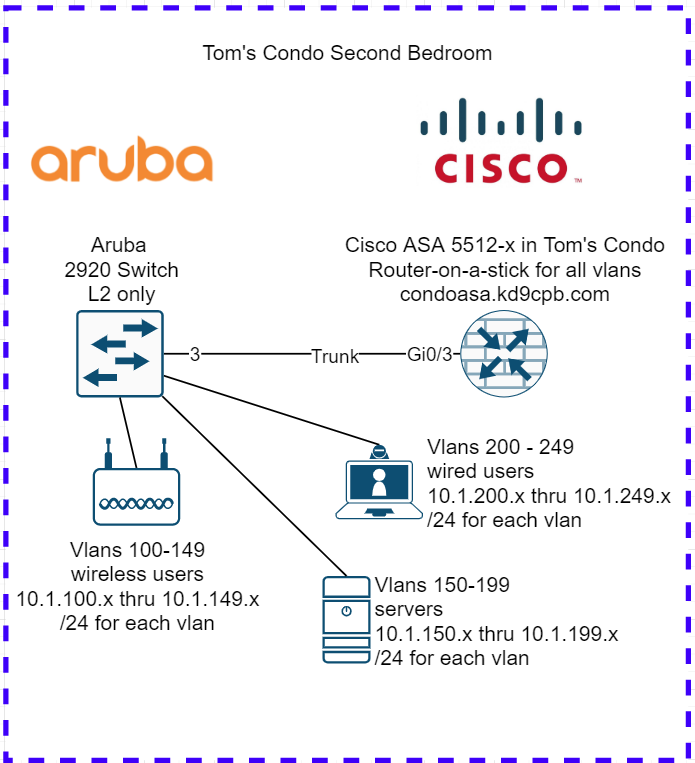
The main reason I wanted to do this homelab isn’t to show off my jankety Excel & Notepad++ tricks, it’s because I want to revisit this lab in 6-12 months, re-doing it using only Netmiko and Python, fully automating all these steps (Update 3/13/2021: that lab is complete!!!). I also want to illustrate that even if you’re not comfortable with coding, you can still do some pretty cool things with python, even with only 15 minutes experience! A few weeks ago, I blabbed on for way too long on this CCNA Toolkit post about how it’s impossible to play Eddie Van Halen solos on guitar without first mastering simple 5-note songs first; much like you can’t start writing python scripts for zero-touch-provisioning without knowing how to print a newline. So without further adieu, let’s start playing one of those simple 5-note songs of network automation with building the following topology:
Initial Configs & Tools
For the sake of time, I’m going to steal the initial configs of the ASA & Aruba switch from my captive portal homelab as those already have basic management connectivity ready to go. You’ll find these configs at the github folder for this lab, along with all the Excel files & 4th grade level python I’ll be cooking up too!
Let’s pretend we are turning my second bedroom into a new branch office for hundreds of users. We’re going to have 50 vlans for wireless users, 50 vlans for servers, and another 50 vlans for wired users. All these networks will be using the ASA as a router-on-a-stick, because I’m very cheap and I want to get fancy with ACLs using ASDM someday. But for now, I only want to get basic connectivity working on all 150 vlans, and that’s exactly what we’ll use Excel, Notepad++ and a little bit of python to automate. We’ll also pretend I have a beefier ASA, as the 5512-x only has support for 100 vlans 🙂
I will be using the following tools on a Windows machine, so ensure you have access to the following if you’re following along at home:
- Microsoft Excel (any version will do, other spreadsheet programs should behave similarly)
- Notepad++, which I like to install via ninite
- Python 3, which I like to install using the Windows installer from the Hello World book, as it’ll include a bunch of fun educational extras
- The SSH client of your choosing for getting into the network device CLIs, I’ll be using PuTTY to keep it simple today, but I’d recommend using Windows Subsystem for Linux with tmux if you want to be fancy
Once you have all those tools installed & your network devices accessible via SSH, meet me inside Microsoft Excel so we can get started on task #1
Task #1: Get 150 subinterfaces created on the Cisco ASA, with proper names & IP addresses
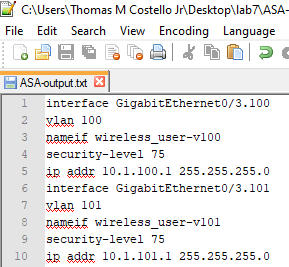
I want output similar to the following example generated 150 times, so that the ASA router-on-a-stick setup is ready to route our traffic:
interface GigabitEthernet0/3.100
vlan 100
nameif wireless_user-v100
security-level 75
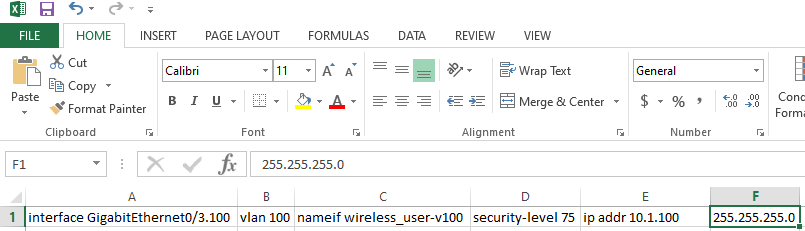
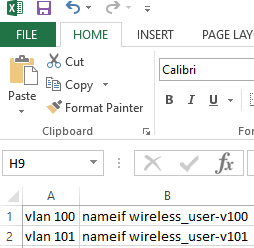
ip addr 10.1.100.1 255.255.255.0Type the following into your Excel notebook, every column correlating to a line of ASA config, except for the IP address config line. For the IP address config line, only type “ip addr” with first 3 octets of the IP in column E, and put the subnet mask into column F (don’t worry, I’ll explain why I’m doing this soon):
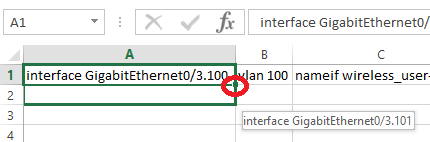
Now that our first row is complete, click & hold on the little green square in the bottom of cell A1, drag it down a row, and you’ll notice Excel is auto-populating the next row with an incrementing interface number!
Go ahead and click & drag this down to cell A150, getting us a nice set of 150 interface commands, perfectly aligned with our vlan numbering. Do the same for cell B1, click & drag this down to cell B150 for the vlan command too. For cell C1, only click & drag down to cell C50. For cells C51-100, I want the interface name to start with server, and cells C101-150 will start with wired_user. If you’re not following me, that’s fine, take a look at the ASA.csv in the github folder. Click and drag cell D1 down to cell D150, but click on the little squares button and select “Copy Cells”, since we don’t want our security-level to increment:

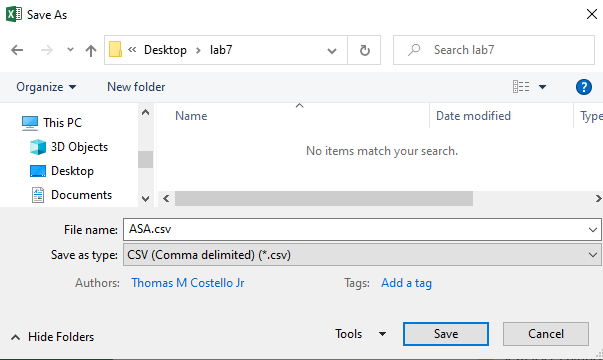
Click and drag cell E1 down to E150, incrementing the third octet of the IP addresses. Do the same “Copy Cells” trick for cell F1 to F150, copying our /24 subnet mask onto each row. Save the Excel doc as a .csv:
Excel will complain about saving in .csv format as it won’t save all the fancy formatting, which is fine. Again, if you’re not sure if you did this .csv creation correctly in excel, just look at ASA.csv in the github folder. Now that the .csv is saved, open it up in Notepad++. Hold down Ctrl + F, then click on the Replace tab. Let’s start off by fixing our IP address commands, by typing ,255 into the “Find What” box. Type a .1, a space, and 255 in the “Replace With” box:
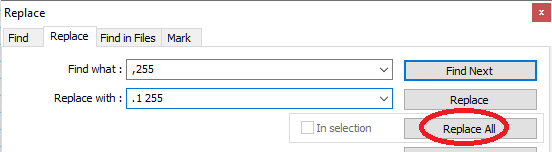
Click on the Replace All button, and just like that our IP address config lines are ready to go! This is why I had you type the subnet mask into a separate column in Excel, I think it’s easier to fix up our data in Notepad++ than it is to get Excel incrementing the subnet IP addresses properly. There’s one more big replacement we need to do: type a comma into the “Find what” box, and \n into the “Replace with” box, then click the Replace All button again:
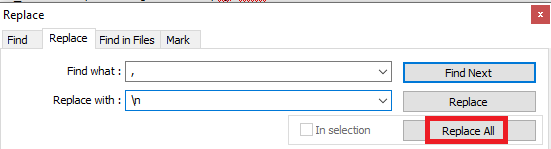
This will create a very ugly looking text file, but don’t worry, python will turn the ugliness into the perfect ASA command line output we desire. Long story short, \n is telling python to start a new line, which will easily give us our desired CLI output. On the very first line of this ugly text file, add the text print(“””
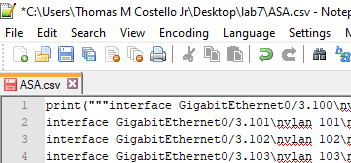
Go to the very last line of the file, and add “””) to the end:

Just like that, we got our 4th grade level python command of one gigantic triple-quote string printing operation completed! Save the file as asa.py. If you’re comfortable with Python, you can run this on the command line, saving the output to a file. If you’re not comfortable with Python, open up the IDLE editor that’s built-in to the Hello World Python3 installer, by searching for IDLE in the start menu:
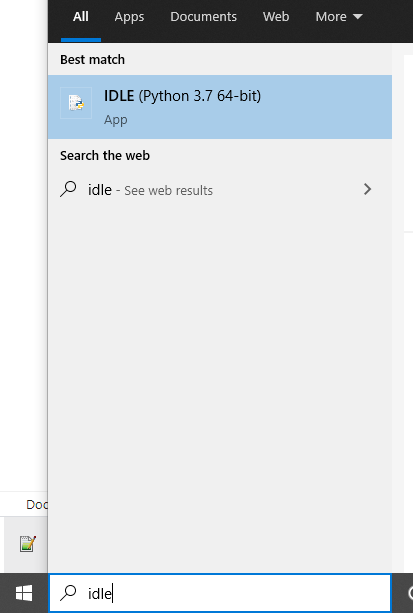
Open that ASA.py file in IDLE, then click on Run Module from the Run menu:

We’re almost there! Double click on the “Squeezed Text” button:
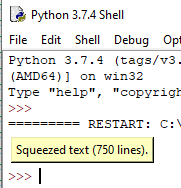
If everything went well, you should see 750 lines of pristine ASA configuration for our 150 vlans, which we can copy/paste directly into the CLI or text editor of our choosing. I went ahead and copied everything back into Notepad++, saving the output as ASA-output.txt, which you can find in the github folder. I’ll also copy/paste this in smaller chunks into the ASA using putty, because I’m worried that copy+paste of 750 lines might be a little too much at once:
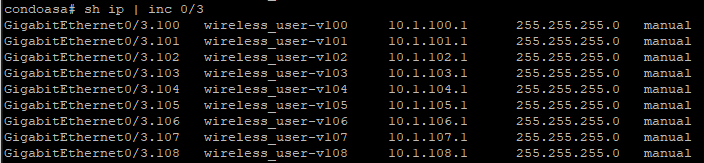
Also don’t forget, we need to do a no shut on Gi0/3 for our link to come up with the Aruba switch:
interface GigabitEthernet0/3
no shutdown
Once the port comes up, we can see some great output from “show ip | inc 0/3”, and it’s time to move onto configuring our switch:
Although I’m not using it today, the multiline editing tool in Notepad++ can be really helpful with .csv files like this. Check out the following YouTube video below, which does a much better job of explaining this than I can:
Task #2: Get 150 vlans created on the Aruba switch, with proper names
Now that the ASA is squared away, let’s take that ASA.csv file and doctor it up a little to automate creation of these 150 vlans on the Aruba switch. Re-open ASA.csv, and delete columns A, D, E and F:
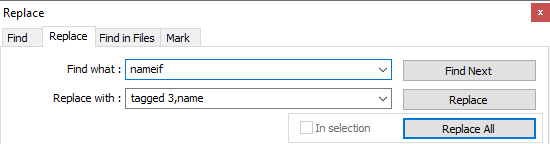
Save this file as Aruba.csv, and open it in Notepad++. We’re going to do the same replace trick, holding down Ctrl+F, going to the Replace tab. In the “Find what” field, type nameif. In the “Replace with” field, type “tagged 3,name”, then click Replace all:
I’ll admit that what I just did was very jankety: it would have been better if I created that “tagged 3” column in Excel. However, I figured I’d do it using the replace tool in Notepad++ to illustrate how powerful this tool is, it’s saved me a lot of time over the years! Now that we have our .csv ready to go, let’s do the same replace , with \n trick as we did for the ASA. Then add print(“”” to the start of the first line, “””) to the end of the last line, and save as Aruba.py. As always, if you’re not following what I just said, just take a peek at Aruba.py in the github folder.
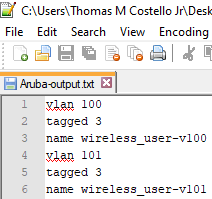
Head back to IDLE one last time, open Aruba.py, run it, then copy+paste that sweet, sweet 450 line CLI configuration directly into the Aruba switch, or into the text editor of your choosing. I saved my output to Aruba-output.txt before copy/pasting into putty, so that you can check it out in the github folder:
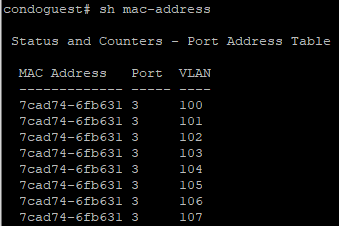
After copy/pasting, it looks like the trunk came up as desired, we can see the ASA’s MAC all over the MAC table!
Conclusion
Although it might not feel like much, we did some pretty cool things in this lab:
- With an ugly but simple python script, using only the print function, we’ve generated over 1000 lines of CLI config for the network devices.
- We’ve removed a very large number of opportunities for someone to fat-finger the IP address and vlan configurations.
- Configs were written for both Cisco and Aruba devices, demonstrating the multivendorness of python scripting.
- These .csv files could easily accept additional columns, allowing for even more automated config generation if we wanted.
- Even the most stubborn refusing-to-learn-code netadmin out there could accomplish this!
I’m sure there’s some experienced network automaters out there who’ve had their eyeballs burn looking at that massive triple-quote string. Again, today’s use of python was absolutely not the most efficient, we could have done just about everything within a python script itself, sending our config direct to the network devices via Netmiko. But using Netmiko, doing a for loop, ranges, string concatenation, etc. takes more than 15 minutes of python knowledge!
Update 3/13/2021: I’ve now refactored this lab in only Python/Netmiko at https://kd9cpb.com/netmiko-auto.
Update 3/28/2021: I’ve now refactored this lab in Ansible/Jinja2 at https://kd9cpb.com/ansible too.
You’ve reached the end of the post! Click here to go back to the list of all Homelab posts.
You should also know I may earn commissions on qualifying Amazon purchases made via kd9cpb.com links to defray the cost of otherwise ad-free web hosting.
4 thoughts on “Network Automation with Excel, Notepad++ & 4th Grade level Python”
Comments are closed.