
As always, opinions in this post are solely those of my own, and not necessarily those of any organization I am currently affiliated with or have been in the past.
First posted 10/11/2020
This post is kinda obsolete. Check out the new eve-ng + OPNsense VPN tunnel write up instead! Or stay here if you want the Cisco ASA specific stuff.
Before we get into some of the big things I want to cover on this website featuring ArubaOS-CX, Cisco ISE 3 and other fun new technologies, let’s take some time to explain the initial state of my homelab, and my reasoning for setting things up the way they are. My favorite thing about this inaugural lab write-up is we get to take full advantage of Google Cloud Platform (GCP) nested virtualization for running Emulated Virtual Environment Next Generation (eve-ng) Community Edition at a really cheap hourly rate. We can then use the newer Cisco Adaptive Security Appliance (ASA) Virtual Tunnel Interface (VTI) with Border Gateway Protocol (BGP) tunnel for excellent connectivity between my condo’s second bedroom and GCP. This acronym soup is far more elegant than traditional “policy-based” site-to-site VPNs on the ASA in my opinion, and I really hope anyone reading this considers VTI with BGP for any site-to-site tunnel needs going forward.
The big picture
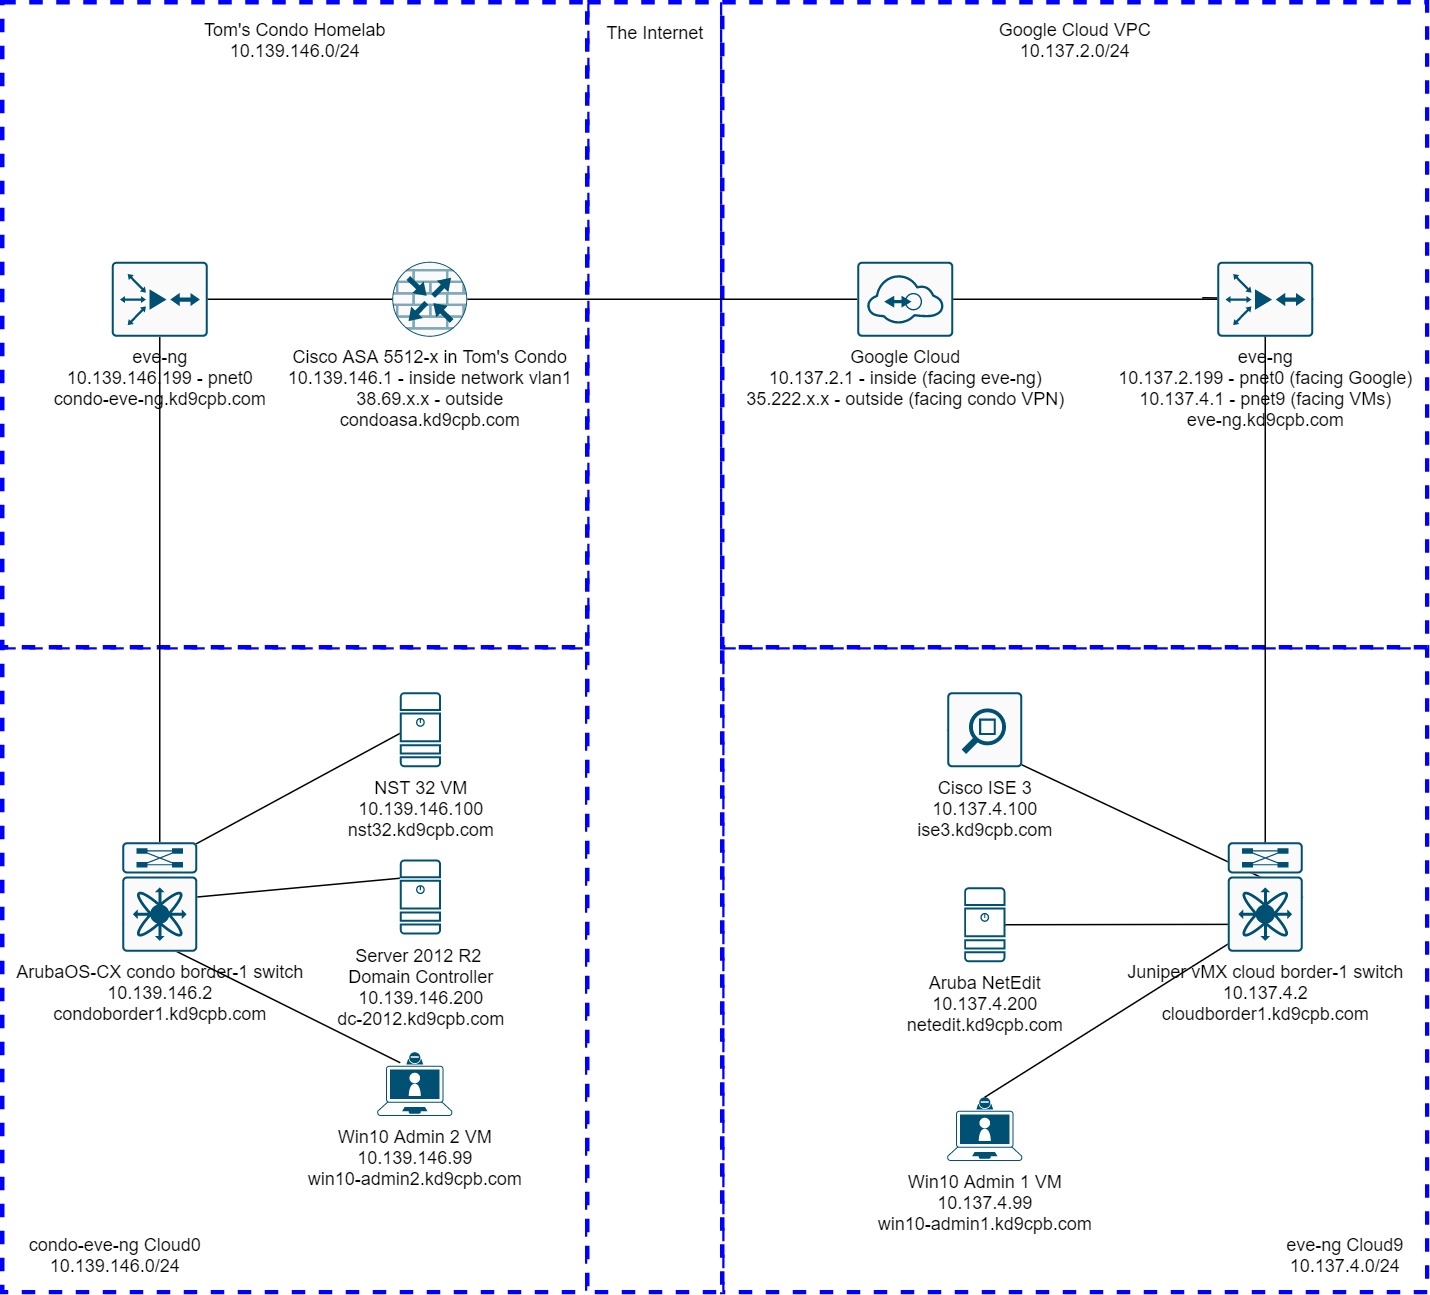
Left Side: Tom’s Condo Homelab vlan 1 & eve-ng Instance (condo-eve-ng topology shown below)
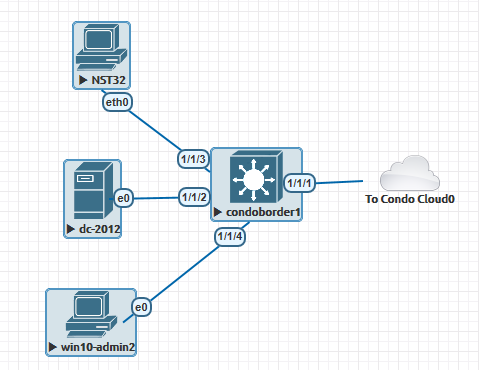
The lion’s share of all things I plan on adding to vlan 1 at the condo will be on an eve-ng instance I have setup on my AMD A10-7850k desktop PC. Under normal circumstances, this “powerhouse by 2014 standards” boots into Windows 10, but I have a 256gb USB key to boot into eve-ng, which is what I’ll be doing for nearly all homelabs. The official eve-ng cookbook does an amazing job of covering how to install eve-ng, and I didn’t deviate from their bare metal instructions for the setup on my desktop. While the performance of the USB key is terrible, this was a super easy hack to get the performance boost of eve-ng running on bare metal without messing with the RAID5 setup for Windows 10 on the desktop. One of these days I’ll reinstall Windows and leave some space for eve-ng!
The Cisco ASA 5512-x is plugged into my home internet via a cheap dumb gigabit switch, allowing for my plain old Asus wifi router to stay online 24/7 while the ASA only powers up during lab hours. Internet via wired Cat5 handoff is included in the HOA fee here in the condo, and thankfully I can grab 2 public IP addresses from our unit’s ethernet jack. However, there is one massive drawback when running any physical ASA other than an ASA5506 for home use; 1U fan noise is not compatible with a lofted ceiling condo! But that’s ok, the firewall is neatly tucked away in a closet, and we get all the benefits of VTI tunneling that are unavailable on the older ASAs.
I believe it is possible to do everything I’m doing with my 5512-x on Cisco’s ASAv platform within eve-ng itself. Personally, I’m not a fan of plugging the nasty raw internet directly into a hypervisor (sadly in most homelab environments, you’d almost need to do this if trying ASAv for tunneling to GCP because of google’s VPN rules on things behind NAT), but if you can get your hands on an ASAv image easily, it may be cheaper/quieter than running an ASA in your second bedroom. If you do a similar lab setup in ASAv, please tell me in the comments, I’d love to know if it works well.
If you’ve never touched an ASA before but really want to do one of these tunnels in your homelab, don’t be intimidated, you can easily learn this skillset! Chris Bryant’s CCNA Security Bootcamp on Udemy would likely be the easiest way to get up to speed on this stuff. I haven’t taken that course personally, but Chris’ CCNP series on Udemy was super helpful for me, and is one of the most sensibly priced Cisco trainings available in my opinion.
Right Side: GCP eve-ng Instance (eve-ng topology shown below)
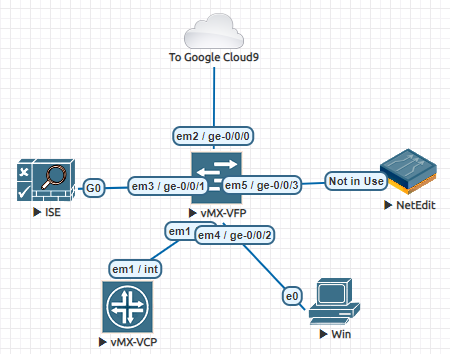
We’re not going to cover a whole lot about setting up the eve-ng instance in GCP, simply because their official guide does a fantastic job of explaining this, and openeye.blog did a great play-by-play if you’d find that helpful. My main purpose for writing this post is to cover the VTI tunnel between the condo and the cloud in extensive detail since that’s half the fun of this initial setup.
I would recommend scrolling down to the steps at “The Main Event” before setting up your eve-ng instance in GCP. Making network changes to existing google cloud instances is a bit more painful than I think it should be, but that’s fine, we’ll do it right the first time! Please keep in mind that as of this writing, you need to use VPC routes and enable IP forwarding to allow eve-ng VMs to talk outside of the eve-ng instance, you can’t just throw everything onto the eve-ng Cloud0 (management) network like I’ll be doing in the condo. We’ll be talking about the routes & IP Forwarding setup required in Google Cloud quite a bit, if someone out there figures out a way to successfully do this with fewer steps in Google Cloud, hit me up in the comments!
The Individual Device Configs
Aruba NetEdit
Surprisingly I found no guidance on getting Aruba NetEdit to work within eve-ng; seems like most are just running it directly on vmware/KVM/GCP/AWS/Azure and following the official Aruba install guide. Sadly NetEdit requires a whopping 32gb RAM and 6 processor cores?!? to run, but at least we can run it within eve-ng without spending more $$$ on another GCP instance just for a single automation tool. We won’t be doing anything inside of NetEdit for this post, but I’m sure we’ll be using it soon.
The trick to getting NetEdit running is to follow the Aruba AMC guide from eve-ng where you first convert the vmdk, set the node to use 6 cores, 32GB RAM, 1 NIC, then connect the “Not in use” NIC to your switch. NetEdit takes an incredibly long time to start, but once it gets going, the performance feels ok for now. I like the fancy looking default AMC icon in my eve-ng topology, but the “not in use” name for the interface is very cosmetically annoying. If you find a better way of getting NetEdit into eve-ng (or an easy hack to rename the interface so it looks nicer in eve-ng topology), please let me know in the comments and I’ll share it here.
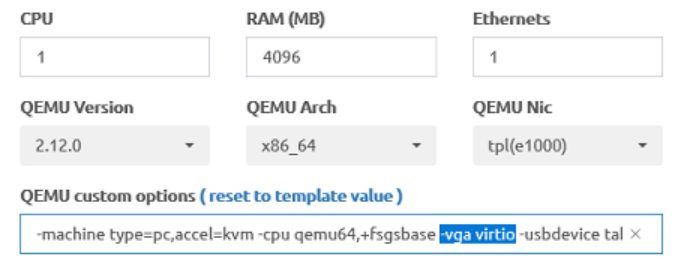
Windows Server 2012 R2 & Windows 10 Clients
The Official eve instructions on getting these to work are pretty good, set the memory & CPU count to something sensible, do the B: Floppy trick mentioned to get storage drivers, and you’ll be fine. Only thing I do differently is change the vga option from std to virtio per the advice I found on r/networking about speeding up Win10 performance.
Even with that trick, the Windows VMs do feel a bit laggier than I was expecting. If you have tricks to make this more tolerable, please share the advice in the comments.
You may be wondering about the Active Directory config for Server 2012 R2. I’ve tried to keep it as dirt simple as possible, there’s so many resources from YouTube/Udemy/Local Library Books/etc that I’m not planning on writing about it here. I’ll definitely share more details when they’re pertinent to Cisco ISE, but for now, AD is pretty boring here in the homelab!
NST 32
This is networksecuritytoolkit.org’s version of Fedora 32 which I’m a huge fan of (more about that at the very bottom of this post). The custom Linux host for eve-ng instructions are pretty straightforward, it’s really no different than installing Windows. If you’re using ArubaOS-CX with NST32 like I am, set the NIC type to e1000, otherwise you’ll get wacky TCP issues even though pings & DHCP work. I also like to run the following two commands as root after NST32 is installed to enable SSH into the host before I forget and wish I had enabled SSH later:
systemctl enable sshd
systemctl start sshd
Aruba OS-CX
Right now, we’re doing a dirt simple config for the ArubaOS-CX virtual switch, future labs will be having a lot more fun on this virtual switch! Official eve-ng instructions are quite good on how to unpack Aruba’s .ova file, and I’ve placed my default config on the initial lab folder in github
Juniper vMX
I’m still warming up to Juniper more, for now the dirt simple config is up on Github and the official eve-ng instructions plus enabling lite mode should get you going. Kudos to Juniper for spelling this mode the same way as Miller Lite, the Midwest appreciates it 🙂 If you’re brand new to JunOS and want to take the red pill into Juniper-land, check out their free Day One Books, it’s good stuff.
Cisco ISE 3
EVE’s official guide on installing Cisco ISE 2.6 is still perfectly valid for Cisco ISE 3! Be very patient during the install; it will take forever, but it will work as long as you give ISE the 250g+ hard drive space and 16gb RAM it wants.
Cisco ASA 5512-x
We’re doing a pretty simple config here to start out, see the next step for all the VTI tunnel fun, and see the github page for the final full config:
condoasa# sh run
ASA Version 9.8(4)29
!
hostname condoasa
!
interface GigabitEthernet0/0
 nameif outside
 security-level 0
 ip address dhcp setroute
no shutdown
!
interface GigabitEthernet0/1
 nameif inside
 security-level 100
 ip address 10.139.146.1 255.255.255.0
no shutdown
!
dns server-group DefaultDNS
 domain-name kd9cpb.com
!
nat (inside,outside) after-auto source dynamic any interface
aaa authentication ssh console LOCAL
http server enable
http 10.139.146.0 255.255.255.0 inside
ssh 10.139.146.0 255.255.255.0 inside
ssh version 2
ssh key-exchange group dh-group14-sha1
dhcpd address 10.139.146.50-10.139.146.75 inside
dhcpd dns 8.8.8.8 4.4.2.2 interface inside
dhcpd enable inside
!
username tcostello password (omitted)
!
policy-map global_policy
 class inspection_default
  inspect icmp
The Main Event: VTI tunnel from condoasa to GCP Virtual Private Cloud
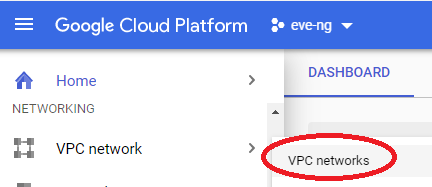
We’re finally at the most exciting part of this lab! Running a VTI tunnel between the Virtual Private Cloud (VPC) up on the Google side and the condo results in all data between the sites being fully encrypted without burning a bunch of public IP addresses or anything crazy. Before setting up the eve-ng instance, meet me at the VPC networks page of the GCP project you’re running your eve-ng instance inside of:
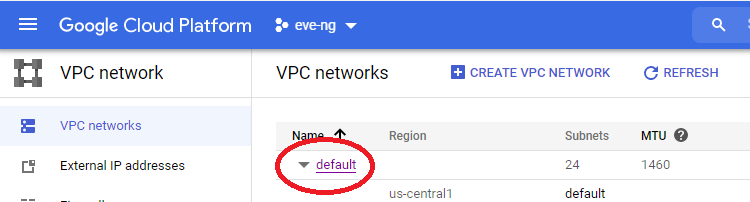
I’m going to edit the default VPC network to remove the auto subnet creation mode, allowing us to remove restrictions on using the 10.0.0.0/8 RFC1918 space. This step is optional if you’re not planning on using the 10.128.0.0 – 10.186.0.0 IP address space the way Google intends on you using it by default, but I think it’s good practice to set your own subnet regardless. Click on that default VPC:
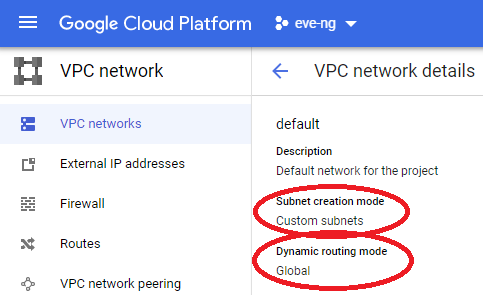
Then change subnet mode from auto to custom, along with changing the dynamic routing mode to Global:
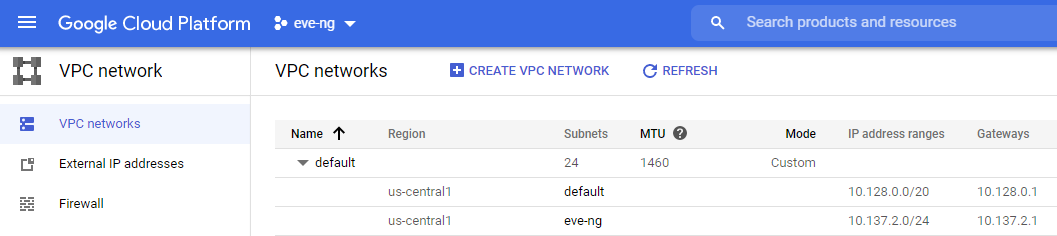
Now you can delete any default subnets you don’t want, and edit the entire 10.0.0.0/8 to your heart’s desire! I ended up making a new /24 named eve-ng in the region closest to me after blowing away some subnets assigned to some US West Coast & European regions that I’ll never be using:
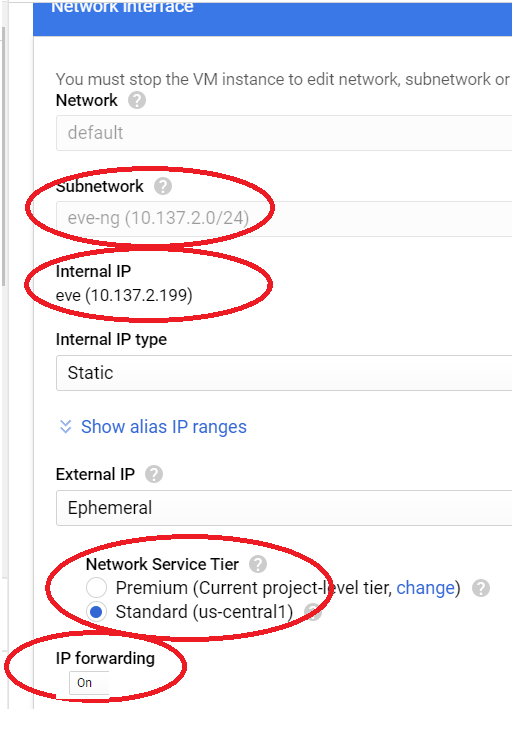
Now that we have a subnet for the eve-ng instance, follow the exact steps from the GCP section of the eve-ng cookbook to get the GCP instance running. Note that as of Feb 2021, there’s a step where you have to enter some syntax regarding a license for enabling VMX. I think that syntax is broken, use https://compute.googleapis.com/compute/v1/projects/vm-options/global/licenses/enable-vmx as the URL, and you should be good. The only other exceptions are to make the following 4 changes on the network interface section:
- Change subnetwork to the custom one I just created
- Change Primary Internal IP to the static one I put in the network diagram at the top of this lab
- Change Network Service Tier to Standard for cost reduction wherever we can get it
- IP Forwarding turned on (this is important and easy to miss!)
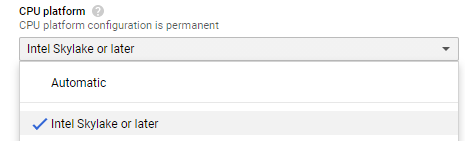
Another optional trick is to set the CPU platform to the newest available. As of this writing, I felt that the n1-standard-16 instance type (near identical to what’s in the eve-ng cookbook) is the best bang for the buck in my homelab, but you might want to pick something smaller/bigger accordingly. Google lets you choose which processor type your instance will get, so might as well select the newest architecture available, which is currently Skylake, but might be something even newer by the time you’re reading this:
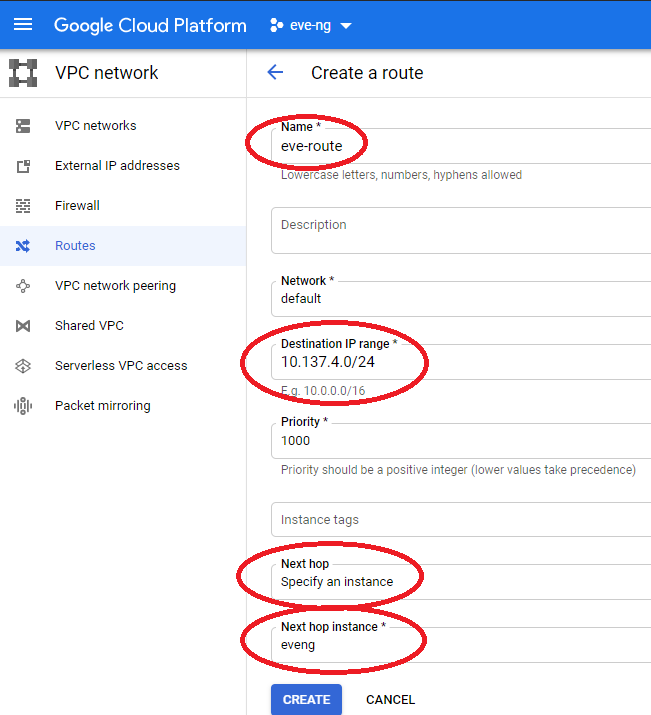
Once your eve-ng instance inside of GCP is running, it’s time to create a route for all the network traffic that will be living inside of eve on the VPC network menu. Without this, I won’t be able to pass traffic between the VMs in your GCP eve-ng instance and our VTI tunnel to the condo, which would make for some awfully boring labs in the future. Head back to the VPC Network menu, select routes, and create a new route pointing to the eve-ng instance as shown below:
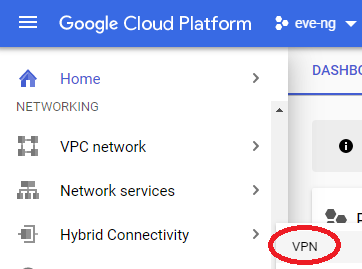
Now that all the VPC network prep is complete, you can go ahead and start setting up the VPN under networking -> Hybrid Connectivity -> VPN in your eve-ng project:
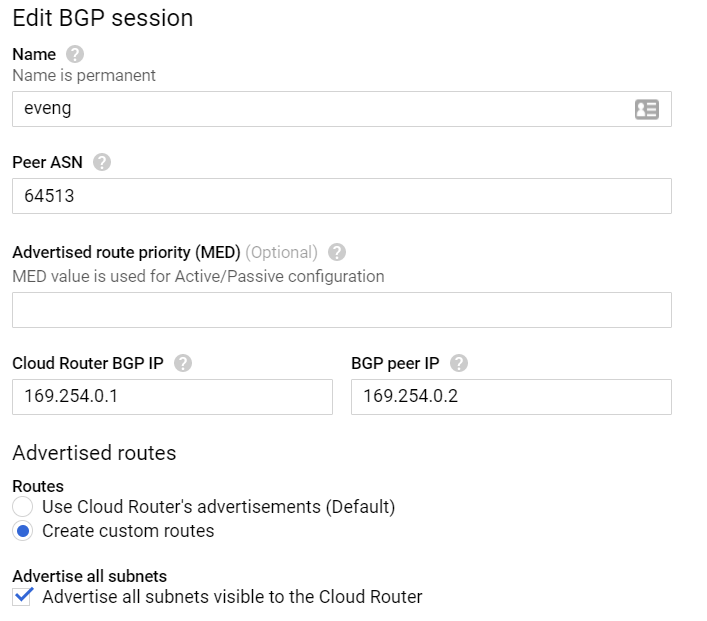
Click on the Create a VPN button, and select the HA VPN option. Name it something appropriate, select the region you’re running in, and enter the IP address of your home firewall under peer VPN gateway interface. Create a cloud router using BGP AS 64512, then make a BGP session using AS 64513. We’ll use the first two IP addresses from the APIPA address range as transit IPs between us and Google. Click on “Advertised routes”, check the “Create custom routes” radio button, then check the “Advertise all subnets visible to the Cloud Router” box:
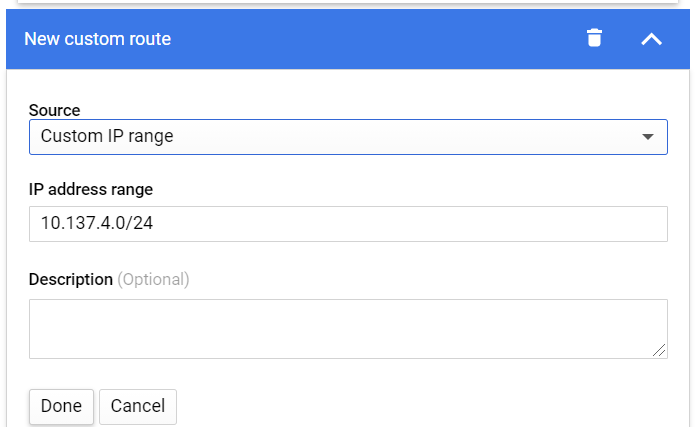
This next step is very important and easy to miss: we must publish a custom IP range via BGP to our ASA if we want the VMs within eve-ng to talk with the condo network. Click on the “Add custom route” box, and enter in the /24 you plan on using within the GCP eve-ng instance for VMs:
Save the BGP configuration, and you should be dropped off at the VPN page of the Hybrid Connectivity menu. Click on your tunnel name (I named my eveng) and take a peek at all your tunnel details:
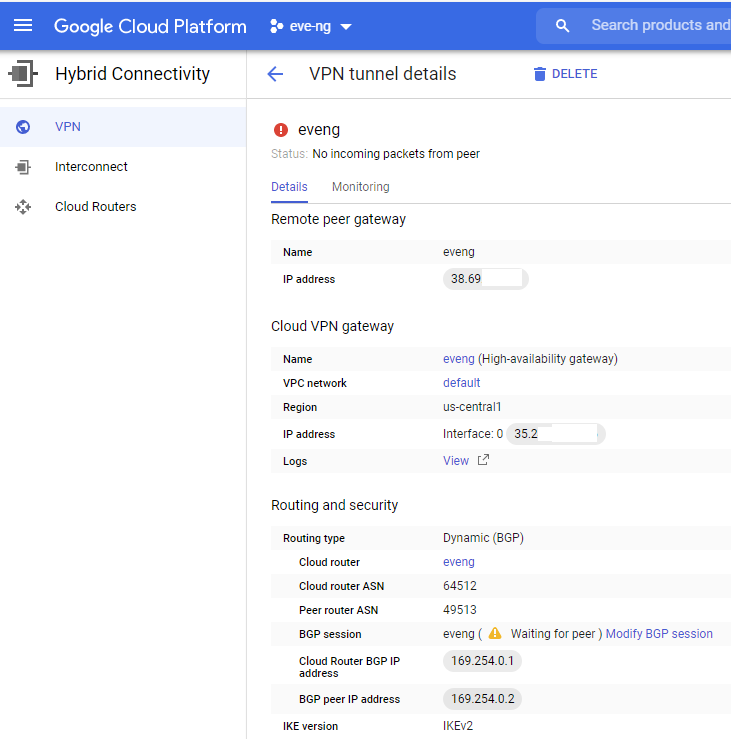
This is exactly what we’re expecting to see at the moment; the condo’s WAN IP on the Remote Peer Gateway, a Google public IP address under their Cloud VPN Gateway, and the correct BGP AS numbers + transit IP addresses under routing and security. Keep this page handy as we’ll be checking back here shortly once the ASA gets configured!
On our ASA, we’re just going to copy + paste all of the following into our config, which is based off Google’s interop guide for Cisco ASA. Just substitute 35.x.x.x for your actual Google cloud VPN gateway IP address, and mysharedsecret with your actual secret:
crypto ikev2 policy 10
encryption aes-gcm-256
group 14
prf sha512 sha384 sha256 sha
lifetime seconds 36000
crypto ikev2 enable outside
!
crypto ipsec ikev2 ipsec-proposal GCP
protocol esp encryption aes-gcm-256
protocol esp integrity sha-512
!
crypto ipsec profile GCP
set ikev2 ipsec-proposal GCP
set pfs group14
set security-association lifetime seconds 10800
set security-association lifetime kilobytes unlimited
!
group-policy GCP internal
group-policy GCP attributes
vpn-tunnel-protocol ikev2
!
tunnel-group 35.x.x.x type ipsec-l2l
tunnel-group 35.x.x.x general-attributes
default-group-policy GCP
tunnel-group 35.x.x.x ipsec-attributes
isakmp keepalive threshold 10 retry 3
ikev2 remote-authentication pre-shared-key mysharedsecret
ikev2 local-authentication pre-shared-key mysharedsecret
!
interface Tunnel10
nameif gcp-if-0
ip address 169.254.0.2 255.255.255.252
tunnel source interface outside
tunnel destination 35.x.x.x
tunnel mode ipsec ipv4
tunnel protection ipsec profile GCP
!
prefix-list GCP-IN seq 5 permit 10.137.2.0/24 le 32
prefix-list GCP-IN seq 10 permit 10.137.4.0/24 le 32
!
router bgp 64513
bgp log-neighbor-changes
bgp graceful-restart
bgp router-id 10.139.146.1
address-family ipv4 unicast
neighbor 169.254.0.1 remote-as 64512
neighbor 169.254.0.1 ebgp-multihop 2
neighbor 169.254.0.1 activate
neighbor 169.254.0.1 prefix-list GCP-IN in
neighbor 169.254.0.1 maximum-prefix 100 70
network 10.139.146.0
255.255.255.0
maximum-paths 2
no auto-summary
no synchronization
exit-address-family
!
access-list GCP-IN extended permit ip any any
access-group GCP-IN in interface gcp-if-0
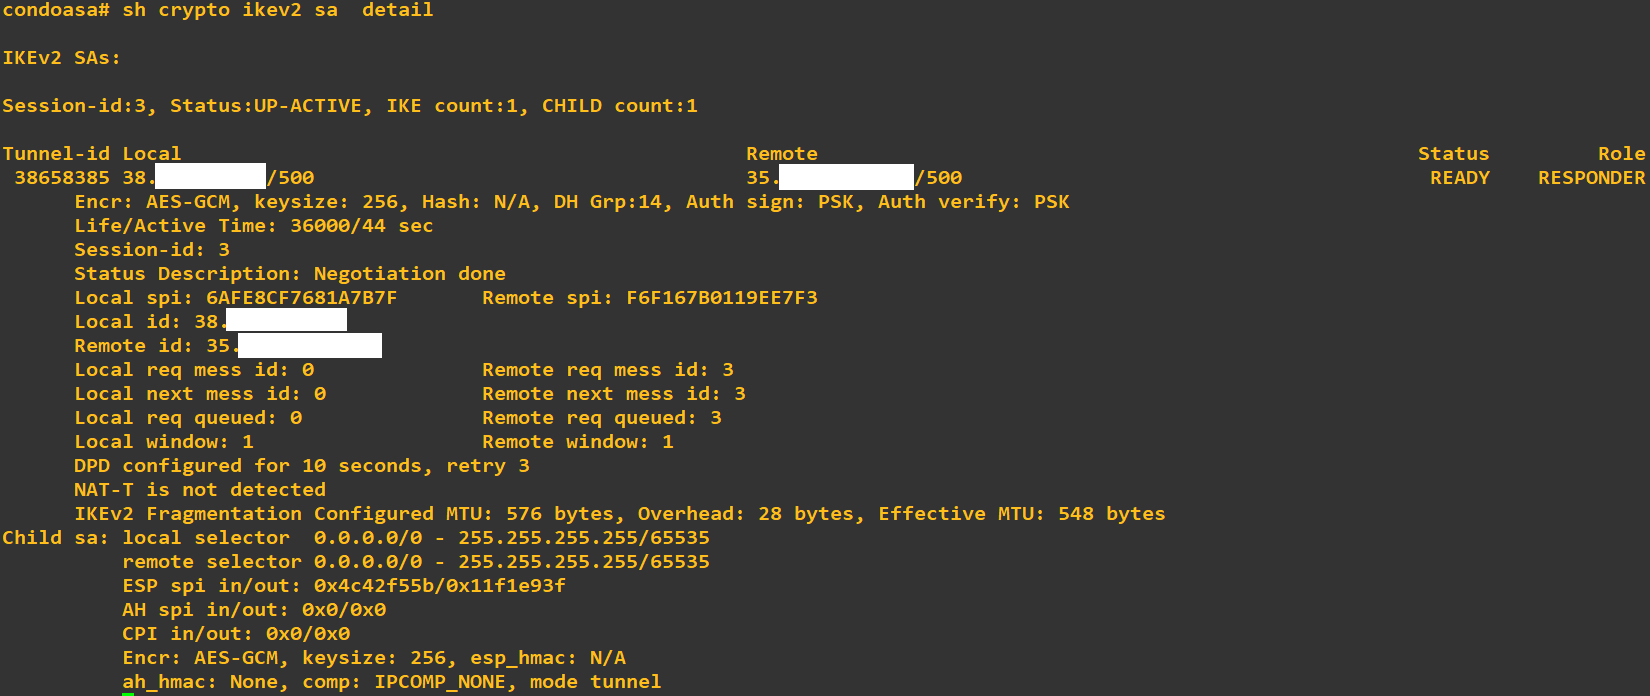
access-group GCP-IN in interface gcp-if-0 control-planeIf you’re using different subnets than what I’m using, make sure to update the prefix-lists and “network” command within BGP accordingly. If the planets are aligned, and our Cisco + Google overlords are satisfied with your efforts, you should start seeing something similar to the following on your ASA and on Google Cloud VPN page:
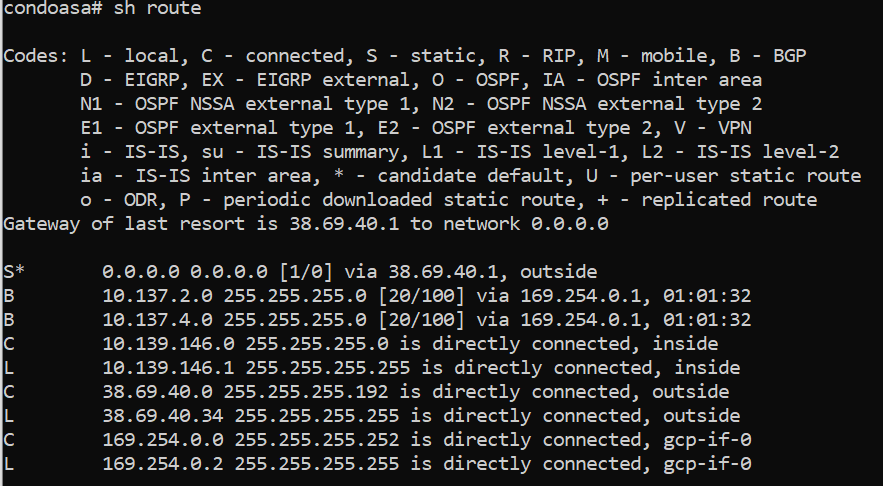

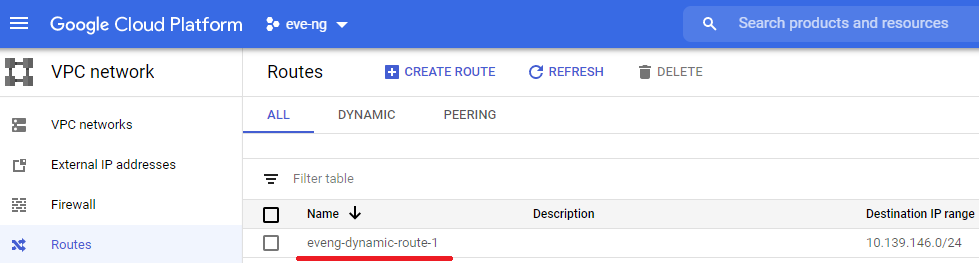
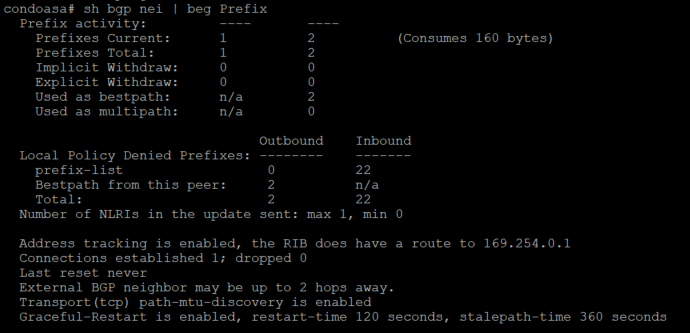
Before we try some pings between the condo and Google Cloud, double check the Routes tab under the VPC Network menu to ensure Google Cloud is receiving a BGP route from the ASA. You can check this on the ASA too by ensuring there’s at least one route sent & received under BGP prefix activity:
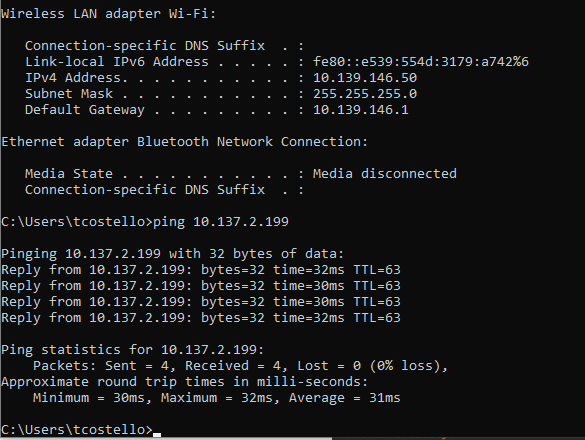
If everything went as planned, you should now be able to pass some glorious pings over your own personal tunnel between the ASA and your eve-ng instance’s management IP address in GCP! If pings fail, spend a little time checking the Firewall and Routes section of your VPC network in GCP, it can be really frustrating if a route or firewall rule isn’t behaving, but eventually you’ll be seeing the following pings traverse the tunnel:
Before we get too carried away into passing traffic between our VMs in the GCP eve-ng instance and devices in the condo, there’s one last critical step we must do to allow the VM traffic. and I need to thank Daniel Herrmann Techblog for pointing this trick out:
Unlike the condo’s bare-metal eve-ng instance where you can just throw a virtual switch into the cloud0 network and hit the ASA’s inside interface, you need to set an IP address on any of eve-ng’s cloud interfaces (I chose cloud9) and enable IP forwarding inside of Linux for traffic to enter/exit the GCP subnet. You can use the following two commands in your GCP eve-ng instance to fix this like Daniel’s blog mentions, but this will only work until the next time you reboot the GCP eve-ng instance, it’s not persistent:
ip address add 10.137.4.1/24 dev pnet9
echo 1 > /proc/sys/net/ipv4/ip_forward
How do you make these changes persistent so you’re not doing this manual labor every reboot? Two easy steps, with kudos to askubuntu.com and debian.org for having solutions that were easily googleable:
- Edit /etc/sysctl.conf to include the following (it should be as simple as uncommenting line 28, assuming you’re on Ubuntu 16.04)
net.ipv4.ip_forward = 12. Edit /etc/network/interfaces to the following for pnet9, then reboot the instance to ensure the changes are working as desired:
iface pnet9 inet static
    address 10.137.4.1/24
    bridge_ports eth9
    bridge_stp off
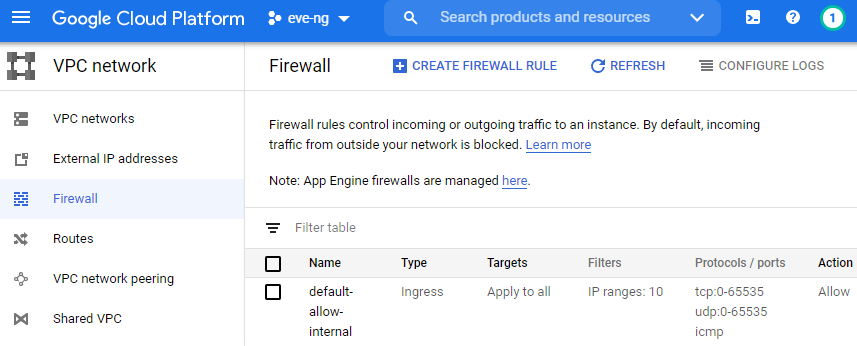
I always like to remove any & all firewall rules that might be allowing more access than necessary now that our VPN is up, along with removing all unnecessary external IPs from my GCP instances. Head over to the VPC Network -> Firewall section of the main menu, and if you used the 10.137.2.0/24 space like I did, the default-allow-internal rule is all you need!
Skip this next step if you want to keep your eve-ng instance on the internet. If you’re like me and don’t want to waste unnecessary public IPs for the eve-ng instance, let’s remove the external IP by clicking on the Compute Engine -> VM Instances section of the main menu, click on your eve-ng instance name, and click edit. Select the small pencil thingy next to your network interface, and change the external IP to none, and don’t forget to click save all the way at the bottom of the screen:
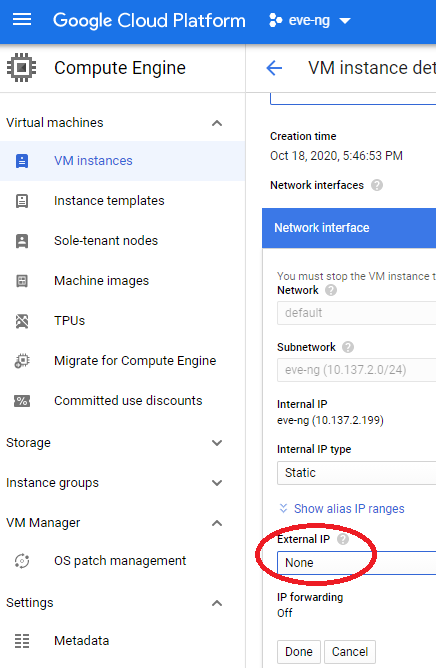
Note how the IP Forwarding setting is off?!? I’m not sure if it’s a GCP bug or what, but this is normal. When you save your changes, you should still see IP forwarding enabled on your VM instance details page after scrolling down to Network Interfaces. You should now see no external IP address on your eve-ng instance, which is exactly what we want for now as it’s effectively walled off from most (but not all!) of the big bad internet. If you decide you want eve-ng back on the internet for whatever the reason, just put the external IP address back on, and you’re good to go.
End State
After completing all of the steps above, you will have an eve-ng instance running in GCP which can pass traffic to your homelab via a VTI tunnel using routes learned through BGP. In the near future, I’ll post more homelab things that you can build on this foundation here. Some of the things I’ve either done or plan on doing are as follows:
- Link Cisco ISE in GCP eve-ng instance with the Active Directory Domain Controller in the condo, setup network gear to authenticate with AD credentials via TACACS or RADIUS
- Use Cisco ISE to setup a wired and/or wireless captive portal guest network in the condo using RADUIS CoA (Done, see https://kd9cpb.com/aruba-captive-portal)
- Setup a Squid proxy in the condo’s NST32 VM so your GCP eve-ng VMs can get on the internet without burning through more public IPs or doing cloud NAT. (Done, see https://kd9cpb.com/squid-proxy-nst32!)
- Automate the GCP VPN tunnel create/destroy process so that when the condo ASA’s WAN dynamic IP changes, no manual intervention is required to bring the tunnel back up without having to pay the ISP for a static IP! (Done, see https://kd9cpb.com/automate-gcp-eve)
- Try any of the super cool things Katherine is doing at network-node.com in the condo, with Cisco ISE living in GCP
- Use Aruba NetEdit to automate ArubaOS-CX changes in both the condo & GCP eve-ng instances (Done, see https://kd9cpb.com/netedit_eve-ng)
- Get the full BGP table into JunOS on GCP eve-ng instance using the ideas mentioned at iprouteblog
Perhaps the best thing you’ll get about trying a similar eve-ng GCP instance with VTI tunnel to your home is the satisfaction you’ll get having a powerful sandbox to try fancy new things in for only ~60 cents an hour. I hope more people give this a shot and write about the results, if you do please share your experience in the comments!!!
Why things are the way they are
The following aims to clarify some of the questions I’m sure you have about my decisions to build the lab as shown above. This is all verbose semi-useless information which does not directly contribute to the value of the homelab initialization, it’s fine to stop reading here and move on to reading something more exciting. But there’s a few lessons learned worth sharing in bold, so it may be worth your time to read the following:
Why eve-ng on Google Cloud? My desktop PC is old, and I don’t really have much room for more tech-gizmos in the condo. I really tried to like the new GNS3 2.0 stuff, but I kept going back to the old-school GNS version 1 Dynamips stuff I knew and loved during my CCNP R&S homelab era (2014-2019). Then one of my former coworkers introduced me to eve-ng, and I was hooked! Unfortunately Cisco ISE is very resource intensive, actually needs 16gb RAM, but works well in a Google Cloud eve-ng instance which you can easily shutdown to avoid insane monthly costs. This is the main reason I’m using GCP instead of other CCIE-lab-type vendors; being able to only pay for the compute hours & storage I actually use a the cloud is a huge win, plus the ability to do the VTI tunnel between the condo and cloud is cool. Originally I wanted to run the cloud eve-ng instance on AWS given that’s the cloud vendor I know the best, but due to the nested VM restrictions and the excellent GCP documentation from eve-ng cookbook, Google was the obvious choice.
Why is your desktop PC so old? Well, back in 2013 my original Windows XP gaming machine from high school was getting a bit long in the tooth. Battlefield 4 was the hot FPS of the time, and when I heard they were coming out with an expansion pack featuring jet skis, I knew it was time for a new gaming PC. Newegg had some promotion where BF4 was free with the new flagship AMD A10-7850k featuring their Mantle technology, and I was sold. While I did get some excellent gaming in on this machine back in 2014, I moved out of my suburban bachelor pad apartment and into the Chicago condo in 2015, right around the same time development ceased on Mantle. Since I’m not gaming anymore, my brain can’t justify spending gobs of money on a new performance desktop. Maybe if this homelab website catches on I’ll buy one of those new Intel NUCs with 64gb RAM or something. But in the meantime, I’m cheap and the early 2014 desktop still gets the job done!
Why are you running Windows Server 2012R2 at the condo? Honestly I really wanted to do Server 2019 since I want this website to focus on new technologies. But I still have an MSDNAA Server 2k12r2 license from grad school (Fire up Chips!) on my home machine, and in the real world most orgs are going to be stuck with a not-so-recent AD domain functional level anyways. Server 2k12r2 is light enough where I can run it virtualized on my AMD A10-7850K desktop without too much pain, and I’ve found that in some cases, it’s nice to just leave the domain controller running in the condo with a license that won’t expire, without any GCP hourly costs.
Why do you have an ASA 5512-x to the outside world? I’ve been a big fan of Cisco ASAs in some way, shape or form since I first learned about them in community college. I’m also a big fan of VTI in the newer editions of ASA software, allowing for some cool tunneling into cloud vendors like Google and AWS. There’s absolutely better options here, but the 5512-x value-for-money on eBay given is awesome. I picked this up for $135 on eBay, it can run ASA 9.8.4, the fans aren’t too terrible to work within 6 feet of the firewall, and I get to choose between my CLI comfort zone or ASDM! The one caveat is you cannot easily run Firepower on a 5512-x, so if you’re thinking you’d ever want to play with fire in your homelab, maybe spend the extra $$$ on a 5506-x or be comfortable running Firepower in a hypervisor.
Why Juniper vMX in Google Cloud? Someday, I’d like to do a lot more with vMX in the homelab. For now, this felt like a great way to warm up into JunOS and ensure I can actually start vMX on Google Cloud. Juniper MX series gear may run a big chunk of the internet, but it’s also resource intensive compared to other switch VMs, and I had big issues running vMX on the old AMD desktop processor at home.
Why are you so interested in Cisco ISE 3 and ArubaOS-CX? When I first started learning ISE, I was pretty turned off by the fact that many of the books, labs, YouTube videos, etc. were for ISE version 1, and everything I wanted to do was in ISE version 2. Eventually, ISE 2 is going end of life, so might as well get a head start on learning ISE 3 while it’s the shiny new toy. My first experience with ArubaOS-CX was actually quite lousy; I had spent way too many hours troubleshooting with their TAC on a packet loss issue which ended up being a software bug. But during the many calls with TAC, Aruba had me run some python scripts to troubleshoot the ArubaOS-CX switch, and I thought this was one of the coolest things I’ve seen on a low-cost campus switch. Even though I feel there’s still an “early adoption tax” on ArubaOS-CX today, I think these switches are going to really catch on given their capabilities & price point. There’s not a lot of ArubaOS-CX homelabs out there yet, especially ones doing things with Cisco ISE, and I haven’t seen anyone tie both ArubaOS-CX with ISE3 yet. So that’s exactly what I’m going to do in the near future 🙂
Why are you using eve-ng community edition instead of professional? I know some readers out there either don’t have the $100ish for a year subscription of eve-ng, or that kind of cash is hard to come by due to these crazy covid times we live in nowadays. Maybe you just want to check out eve-ng in GCP for a few days before deciding to shell out the money. For this reason alone, I’m going to try and keep everything community edition on the website going forward. I highly recommend throwing some cash towards eve-ng.net either as a small donation or buying professional if you can afford it.
Why are you doing NST32 instead of some other Linux distro? Over the years, I’ve started to prefer Red-hat flavored Linux distributions, and never really found myself enjoying the use of debian-flavored Kali Linux like so many cybersecurity folks typically do. I discovered what was NST28 at the time, and immediately fell in love with the way I could do all the Fedora/RHEL style sysadmin commands I’m most comfortable with, but also have all the network security tools ready to go! Eventually we’ll probably do some cool things with ntop-ng, Squid, and who knows what else on this box.
This is possible even easier now. EVE Pro cluster feature.
https://www.eve-ng.net/index.php/documentation/eve-ng-cluster/
Using GCP EVE instances as well.
Thanks Uldis! I’ll definitely be giving that a try soon, keep up the amazing work on eve-ng!!!