
As always, opinions in this post are solely those of my own, and not necessarily those of any organization I am currently affiliated with or have been in the past.
First posted 3/13/2021
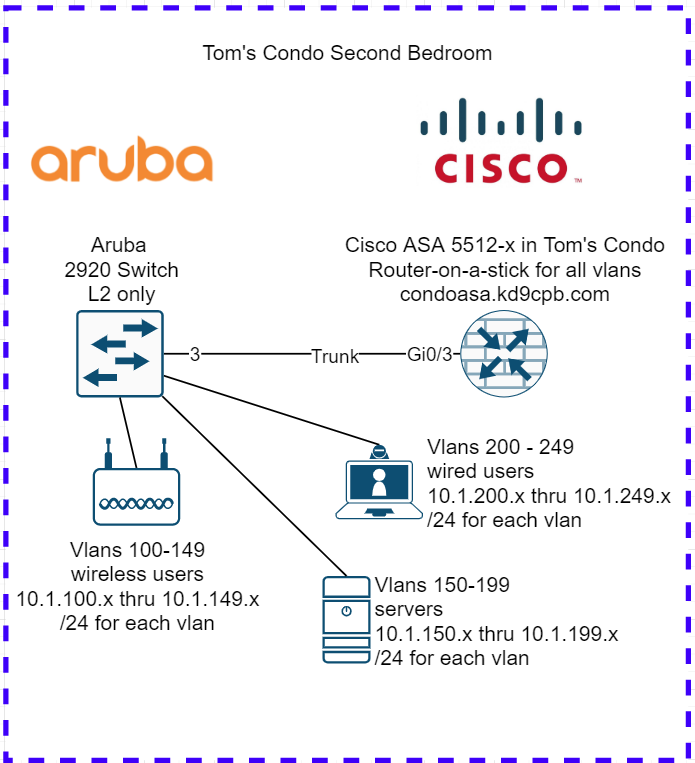
Since I got more interest than expected on my 4th Grade Level Python + Excel + Notepad++ Network Automation homelab post last year, figured I’d finally get around to better automating that homelab entirely inside of Python, including pushing the configs to the devices with Netmiko. If you’re brand new to network automation with Python, you’re at the right place, and I hope you find this entire article helpful! If you’re already familiar with Python Network Automation, you’ll probably want to skip to the Task #1 section. We’re going to automate setup of the following network diagram with some help from Python & Netmiko today!
Intro
If you asked me about automating Cisco IOS/ASA/NXOS/etc tasks that I was doing manually via the CLI a few years ago, I probably would have sent you a link to this amazing XKCD, as it accurately described my experiences trying to automate network stuff:

Sadly, I was stuck in my ways of not embracing network automation tools other than Excel, Notepad++, and a tiny bit of tmux for way longer than I should have been. “It’s not that I don’t want to get better at automation, I’m just so busy with firefighting, this site refresh, a new business requirement, etc. that I never have time to complete the Kirk Byers’ python course” was my MO for way too long. If you find yourself in that position, it’s ok, but I’m going to challenge you to at least try the first couple chapters of Hello World rev. 3 as it might just change your outlook on learning python like it did for me. Today’s lab is entirely in Python, but in all honesty, other frameworks like Ansible/Nornir/etc can push automated CLI changes via SSH more efficiently. I redid this lab with Ansible, but knowing how to do this in Netmiko is a great learning exercise.
The reason I’m not diving straight into Ansible/Nornir/etc right now is these newer, more robust automation frameworks have an initial learning curve that can be quite steep for a traditional no-coding-knowledge CCNA-level network/systems technician. John Capobianco’s Automate Your Network book does an excellent job of eliminating said learning curve for Ansible, but I’d like to keep things basic using only Python with Netmiko today. This way, we can see how basic loops & string concatenation inside of Python can be used to create automated device configurations. We can then take these configs and automate SSHing them to the devices using Netmiko inside of the same Python script. Ansible/Nornir/etc allow you to make big automated changes like you’re AWS easily, but they also allow you to fail at scale like you’re AWS too!
Today’s homelab is going to be the same exact topology as the jankety Notepad++, Excel and Python homelab from last year. That homelab only required knowing how to print a triple quoted string in Python, whereas today’s homelab will require you to have a basic understanding of Python (equivalent to completing the Kirk Byers Python for Network Engineers free course.) If that course sounds like too much coding for you at the moment, that’s totally fine as well, check out this CCNA Candidate toolbox post I cooked up awhile back if you fall into that bucket as it might help your mindset towards learning Python. So without further adieu, let’s get started with setting up our workstation for Python development:
Initial Configs & Tools
If you’re using Linux or already have a Python3 environment setup on your Windows machine, you can safely skip this section, just make sure netmiko is installed. If you’re just getting started with Python on Windows, you’ll want to do the following:
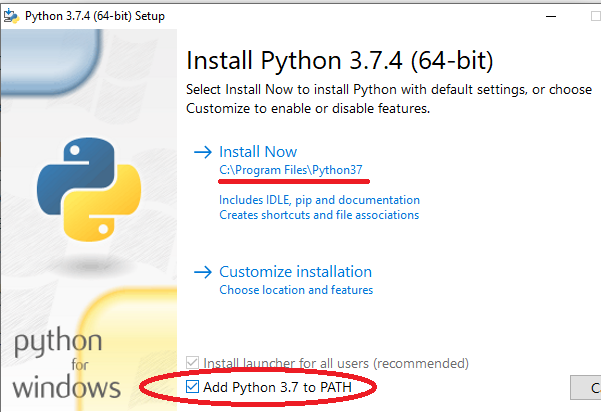
- Install Python 3, which I like to do via the Windows installer from the Hello World book, as it’ll include a bunch of fun educational extras. When you do this, I highly recommend using the default install path in Program Files, and checking the “Add Python 3.7 to PATH” box, it’ll make things easier down the road:
- Install the SSH client of your choosing for validating into the network device CLIs, I’ll be using PuTTY to keep it simple today, but I’d recommend using Windows Subsystem for Linux with tmux if you want to be fancy
- Install Microsoft C++ Build Tools, which you can download + install from https://visualstudio.microsoft.com/visual-cpp-build-tools/
- Install Rust from https://www.rust-lang.org/tools/install
- Install an IDE (fancy term for text editor that’s smart about python). These days I’m all about Visual Studio Code, but there’s many other options out there (Sublime Text, PyCharm, IDLE, Notepad++, etc) which will work just fine too
- From an administrator command prompt, run “python -m pip install –upgrade pip” without the quotes to update pip3, otherwise you might have problems with the next step involving pip3
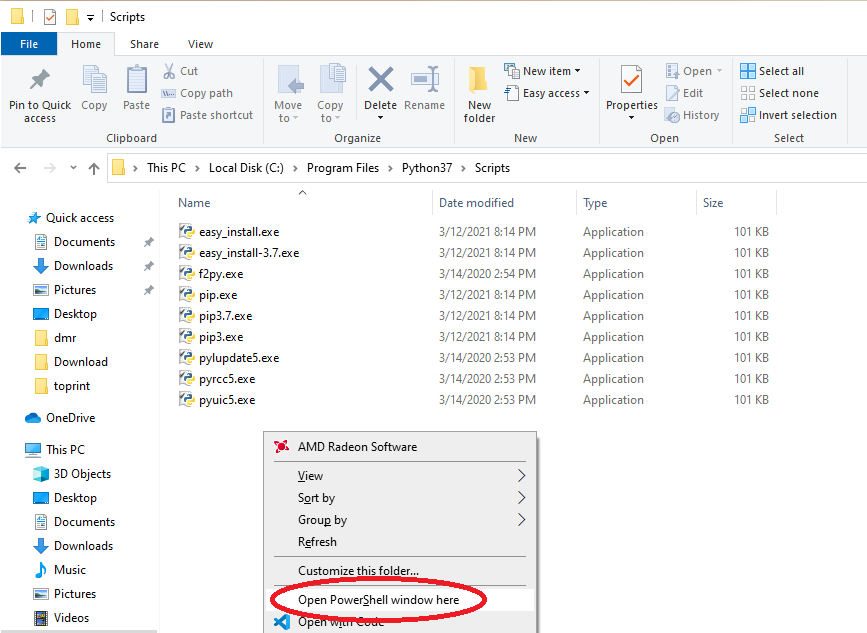
- Install the netmiko library via pip3. To do this, use windows explorer for navigating into the C:\Program Files\Python37\Scripts directory (assuming you used the above installer), hold down shift, and right click to get the “Open PowerShell Window Here” option:
Once you’re in powershell, type “pip3 install netmiko” without the quotes, press enter, and wait a couple minutes while everything installs.
Task #1: Get 150 subinterfaces created on the Cisco ASA, with proper names & IP addresses
For the sake of time, I’m going to steal the initial configs of the ASA & Aruba switch from my AOS-S captive portal homelab as those already have basic management connectivity ready to go. You’ll find these configs at the github folder for this lab, along with all the 8th grade level python I’ll be cooking up too!
Let’s pretend we are turning my second bedroom into a new branch office for hundreds of users per the diagram at the top of this page. We’re going to have 50 vlans for wireless users, 50 vlans for servers, and another 50 vlans for wired users. All these networks will be using the ASA as a router-on-a-stick, because I’m very cheap and I want to get fancy with ACLs using ASDM someday. But for now, I only want to get basic connectivity working on all 150 vlans, and that’s exactly what we’ll use Python with Netmiko to automate. We’ll also pretend I have a beefier ASA, as the 5512-x only has support for 100 vlans 🙂
I want output similar to the following example generated 150 times, so that the ASA router-on-a-stick setup is ready to route our traffic:
interface GigabitEthernet0/3.100
vlan 100
nameif wireless_user-v100
security-level 75
ip addr 10.1.100.1 255.255.255.0
Let’s get the party started in our IDE, creating a file named firewall.py, and getting the following opening lines in:
#!/usr/bin/env python3

from netmiko import Netmiko
import sys

# redirect stdout to file for Netmiko to use later
orig_stdout = sys.stdout
sys.stdout = open("firewallfile", "w")
I won’t be deep diving too much into the above code, but the big items here are importing sys & netmiko into our python script, and redirecting standard output (what you see on the screen when the script runs) into a file. The reason I’m doing this is because I’m too lazy to write the firewall config into a file with a cleaner code style, and I said I’d keep today’s code “8th grade” level 🙂 Writing our configuration to a file comes in handy as we can look at it after the script has been ran, and Netmiko can use the file to SSH our config directly to the firewall. Next, we get to loop through ranges equal to our vlan numbering scheme to generate the actual config we’re looking for:
# generate the 150 firewall network configs
for i in range(100,150):
    print("interface GigabitEthernet0/3." + str(i))
    print("vlan " + str(i))
    print("nameif wireless_user-v"+ str(i))
    print("ip address 10.1."+ str(i) + ".1 255.255.255.0")
    print("security-level 75")
for i in range(150,200):
    print("interface GigabitEthernet0/3." + str(i))
    print("vlan " + str(i))
    print("nameif server-v"+ str(i))
    print("ip address 10.1."+ str(i) + ".1 255.255.255.0")
    print("security-level 75")
for i in range(200,250):
    print("interface GigabitEthernet0/3." + str(i))
    print("vlan " + str(i))
    print("nameif wired_user-v"+ str(i))
    print("ip address 10.1."+ str(i) + ".1 255.255.255.0")
    print("security-level 75")
If you want the full run-down of how these loops through ranges are working, I’d recommend either going through the Hello World chapter on loops or the Kirk Byers free course as they can explain what’s happening far better than I. Since the stop value of a range does not include the number itself, the 3 ranges representing the vlan numbers above might look like they’re one number off at first, but it’s correct!
Also pay careful attention to the spacing (especially on that print(“vlan “) line): getting the strings to line up properly for a valid firewall configuration might take a few tries. Remember we’ve been redirecting standard output to a file, so we need to stop that & close our file before having Netmiko deploy the config:
# close the file, stop redirecting stdout
sys.stdout.close()
sys.stdout = orig_stdout
Now that our configuration’s generated to a file, let’s go ahead and configure Netmiko with the firewall’s personal information:
# setup Netmiko
firewall = {
            'host': '10.139.146.1',
            'username': 'tcostello',
            'password': 'not_the_real_password',
            'device_type': 'cisco_asa',
            'secret': 'not_the_real_enable_password_either',
            }
firewallconnect = Netmiko(**firewall)
firewallconnect.enable()
Again, for a deep dive of what’s going on here, I’d highly recommend checking out the Kirk Byers course or his excellent examples on github. The short answer is we’re creating a dictionary with all our firewall’s personal info, then using the firewallconnect variable to have Netmiko connect into the firewall using said dictionary. This allows us to wrap up our script with the following, which actually sends our commands via SSH to the firewall:
# run Netmiko, print what happens on firewall, disconnect
# https://github.com/ktbyers/netmiko/issues/2025 for why we want that cmd_verify=False here
output = firewallconnect.send_config_from_file("firewallfile", cmd_verify=False)
print(output)
firewallconnect.disconnect()
So that’s the end of the script, running it will create our 150 networks on the Cisco ASA! But what’s that https://github.com/ktbyers/netmiko/issues/2025 comment all about? Well, I’ve been burned by Cisco ASAs not playing well with automation due to their wacky terminal length settings in the past, so I generally always use that “cmd_verify=False” argument to avoid terminal length problems. This is a bit dangerous as it could hide legitimate issues, but for today’s simple homelab, I’m not too concerned about it. Whenever I do weird stuff like this, I like having a comment with a link to more info in the code so it makes sense when someone else looks at the code (or when I look at it 5 years later and wonder what I was thinking!)
Using the SSH client of your choosing, you can now login to the firewall and see the 150 networks created! Unfortunately my ASA 5512-x is only capable of doing 100 vlans, so sadly I’ll just have to pretend everything went according to plan. On the bright side, I’ve uploaded the script’s file output to the lab’s gitlab folder, so definitely check that out (along with the complete python scripts) if you’re curious. Now that our firewall is good to go, let’s make another Python script for the switch:
Task #2: Get 150 vlans created on the Aruba switch, with proper names
On my home Aruba 2920 switch, I want output similar to the following example generated 150 times, so that the switch has all 150 vlans properly configured & trunked up to the ASA for our traffic:
vlan 100
name wireless_user-v100
tagged 3
Now that the ASA is squared away, let’s create a new script of switch.py, and load the following into the file:
#!/usr/bin/env python3

from netmiko import Netmiko
import sys

# redirect stdout to file for Netmiko to use later
orig_stdout = sys.stdout
sys.stdout = open("switchfile", "w")

# generate the 150 switch vlan configs
for i in range(100,150):
    print("vlan " + str(i))
    print("name wireless_user-v"+ str(i))
    print("tagged 3")
for i in range(150,200):
    print("vlan " + str(i))
    print("name server-v"+ str(i))
    print("tagged 3")
for i in range(200,250):
    print("vlan " + str(i))
    print("name wired_user-v"+ str(i))
    print("tagged 3")

# close the file, stop redirecting stdout
sys.stdout.close()
sys.stdout = orig_stdout

# setup Netmiko
switch = {
            'host': '10.139.146.3',
            'username': 'tcostello',
            'password': 'not_the_switch_password',
            'device_type': 'hp_procurve',
            }
switchconnect = Netmiko(**switch)
switchconnect.enable()

# run Netmiko, print what happens on switch, disconnect
output = switchconnect.send_config_from_file("switchfile")
print(output)
switchconnect.disconnect()
The above script is super similar to what we did on the ASA, except the switch command syntax loop is slightly different to create the switch vlans, and the dictionary used by netmiko has values that will actually work on the Aruba 2920. It’s a bit confusing that the older Aruba switches are still known as hp_procurve in netmiko, but that’s perfectly fine, because we can run this script and it’ll work well 🙂
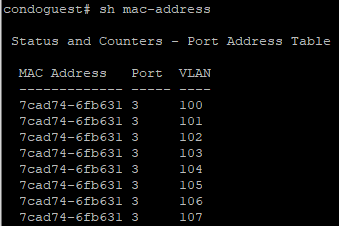
After running the script and verifying the switch using the SSH client of our choosing, it looks like the trunk came up as desired. We can see the ASA’s MAC all over the switch’s MAC table!
Conclusion
Although it might not feel like much, we did some pretty cool things in this lab:
- With an ugly but simple pair of python scripts, we’ve generated over 1000 lines of CLI config for the network devices.
- We’ve removed a very large number of opportunities for someone to fat-finger the IP address and vlan configurations.
- Configs were written for both Cisco and Aruba devices, demonstrating the multivendorness of python scripting.
- Netmiko automated away transferring the configs onto the equipment, further reducing human error opportunities and unnecessary config copy/paste pain.
- Even the most stubborn refusing-to-learn-code netadmin out there could accomplish this with only a few weeks of pythoning!
I’m sure there’s some experienced network automaters out there who’ve had their eyeballs burn looking at that redirected standard output & super basic Pythoning. This is the last python related homelab I’ll be doing with tech debt like that, be sure to check out the technical-debt-free Ansible + Jinja2 homelab!
If you scroll through last year’s shady 4th grade python post and this one, I think you’ll very quickly see that today’s post is infinitely cleaner than all the shady Excel + Notepad++ trickery. Sure, it takes a while to understand how to configure Netmiko, do the for loops in python, and figure out how to tie it all together. That being said, it is also my experience once you start getting the hang of this Python/Netmiko stuff, the return-on-investment usually will occur quickly! We’re only scratching the surface of what Python/Netmiko can do, and I’ve been having a blast with the Cisco ASA support recently. Hope you’ve enjoyed today’s homelab, please let me know what you think here in the comments or on Github.
You’ve reached the end of the post! Click here to go back to the list of all Homelab posts.
You should also know I may earn commissions on qualifying Amazon purchases made via kd9cpb.com links to defray the cost of otherwise ad-free web hosting.
6 thoughts on “Network Automation with Netmiko & 8th Grade Level Python”
Comments are closed.